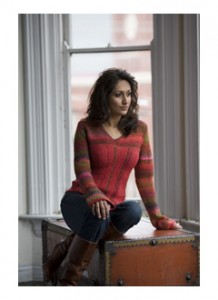
Image 01

Lady Violette

The Romantic Lifestyle

Posts Tagged ‘Style’

Lady Violette’s “Belted Half Dress Drape” ~ A New Scarf Style ~ How to Wrap It & Wear It & Transform a Dress!

Wednesday, April 13th, 2011

Necessity is the mother of invention. I needed to figure out something impressive and dramatic to wear to a midday meeting with a producer/ presenter. I needed to look creative and talented and be memorable. I wanted to look ultra feminine as well because I feel that works to my advantage. I wanted to look both business-like and artistic. I felt that sensual and attractive would work, but I did not want to look not overtly sexy. Although it is spring it is also still cold out and I needed to be warm. I find that wearing tights and  layering scarves and shawls over dresses traps air and creates a cozy layer of practical extra warmth. I cannot think and relax if I am cold! It has been in the 30’s all week. It has been wet and windy, even snowing and hailing. And it has been drafty everywhere, both inside and out. All these thoughts were at work in the back of my mind. And this was only what I had to be thinking about what I was going to wear! The other things on the agenda were on my mind as well, but I felt I had them under control. I just wanted to figure out something to wear in which I would feel comfortable and confident, and have my outfit and accessories all worked out in advance.

Browsing through the Nieman Marcus online catalogue for ideas yesterday I found an immense Oscar de la Renta scarf and a wide belt that I loved. Alas, the scarf was $850 and the belt was $395. I couldn’t buy that right now, but I was determined to have the look! So I sorted through my things to find my biggest scarf and a belt of similar width. They don’t give the size or the shape of the Nieman Marcus scarf, only the price! It looked big and it looked like a square.

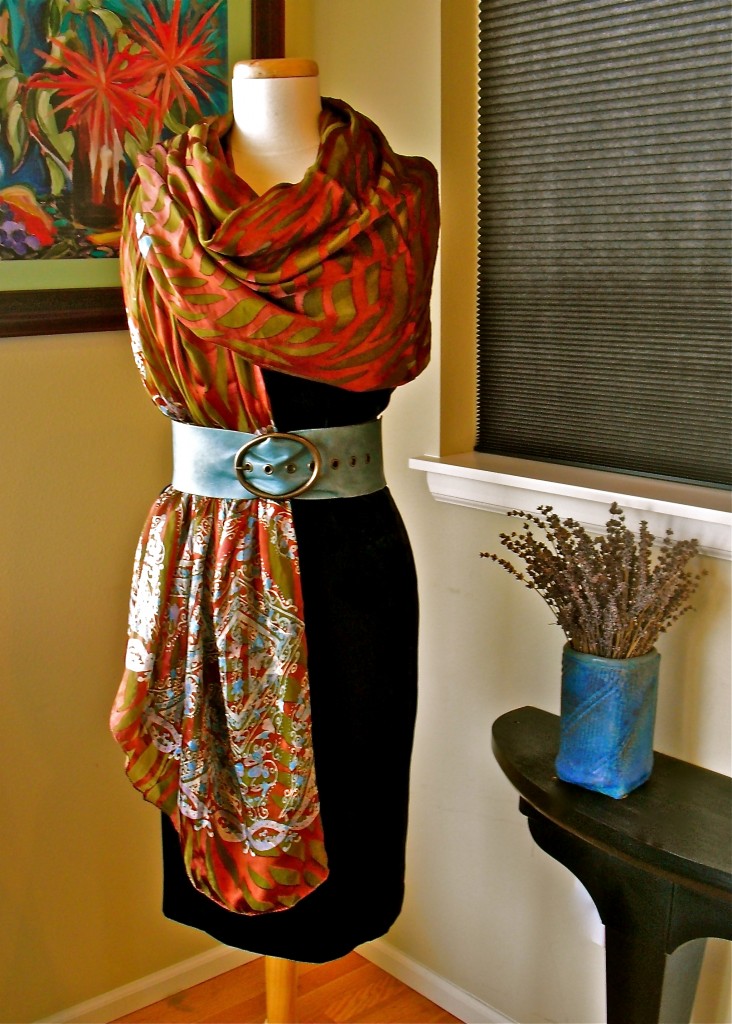
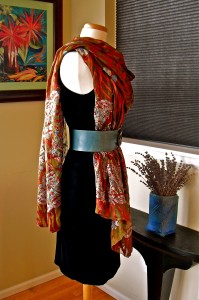
Front View of the "Belted Half Dress Drape" Achieved ~ Transforms a Dress with Just One Wrap & a Wide Belt!

I don’t currently have a gigantic square, but I do have a brown and olive green gigantic oblong silk scarf that measures 45″ x 96″. It is basically an 8′ x 45″ wide piece of fabric, but it is printed with a blue and white floral design at both vertical ends like a border print, so it was designed to be a scarf, shawl. or stole. I also found that I had a blue leather belt about 3 inches wide.

The idea I had was to make what I have named a “Belted Half Dress Drape” using the gigantic oblong silk scarf  and securing it with the wide color co-ordinated belt. I wanted to transform my basic sheath dress into a cinch waist draped silk dress by using one simple to do wrap and belting it! I wanted the finished style to look like one of the very expensive European or American designer silk draped sheath dresses I have been seeing in fashion magazines and stores lately.

Thus I concocted my “Belted Half Dress Drape”  Scarf Style.

3/4 or Right Side/Front View of the "Belted Half Dress Drape"

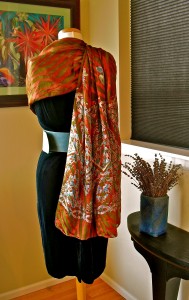
I think it worked quite well and it was amazingly easy to do! I have taken photos from all angles so you can see that my new “Belted Half Dress Drape” scarf design actually looks nice and works as a dress from back, side and front views!

As you can see the “Belted Half Dress Drape” is beautiful from all angles.

I think wearing a scarf beautifully is one of the ultimate feminine arts!

Step #1) Drape Scarf Over Shoulders, Left side Longer Than Right as Shown.


To create this sensual style all you do is:

Step #1) Drape 96″ long or longer scarf around the back of your neck and over your shoulders, Left side longer than Right as shown. Right side reaching almost to the hemline of your dress. Spread the Right side out to fan over your body from the center to the Right side seam of your dress.
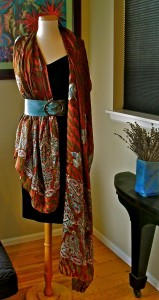
Step #2) Fasten the Belt Around Your Waist with Right Shorter Side of Scarf Underneath It & Left Longer Side Hanging Free.

Step #2) Fasten the wide belt around your waist with Right shorter side of scarf underneath it and Left longer side of scarf on the outside of belt hanging free over your Left shoulder. Arrange the folds of the scarf to your taste like a little half dress that covers the right side of your body.

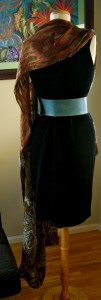
Step #3) Check the Back View in a Hand Mirror After Putting on the Belt. It Should Look Like This!

Step #3) The back will look like this! I found it helpful to look at the way things were arranged in the back in a full length mirror using a hand mirror. Be sure that only the Right front shorter side is tucked under the belt. The Left longer side should be hanging freely off to the Left side in a casual manner like this.

I experimented with the arrangement of the front folds and found that I preferred them to be uneven and arranged like a gathered skirt in the front. This was softer, prettier and more feminine than a straight across the bottom hemline. I pictured a Grecian draped effect as my goal. It may be helpful to strive for that as you arrange your folds.

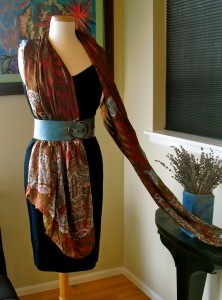
Step #4) Gather Up the Long Left Side of the Shawl and Drape it Over Your Right Shoulder!

Step #4) Finally gather up all the fabric in the long Left side of the shawl and drape it loosely and casually over your Left shoulder around your neck and over your Right shoulder letting the long drape of fabric hang down your back! You will need to arrange the drape in your own individual manner in a way that is pleasing to you.

I was able to do this on myself in about three minutes! I wore it around the house for a couple of hours and it actually stayed put and maintained the original look while I tested it out. I did not pin it in place, but you could use a brooch on the Right shoulder to hold the finished drape in place or just decorate it if you want to.

I encourage you to experiment until you find the way that is comfortable for you. I try things out the night or day before I plan to wear them if they are new looks for me. This way, if I need a supply to hold myself together, (or who knows what!) I have time to get it ready in advance.

I’ve written instructions on making your own gigantic scarf like this one on my next blog post. Check it out!
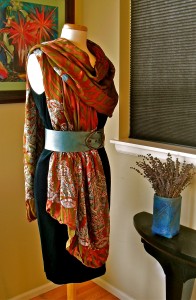
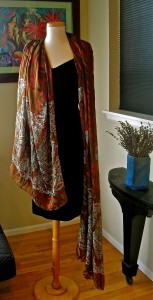
Step #5) To Finish the Beautiful "Belted Half Dress Drape" Scarf Style, Arrange the Way the Fabric Loops Around Your Neck and Adjust the Folds and Gathers in the Half Draped Skirt to Flatter Your Face and Figure and Please Yourself.

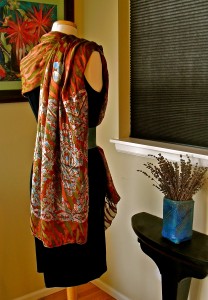
Finished Back Right Over the Shoulder Shoulder View of the "Belted Half Dress Drape" Scarf Style

Finished Back View of "Belted Half Dress Drape" Scarf Style

Finished Right Side View of the "Belted Half Dress Drape" Scarf Style

Share

Vintage Shoe of the Week ~ Exquisite Red Patent Herbert Levine Pumps

Tuesday, April 12th, 2011

Red Patent Leather Pumps by Herbert Levine

This is one of my favorite pairs of vintage shoes! I love the color and the style, and the Herbert Levine last fits me like a dream.

Plus, I had the pleasure of knowing Herbert and Beth Levine and their daughter when I was dancing in New York with the City Center Robert Joffrey Ballet Company. They kindly invited me to live with them when I first moved to New York City as a young ballet dancer on a Ford Foundation Scholarship . They were always interested in artists and very supportive of them. They were wonderful friends.

While living in their home I met many interesting people, including Henri Bendel who came to dinner once a week, the photographer Hiro, and Mr. Conde Nast who was a real person. They lived in a very modest and tiny two bedroom apartment on East 12th Street in The Village.

The notorious guests liked to come their to relax and eat their cook’s most amazing I have ever tasted crispy and delicious Long Island Duck. I wondered if it was the special duck that made it so delectable or the way it was cooked. It was the latter. On a trip to LI I asked Herbert which duck of a large gaggle of assorted types of ducks we passed was the delectable and famous Long Island Duck and he replied, “Any duck on Long Island!” They knew because Beth had grown up on a LI farm and told me she had plucked ducks as a girl for that recipe on the farm. Beth was a very down to earth talented woman who became a famous shoe designer and ended up winning the Coty awards and  hanging out with the rich and famous ~ but she retained her earthy qualities.

The Gold Herbert Levine Label ~ These Were Made for Neiman Marcus

Beth Levine actually designed the all shoes, but the company was named Herbert Levine by the couple because they were afraid buyers would not purchase shoes made and manufactured by a woman when they began. Herbert was the business brain behind the company and he was absolutely brilliant. He was incredibly supportive of his wife’s talent and promoted her endlessly. They had a fabulous partnership ~ both personally and as business partners. it was a privilege to know them. And I learned a lot about shoes from them!

These shoes are special to me because of my relationship with the designers as well as for their own beauty.

Beth Levine often said, “If your feet hurt, my feet hurt.” Her shoes were elegant and incredibly comfortable. There is not another designer’s shoes to this day that are as comfortable for me as hers. She really meant what she said and knew what she was doing.

Last year a retrospective show of her work was held in the Bellevue Art Museum near Seattle where I live. Of course I attended. It was excellent and I know the show has traveled around to museums throughout the country. I highly recommend seeing it if you have the chance.

The Famous Herbert Levine Red Shoe Box

I have collected a lot of beautiful vintage shoes, many of historic quality. I owe my interest in and knowledge about shoes to the Levines! They got me started and taught me to appreciate quality shoe design as well as appearance. I was exposed to the very best. Being a young ballet dancer I could not afford a lot of expensive shoes, but Beth saw to it that I was supplied. She gave me shoes so I would be properly shod at all times in New York City!


People ask me, but these shoes are not for sale! They are and will remain part of my personal collection!

Share

International Scarf Styling ~ a Simply Beautiful Cherry Blossom Pink Japanese Shibori Scarf Tied as a Wide Sash and Worn with Hand Made Bead Necklaces Designed by Lady Violette de Courcy

Sunday, April 10th, 2011

Japanese Cherry Blossom Pink Pleated Shibori Scarf Tied as a Sash

Shibori is an ancient Japanese method of dying and pleating. The beautiful pink pleated oblong Shibori scarf that I have simply tied around my mannequin’s waist as a sash reminds me of pink Japanese cherry blossoms.

It is cherry blossom time in Seattle where I live. The cherry trees are just beginning to bloom, but it has also been unseasonably cold and we have had several heavy periods of freezing hail and snow over the last few days! Temperatures have been in the low 30’s and accompanied by strong winds.

The University of Washington Campus has a well known large planting of Japanese cherry trees that burst into a flurry of extraordinarily beautiful lovely smelling pink blooms at the beginning of April every year. I make sure I go there every spring when they are in the height of bloom to walk under them and experience their color and enjoy their exquisite perfume. Nothing is more beautifully scented than the Japanese cherry blossom trees in full bloom. The exquisite perfume from these flowers lasts only one day, then the blossoms fall from the trees in swirls of pink snow petals and are blown away by the turbulent spring winds.

Getting caught in pelting rain and wind and a blizzard of the pink petals is all part of the memorable experience of walking under them and enjoying them. I am always a little upset by the fact that the weather is destroying them so quickly when they last such a short time anyway! I would like this transient experience to last as long as possible! So I do things to remind of it, to stretch it out a little and enjoy the memories of it longer. One thing I do is wear my pink Japanese Shibori scarf, either tied around my waist as a sash, as illustrated in the photo, or simply wrapped around my neck. It is an easy scarf to wear because it is a permanently pleated oblong. I wish I had a cherry blossom perfume to wear!

I love the scent. I’ve always  fantasized about creating a perfume from Japanese cherry blossoms. Even to the point of experimenting with making it and, about 15 years ago, talking to a professional perfumer, called a Nose, from Italy, who creates perfumes for major European couture houses. He told me it cannot be done because the flowers are only at the height of their scent for less than 24 hours each year! It is then, and only then, that hundreds of thousands of pounds of the flowers would have to be collected and their essence extracted to create a perfume. From these thousands of pounds you might get an ounce of the essence necessary to make real cherry blossom perfume. It would take impossibly vast orchards of the trees to grow enough flowers. And that is not the only problem!  The fact that the height of bloom and scent is such a short period that harvesting enough of them at exactly the right moment and processing them quickly enough to extract their pure essence is impossibly difficult.

The Italian Nose told me that many kings and emperors and professional perfumers have shared my dream. And that, over the centuries much experimenting has been done to extract the elusive essence of the pink Japanese cherry blossoms. No one has been able to succeed because it is logistically impossible and impossibly expensive. “What about a synthetic recreation of the scent?” I asked. Some of the world’s greatest perfumes, notably Channel #5 are synthetic creations. He said their have been many many attempts to do this but so far no one has succeeded. He gave me samples of several expensive perfumes that claim to have recreated the scent. They were pleasant but did not succeed.

Over the years I have tried out every perfume on the international market that claims to be the scent of Japanese cherry blossoms. I believe he is right. None of them manage to recreate the beauty of the original! Not even for a fleeting moment of delightful memorable scent. One of the great allures of perfume is its ability to recreate memories ~ memories of the person who wore it, or the place and time you wore it or an experience you had when wearing it. These supposed cherry blossom perfumes did none of that for me. I am quite a good Nose myself and know that many other perfumes are successful in that respect.

Cherry Blossom Inspired Bead Necklaces by Lady Violette de Courcy

I have had to be satisfied with creating and collecting other things that remind me of the cherry blossoms when they are not blooming. To this end I have made the necklaces of pink beads in the picture. I call them my Cherry Blossom Collection. They consist of lamp work beads I have made myself and vintage and antique beads made of all kinds of different materials that happen to be the right color of pink or, when combined together suggest Japanese cherry blossoms to me. These beads come from all over the world and have taken me many years to collect. The necklaces are one of a kind art pieces ~ no two alike and unrepeatable. In that way, too, they are like the scent of the  Japanese cherry blossoms ~ impossible to capture and reproduce ~ rare, elusive and special ~ totally unique.

I have also discovered, one night in a Japanese restaurant, that the taste of plum wine actually reminded me of the Japanese cherry blossom. Quite unexpectedly I tasted it and had a memory flash of walking under the pink trees in full bloom. I concentrated on the plum wine. I realized it has no scent, only a taste. But the taste reminds me of how the cherry blossoms smell! In that way it is very pleasurable. However, because it doesn’t have any scent at all there is no possibility of my using it as a perfume to trigger an association of the Japanese cherry blossoms scent in other people!

So far I have resigned myself to having to use the visual sense to trigger memories of cherry blossoms. Sometimes, when appropriate, I can also serve plum wine! I will continue to search for a rendition of cherry blossom perfume that satisfies me. In the meantime I will wear the Japanese cherry blossom pink accessories that I associate pleasurably with this experience ~ my pink Shibori scarf and the pretty pink necklaces and earrings I have designed.

I have some clothing designs inspired by Japanese cherry blossom forming in the back of my mind as well! And I feel that the two concert performance dresses I have made for Princess Wow! in myriad pinks are associated with this imagery. I have just finished these dresses and will be putting up final photos of them soon.

Isn’t it amazing to think about what image and association triggers an artist or designer’s imagination and leads to the creation of art in other forms? I know flowers have always stimulated fashion designers. A few posts back I quoted Christian Dior saying, “I have made flower women.” when interviewed about his New Look Collection after WW II. He also loved lilies of the valley and talked about their scent reminding him of his childhood and his mother because they were her favorite flowers. A perfect example of a perfume triggering memories! Of course he created a perfume featuring lily of the valley!

I am lucky, being Lady Violette de Courcy, that my personal flower is the violet and that both it’s flower and it’s leaf have distinct and lovely scents that are extractable for use in the making perfumes. I have several perfumes containing one, the other, or both that are very attractive and easily obtainable. I will write more about perfumes later!

Share

Lady Violette’s Interpretation of the Hand Knitted Poppy Sweater in the Iris Color Way ~ Just Finished and Successfully Figure Fitted Like a Corset Through the Use of Negative Ease

Saturday, April 9th, 2011

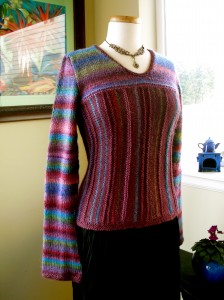
My Iris Color Way Hank Knit Sweater

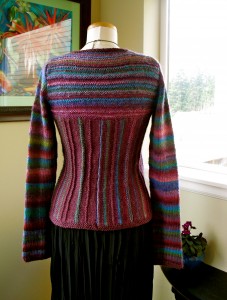
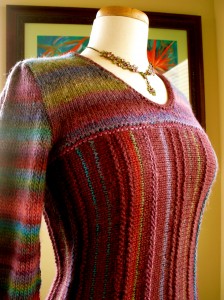
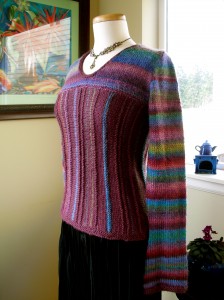
I have just finished knitting this beautiful blue, purple and green striped sweater from the pattern for the Poppy sweater in the book Yarnplay by Lisa Shobana Mason. Poppy was originally done in reds and browns using Noro yarns Silk Garden and Cash Iroha. I substituted Tonalita for the striped sleeves and the striped portion of the yoke and body and an old unlabeled purple mystery yarn in a silk and wool blend for the solid red sections in the original pattern. The mystery yarn was given to me by a friend and I had it for years without any tags or labels so I have no idea what it is. I do know it is an old yarn and isn’t carried by yarn stores now as I have taken it around to several with me and no one recognizes it. I luckily had just enough for this project!

I am calling this my Iris sweater, because it is done in blue and purple iris colors, not red poppy colors. They are both named after flowers though, which was one of my attractions to the design ~ being Lady Violette and having an interest in all things floral!

The original pattern was knit of scratchy yarns and I chose to do mine out of very soft yarns. I cannot wear rough yarns. They are way too itchy for me, even during the knitting process. I did use yarns that worked up at the same gauge. I had to adjust the pattern to fit me and measure and make adjustments constantly as I was working. It was a difficult project. I only recommend undertaking it if you are an advanced knitter and have a great deal of patience to see it through to finishing. I had to stop and work on other projects that were not so demanding, then pick it up again and continue several times before I finished it. It is beautiful now that it is finally done so I guess it was worth it!

Fashionably Long Hand Covering Sleeves in Tonalita Knit In the Round on Five Douple Pointed Needles

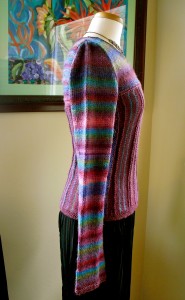
The sleeves may appear long in the pictures. That is because they are designed to be the trendy long type of sleeve that goes over the palm of the hand. They are also taken up when worn so they really do fit perfectly. The bottom edges of the sleeves cover my hands and reach the bases of my fingers exactly. This is very pretty and very cozy ~ but definitely makes for a dressy sweater rather than one you would wear for cooking or doing the dishes! ( A great excuse for avoiding those activities!)

The bottom part of the sweater is knit in a strip from side to side in stockinette stitch with occasional stripes in garter stitch and stockinette stitch. The knitter adds these whenever and wherever she likes, so each rendition of this pattern is unique. I put in a lot more stripes than the original designer did ~ originally to be sure I would have enough of the solid purple color to finish the body ~ ultimately because I really liked the design better that way!

I knit the sleeves in the round on double pointed needles in order to avoid seams. I made the stripes on both sides match each other as well ~ on the yoke and both sleeves. This required cutting the yarn and reattaching it and carefully keeping track of the rows worked in each color. I did the back yoke on mine with a lot more texture and garter stitch worked into it than the designer used in hers as well. I tried to do the same method in the front but it didn’t work out as well there! So my yoke ended up being highly textured in the back and smooth stockinette stripes on the front. this was risky, but it worked.

The Back of the Iris Sweater Featuring Garter Stitch Stripes in Two Directions


All in all this sweater was a huge experiment. I added a double row of garter stitch around  the bottom to tie it in better with the edging around the neck. The designer originally finished off her edges with a line of single chain crochet! Because I used different yarns and am a different knitter, my Iris sweater almost looks like a different sweater than the original Poppy design. This often happens when you knit something in very different yarns and make fitting and design adjustments along the way.

My Iris Sweater is an interesting project that evolved using bits and pieces of leftovers from two other projects. And using a lot of determination! It is sometimes fun to see what you can do working with limitations. In this case only having small amounts of two types of yarn that weren’t even the ones called for in the pattern. If I had gotten stuck without enough to finish I would probably have added yet another yarn or changed the design to accommodate my limitations.

I was anxious to photograph it and post it. After the agony of finishing it I am anxious to get some feedback from other knitters and designers! Of course I am interested in the opinions of non knitters as well. I photographed it with a black pleated skirt, but, for a more casual look I plan to wear it with dark green or dark blue vintage jeans and dark green boots or a dark purple skirt and purple tights that I have.

Corset~Like Figure Forming Fit

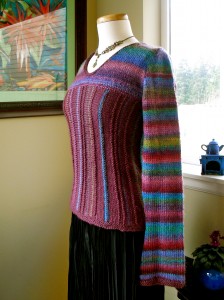
I knit my Iris sweater to be very fitted with a slight negative ease. To me the body of the sweater has a corset~like effect with the shape of the body and the slimming vertical stripes simulating the stays of a corset. This is form fitting and figure flattering. The yarn is fairly fine in quality and certainly in feel, so I wanted a refined looking fitted  sweater rather than a loose fitting one. It is possible to make fitted knits when you make them custom to fit yourself or another person for whom you are knitting. The trick to achieving that is negative ease. I made the sweater tighter than the designer did hers. I achieved a dressier more formal look. Her looser fitting one is more casual.

Knitting is an art form, and in making art, each artist’s interpretation is individual and unique, even when using a pattern. In knitting I find a pattern is really just a guide to get me started. I rarely make any pattern the exact way it is written with the same materials the writer used. In fact I do not know if I ever have.


Side View of beautifully Shaped Iris Sweater

I always wonder if people who do not knit have any idea how complicated making something like this sweater is. Think about it! Every single stitch is made by hand and has to be counted and kept track of while you go! It requires a tremendous amount of concentration and time and self discipline. Hand knitting takes a lot more time than sewing.


It breaks my heart when I see a beautiful hand knit sweater that someone lovingly made somebody given to a thrift store. I have found them and It is my personal mission to rescue them whenever I do. It is on the same level as rescuing an abandoned animal for me! Knitting is an art form and to do it well is an amazing accomplishment. It takes hundreds of hours to make a hand knitted garment. I will be pleased if people who didn’t understand anything about what was involved in knitting before reading my blog develop an interest in it from reading what I write and looking at the pictures I post. Not only does the knitting take a lot of time and expertise, but the yarns and fibers themselves are amazing, fascinating and very valuable. I will write more about that in the future.

Fitted Knit ~ Like a Corset Through the Torso

The Original Poppy Pattern, in red yarns is pictured below. More photos in red can be seen on the blog of Lisa Shobhana Mason and can be found in her book Yarnplay, available from Amazon. This sweater is photographed on the cover of her book and directions begin on page 98. It is rated  advanced level for experienced knitters. I would definitely agree with that rating! You can find photos of other knitters completed versions of this pattern on Ravelry if you would like to see how their interpretations of the same original pattern turned out. I always enjoy seeing them!  You can see them on Ravelry (requires free account). I just looked at these other knitters works – and what fun it was to see how they differed from mine! This is always the case with the feminine arts like quilting, knitting, sewing, crocheting, embroidery, etc. – each woman’s personality comes out in her needlework. Check it out, you will see what I mean! The sweater has been made up in many different yarns, colors and sizes.

Incidentally Ravelry is a great place to get ideas and find patterns for knitting and see other peoples work.


Original Poppy Sweater in Red by Lisa Shobhana Mason

If you want to make a fitted garment with negative ease experiment with the following suggestions. Knit a size smaller than you normally would. Be sure to make the pattern pieces long enough though! You will want them to end up tighter around but not a lot shorter! Try knitting on a size smaller needles than the pattern calls for. This will create a tighter knit, thus smaller, piece of knitting. Be sure, again, that the length is adequate. In this case I experimented and ended up using one size smaller needles than originally called for in the pattern and adding length by knitting a few extra rows to get the length I needed through the torso. I knit sections, take them off the needles and try them out by holding them up to my body or that of the person I am knitting for. I put them back on the needles and make any necessary adjustments, then continue. I sometimes have to take out fairly large sections and redo them, but I do it because I want perfect results. The trick to avoiding having to redo large sections is to try things on to test the size and figure out the measurements fairly often. theoretically you should be able to do this by calculating it out on paper, but that is not the same thing as a try on! The only true test is actual fitting on the body of the person for whom you are making the garment. It is always worth the extra time it takes.


Share

Scarf Styling in a Pinch. It Works for All Sizes! How About Making a Sarong into an Instant Dress When You Need a Dress Immediately for Yourself or for Your Doll…

Wednesday, April 6th, 2011

Lisa in Her White Sarong at an LA Art Gallery

You Just never know what challenges life will throw you do you? When shopping in thrift stores I always check out the toys in case I find some wonderful toy that has been abandoned and is appropriate for a 4 year old boy and or a 3 year old girl. I have found a lot of really nice things.

Recently I found Lisa. She is a genuine Madame Alexander My Favorite Friend doll. She is an 18″ doll similar to the American Girl Dolls. She had no name and no clothes! Other than that she was in like new condition. She has pretty long blond hair that you can comb and style and it won’t fall out. She cost only $1.

We instantly named her Lisa. It suits her. And we were going out to lunch. She had to come, of course. But what about the no clothes problem? Not a problem! If you know how to tie a scarf! I carried her into the restaurant wrapped into my coat so people wouldn’t notice she was naked.

Napkin Dress, Gourd Purse, Seed Jewelry

We were given a table and we immediately spread out a cloth napkin on the seat of the booth, like you do for changing babies! We lay Lisa down on the napkin, then took another napkin and folded and wrapped and tied it into a fashionable sarong dress for her. It worked perfectly!

One member of our party was wearing a few casual seed bracelets and we instantly made those into a belt and several doll size necklaces! Simply by putting them over Lisa’s little head. We had a keychain made from a small gourd which we took off the keys and appropriated for use as a purse! Then we combed out Lisa’a beautiful long blond hair.

She looked great! She was appropriately dressed in an elegant white sarong with a belt and necklaces and the latest style in a “designer” bag! She joined us at the table for lunch and several women came over to comment on how pretty she looked! We thanked them. And we said we were going to go shopping for shoes for her later.

Tres Chic ~ Who is the Designer?

We visited an artists house after lunch and Coco posed her.


I photographed her “in the gallery” looking at the art. We are posting some of the pictures so you can see how pretty and versatile a sarong dress can be! In a pinch you could make one out of a table cloth, a curtain or a sheet! Any large piece of cloth can be fashioned into a dress or a skirt. Lightweight ones drape, fold, wrap and pleat more easily than anything heavy would.


"Look at this Detail!"

Isn’t Lisa’s white linen sarong dress made out of a cloth napkin darling? I think she looks quite fashionable!


I have demonstrations of many ways to style, tie and wear scarves on my blog with complete how to instructions. Please scroll back through my postings to check these out. They were written and photographed for grown ups but, we realized we can easily tie them on dolls as well! They work for people of all sizes.


The Final Shot ~ What a Doll!

Behind the Scene ~ Getting Lisa Prepared for the Photo Shoot

Share