Image 01

Lady Violette

The Romantic Lifestyle

Posts Tagged ‘Fashion’

Two Antique Manton de Manila Embroidered Silk Shawls From The San Francisco Gold Rush – 1850

Sunday, January 28th, 2024

Part One in a Series on Antique Mantons de Manila, Antique Embroidered Shawls from Canton, Antique Embroidered Silk Piano Shawls, Embroidered Spanish Shawls and Spanish Flamenco Shawls ……..

ABOUT THE BLACK AND WHITE SILK SHAWL & THE IVORY BIRDS OF PARADISE SILK SHAWL Acquired in San Francisco during the Gold Rush in 1850:

During the Gold Rush, San Francisco was a frontier boomtown, a slice of the Wild West that was rapidly civilizing with the influx of money from the mining activities. In the early 1850s, two sisters attended the traveling opera in San Francisco, in a makeshift music hall with wooden chairs for seats. They wore their status on their persons, in the form of two dramatic, embroidered silk shawls, imported all the way from the exotic Far East by rickshaw, rail and sail. As they made their way up the steps, the shawls flowed around them, adding a sense of glamor and drama to the evening before the opera even began.

These women wore Cantonese, via Manila, Mantons – exotic heavy silk shawls hand embroidered in Canton for the export market, originally produced for well to do fashionable women in the Americas.  These two shawls were acquired by a ship captain in Canton and brought by ship to Manila, the capitol of the Spanish Colony in the Philippines. Then they traveled on the Manila Galleons from the Philippines to San Francisco where they were purchased by a gentleman gold miner who had struck it rich from the sea captain in 1850 during the heart the San Francisco Gold Rush (1848 – 1855.) It was socially and economically important for this businessman to exhibit his success by dressing the women in his family in the most expensive and fashionable attire of the times. In those days the opera was the place to see and be seen as well as the place all manner of social and business transactions were conducted. It was the perfect venue in which to exhibit these exquisite and expensive shawls and show off his beautiful wife and sister…

Provenance: His niece wrote, 

“This Spanish Shawl was bought in California ($150) in the years of the Gold Rush  – 1849 by my father’s Uncle, Nathanial S. Harold, for his sister my grandmother, Margaret Case, who gave it to me about February 1881. My uncle bought these two shawls from the captain of a ship that came from a far country for his wife and my mother and these two ladies wore them to the Opera in San Francisco.” Estylle M. Davis.

 Incidentally $150 in the years of the San Francisco Gold Rush (1850) is equal to $6,090.24 today! (January 28, 2024.) These shawls are now 176 years old!

The black and white shawl covered with camellias is one of those two shawls worn to the opera so long ago. It is wonderful and unusual that I know the provenance of this beautiful shawl. I acquired it 45 years ago from an antique dealer friend of mine who purchased it directly from the elderly niece of the original owners described above. I have both shawls from this transaction. The niece wrote the above statement on a card that accompanies the shawls in her own handwriting. I expressed interest in meeting Estylle M. Davis herself and my friend was able to arrange it! We visited her in her family home on Clay Street in San Francisco and she was so kind and lovely! She was happy that the person who acquired her shawls appreciated them and her family history. She showed us photos of her family from the Gold Rush days up to the present period which was 1986. She was in her late 90s when we met! I later learned that she passed away at the age of 103! She explained that the shawls were left to her by her female relatives when she was very very young – too young and small to wear them. She was the only female relative in the family to leave them to and they wanted to be sure that she would have them, as part of her history when she grew up.

Her motivation in selling her shawls was that she wanted to find them a home in which they would be treasured and cared for. She only had sons and they were not at all interested in the shawls. My antique dealer friend assured her that they would only be sold to an appropriate person. She was actually delighted to meet me and fortunately I was approved and passed inspection! Here is the note Estelle wrote:

Ideally, Estelle Davis wanted these two shawls to remain together as they had been purchased by Nathaniel Hawthorne from the sea captain and worn by his wife and sister, Estelle’s grandmother, Margaret Case. I promised to do so and so far have managed to keep them together……

The second shawl is ivory silk covered in a profusion of brightly colored birds, butterflies and exotic flowers skillfully hand embroidered in silk thread. A large peacock with its tail spread open occupies the center of this shawl, while colorful pheasants, flamingos and other exotic birds fill out the four corners. It is finished with a heavy white silk macrame lattice and long ivory fringe. I call this one The Birds of Paradise Manton. Manton is, simply, the word for shawl in Spanish.

These exquisite shawls were among the most treasured possessions of these two early San Fransisco women and were passed down to the niece who kept them carefully until she was an elderly woman in her 90’s, wearing them only on special holidays. These shawls were beautifully made and properly cared for and, as antiques, will continue to increase in value. They are both in excellent condition for their age – clean and free of damage. The embroidery is perfect. The hand macrame lattice is exceptionally elaborate and heavy and the silk fringe is dense and long. 

The embroidery on the Birds of Paradise shawl is unique in its imagery and imagination especially in the realistic depiction of birds from pheasants, to flamingos and peacocks – other atypical details include fanciful flowers and vines and plant pods insects and butterflies. Much of the embroidery is executed in satin stitch but the tails and wings of the peacocks and other birds are done in a fine herringbone stitch that imitates the texture of feathers. I do think some of the birds were fantastical combinations of different birds made by the designer embroiderer and I love this about it! The one below, in my opinion, is a kind of flamingo/ peacock combination!

When I discovered and acquired these two San Francisco Gold Rush Shawls I fell in love with them. I was fascinated by the highly skilled embroidery and the incredible designs as well as the history surrounding them. I began to investigate Manton’s de Manila and visit them in museums and textile collections whenever I could. And I began to assemble my own collection. I have now been collecting Manton’s de Manila for 45 years. In the process I have learned a lot about them and the women who originally owned and wore them. I have learned how these shawls were made and the history of the silk and fine embroidery trade between China, the Americas and Europe. I love learning the background history of the shawls as well as their beauty and especially value knowing about the women who originally owned them.

In future posts I will discuss the interesting history of the Mantons de Manila and share beautiful examples from my own collection and others. I am a dancer and I of course become interested in how the shawls have been incorporated into Flamenco and Spanish folk dance. I will show examples of their use in dance and how each art form has enhanced the other. Isadora Duncan, the famous modern dance pioneer, also initially from San Francisco, famously wore such shawls in performance and daily life with her famous Delphos gowns.

I will also explain how to care for these shawls properly, how to restore them, how to evaluate the originality, authenticity and quality of an antique Manton de Manila, and how to locate one if you want to acquire one for yourself. Because there is a lot of information to share I am choosing to do it in a series of Manton de Manila related blog posts.

The embroidery on the Black and White Shawl is executed in satin stitch. Both shawls are double embroidered on both the front and back in the same images making them completely reversible.

These shawls are large. The Black and White one is 60 inches square before adding the measurement of the fringe which is another 5 inches of macramé lattice work plus 13″ of long silk fringe. Thus another 18 inches of fringe all the way around the shawl.

When these shawls were made in the 1840s Western ladies were wearing enormous voluminous skirts that steadily grew in size through the decade! The large skirts were supported underneath by multiple petticoats, sometimes as many as seven at once. At least one of these petticoats would be a crinoline – a type of petticoat stiffened by horsehair. The steel cage crinoline was introduced in 1856. It provided immense relief from multiple heavy and cumbersome petticoats and allowed skirts to reach even larger new proportions especially between 1858 and 1862, relatively inexpensive, the cage crinoline was worn at all levels of society. The shawls were required to cover the lady and her crinoline skirt – thus the size! Today this size can adequately cover a queen or king sized bed as a coverlet or be used on a grand piano as a piano shawl or as a glamorous coverlet on a chaise lounge.

Shawls and beautiful historic dresses and other clothing and accessories are for sale in my online shops. 

Ebay: ladyviolettedecourcy

Etsy: LadyVioletteBoutiqe

Poshmark: cocoviolette 

Fashion Conservator: Lady Violette Boutique

Share

Cold Rayon WWII Era Print Dresses

Friday, December 15th, 2023

Brown Print Cold Rayon Dress – 1940’s

A gorgeous historically significant 1940’s Cold Rayon Dress from WWII Era. With Iconic multi-directional print of nosegays, doilies, flowers, and bows.

During the war fabrics were rationed and prints were cleverly designed to be multi-directional so that laying out and cutting pattern pieces could utilize as much of the yardage as possible. Rationed yardage allowed no more than 4yds for a dress. And it was usually only 36” – 39”.wide.  Every inch of precious fabric was utilized in these clever dress designs. 

Rationing dictated the wartime silhouette and influenced the fashions. Dresses were narrow and featured short sleeves, high necklines and “short” skirts. Clever cutting and seaming was utilized to embellish this basic shape. Bodices were closely fitted and the waistline was often slightly dropped below the natural waist to create a long waisted line through the torso. This mades a woman look taller and narrower. 

Examples of embellishments used are peplums skirts, curved seams, ruching, shirred seams, hip flounces, draped skirts and extended shoulders with the use of shoulder pads. A-line or straight skirts with peplums applied over the top created the illusion of a jacket without using the extra fabric required to make one. 

Sleeves were short and often cut in one piece with the bodice. These little sleeves were called kimono sleeves. Long feminine gloves were often worn with these short sleeves. 

Fabric rationing required that hemlines be less than 2″, and in accordance with the regulations this one is a mere 3/4″ then faced with hem tape. Because of the lightweight fabric this actually looks nice and adds to the flowy effect of the skirt.

This brown print dress has shirred gathering at the side seams and one shoulder, moderate shoulder pads extend the shoulders and make the  wearer’s waistline appear smaller. The high jewel neckline was the style of the times. One shoulder, the Left one, is gathered creating a draped effect across the fitted bodice. Clever pattern construction creates a diagonal seam across the bodice from L shoulder to R hip and a flouncy ultra-feminine gathered drape over the Right hip. The narrow skirt is attractively draped, appearing long and lean, but is actually gently flared and reaches to mid-calf in length. The short sleeves are set in. A metal zipper in the center back seam of the dress is 21” long allowing for easy in and out. 

The shoulder pads are of modest size to achieve the wartime silhouette, but not extreme such as those worn by Joan Crawford. They are basted into position so that they could be easily adjusted if required. 

This dress has been freshly dry-cleaned by a cleaner specializing in vintage clothing. It appears not to have been worn much because it is still in excellent condition. Amazing for a garment that is 80 years old! This dress is very well made, but there are no labels in it. It could possibly be a homemade dress or custom made dress made by an exceptionally skilled seamstress.

Size and measurements: Shoulders: natural shoulders are 16”,across the back measured side to side at seam, but are only 15.25” across the front . They are extended to be about 1” wider with the shoulder pads. As mentioned above shoulder pads are basted into place and their position could be changed or they could be removed entirely if desired. People’s shoulders are uniquely shaped so it was common to insert shoulder pads is such a way that they could be repositioned easily to best flatter the wearer.

Bust : 17″ x 2 = 34″ maximum – because of the design fabric drape is required across the bodice. I recommend a bust size of no more than 32” to allow for adequate drape, comfort, freedom of movement and proper fit. A smaller bust size will work just fine because of the drape. 

Waist is 12.75″ x 2 = 25.5 ” at most – again, some space should be allowed for the waist to fit comfortably and allow for movement. I recommend a wearer’s waist size up to 24″ so dress is not too tight. 

Hips: measured 7” below waistline :  skirt measures 20″ x 2 = 40 ” in circumference, but I recommend a looser fit to allow for the proper drape and comfort. Wearer’s hips should not be more than 38″ to allow for a graceful drape. Anything less will also be fine. 

Sleeves: From top of shoulder to hem are 8.5″ in length. They are loosely cut to flutter gently around the upper arm. 

Back length of bodice from center of neckline to slightly dropped waist is 16.25″ . Waistlines were positioned a bit below the natural waistline to create long-lined look through the torso.  

Skirt length from waist to hem is 30″ long.  

Care: This type of Rayon should be dry-cleaned only. If it needs ironing use a cool iron and press on the back side of fabric only.  I recommend pressing over a pressing cloth. 

Modern sizing is equivalent to a size 2  – my recommended best fit for this dress is modern sizes 0 – 2. 

Fitting Note: My mannequin is a well endowed size 6 and this dress does not come together in her bodice back. 

Wartime Fashion Facts: 

An interesting historical note : Food was also rationed during WWII and many people did not get enough to eat so were very thin and often malnourished. This historical fact explains why many of the clothes from the period are such small sizes. These women just did not have any fat stored on their figures. A woman who was a nurse in England during this time period explained this to me. She said the girls looked fragile and waif like and very pretty in their clothes but this was the result of not having enough to eat.  It was easy to be slim if there was not enough to eat! Audrey Hepburn was an example of this. She grew up in Holland during the German occupation and they could not get enough food. She was malnourished after the war and it caused her lifelong health problems. That delicate gamine look came at a price! 

Rayon fabric is made from wood pulp and as such is considered a semi-synthetic. Its properties are akin to a natural fiber. Rayon is breathable, takes pressing quite well, is absorbent and can hold in body heat. 

Cold rayon is made via a cold process. It is smooth, has a subtle sheen and drapes beautifully. It initially feels cool to the touch. During the World War II era it was a popular, more affordable and more available than silk and was used to produce women’s dresses, blouses and lingerie. Fabric artists cleverly developed multi-directional prints so that pattern pieces could be cut and seamed facing any direction instead of just one – way. This allowed for the maximum use of every inch of rationed fabric. 

Rayon takes dye very well so prints were often quite colorful. Whimsical floral patterns were popular as well as unusual atomic prints…. The multi-directional prints developed by clever artists allowed you to use all the fabric without concern for which way the print was running. 

Rayon fabrics in solid colors were used for summer weight military uniforms for men and women as well. 

Rayon was economical. The established American rayon industry was positioned with raw materials and manufacturing capacity to produce goods for the war effort and civilian use. In 1940, the average price for a pound of rayon yarn was $0.53, while wool was $1.34 and silk was $2.79. 

Silk was allocated to the military for parachutes. Soldiers would sometimes send damaged parachutes home for their women to make into dresses, blouses, nightgowns, slips and other lingerie. A few girls even made their wedding dresses out of damaged parachutes. Parachute silk was highly prized! 

Most women sewed and sewing skills improved during the war as you had to keep your old clothes in decent shape, mend and remake things into other things, and make what new items you could out of rationed fabrics. You got more value for your ration coupons in sewing fabric than in ready made clothing. 

 A woman’s skirt could utilize no more than 2.5 yds of fabric. The number of pleats allowed in a skirt was also restricted. Remember this fabric was also narrow! By 1945 each woman was allowed only 36 clothing coupons per year. A woman’s ready-made tweed suit cost 18 coupons and a pair of shoes cost 5. Be aware that people had to pay money as well as present coupons to buy the rationed articles of clothing. By 1946 the number of coupons issued was reduced to 26 per person per year. 

All silk came from Japan. After the bombing of Pearl Harbor in 1941 silk was completely banned because it came from Japan! That put an end to luxurious silk stockings, lingerie and dresses! Rayon was the substitute and they began to call it “artificial silk.”

Fabric artists, clothing designers and the women who sewed and wore rayon during WWII became clever and resourceful resulting in some very attractive prints and clothing designs and styling options resulting from the limitations of rationing.

After the war, more synthetic fabrics were developed and manufactured. Then cold rayon the distinctive WWII era rayon prints were replaced in the marketplace by something newer. Rayon gradually disappeared from the marketplace and now is practically impossible to find! The type of cold rayon in the prints used in these Iconic WWII Dresses is now rare, expensive and highly sought after.

If you find a dress in good condition that fits you should acquire it! If you come across a 4 yard piece of Cold Rayon fabric from WWII era that has not yet been made up you should acquire it! And if you find a lovely dress pattern from that period you should also acquire it. Either make your own dress or find a seamstress to do so. The styles of this era are unabashedly feminine and charming!

This Cold Rayon Print Dress and and other rare and beautiful historic clothes and accessories are for sale in my online shops.

Ebay: ladyviolettedecourcy on Ebay

Etsy: LadyVioletteBoutique

Poshmark: cocoviolette 

Fashion Conservatory: ladyvioletteboutique


Note the high round neckline, the shirred gathers on the left shoulder, the short sleeves, the below natural waist dropped waistline, the flounce on the right hip, and the non-directional print.

Note the curved seams, the ultra-feminine hip flounce, the softly gathered skirt, the mid-calf skirt length, the shallow hem giving lightness to the skirt; and, again, the multi-directional print that could be cut and assembled in any direction.

Note the curved seam, the waistline which is dropped below the natural waist to elongate wearers torso and the hip flounce which creates the illusion of a jacket with very little material being used.

Note: A Closeup of the multi-directional print and the fact that only four colors were used: brown, white, green and yellow. Also of note are the brightness of the colors since rayon absorbs dye very well.

Note: the high round neckline, the small shoulder pads, short soft kimono sleeve with a bit of billowing drape, the figure flattering fitted waistline and the gentle bust shaping.

Note: how the waistline dropped below the natural waist lengthens the torso adding to the illusion of length and slimness

Note: The ultra-feminine shape of the torso achieved when all the elements of the design come together. There is skill in the design and construction of these dresses which results in feminine flattering results.

Note: The long metal back zipper ( 21″) in length which facilitates getting in and out of such a fitted dress with ease.

Note: how all the features of the WWII Wartime Era Cold Rayon Dress come together in this Iconic Example of the feminine beauty and ingenuity of design during an historic time of adversity.

Share

Edward Hopper Inspired Portrait Cloche Hat Pattern by Lady Violette de Courcy , Part 2 ~ Knitted Bow Tutorial

Wednesday, February 12th, 2014

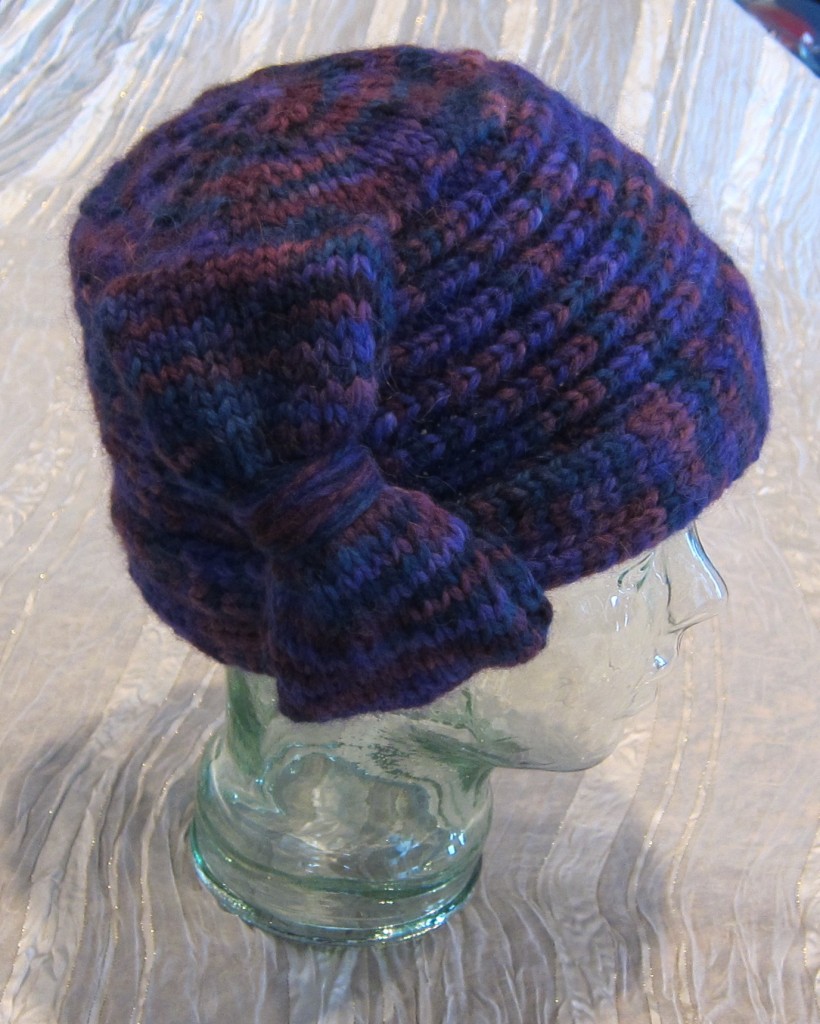
My Edward Hopper Inspired Portrait Cloche Hat Decorated with a Knitted Bow

The Edward Hopper Inspired Portrait Cloche Hat is trimmed with a knitted bow which both adds a decorative vintage touch to the hat and conveniently covers and conceals the side seam over the right ear. The pattern for this hat is in yesterday’s blog post here.

Cast on 18 stitches on Size 8 US needles and work 12 inches of stockinette stitch to make a piece of fabric for the bow.

To make the bow cast on 18 stitches on size 8 US needles in the same bulky weight yarn as you use for the hat. Work in stockinette stitch for 12 inches, then bind off. (Stockinette stitch is Knit one row, Purl one row.) Cut the yarn but leave a tail of yarn about 12 inches long to sew the center seam of the bow together.

Do not block the piece of fabric you have made for the bow. You will want the selvedge edges to curl in order to create a nice soft plump looking bow.

Sew the center seam together on what will be the back underside of the bow when it is attached to the hat. 

Turn the bow and fold ends inward toward the center. Sew the ends together along the center seam which will be on the underside of the bow when it is sewn to the hat.

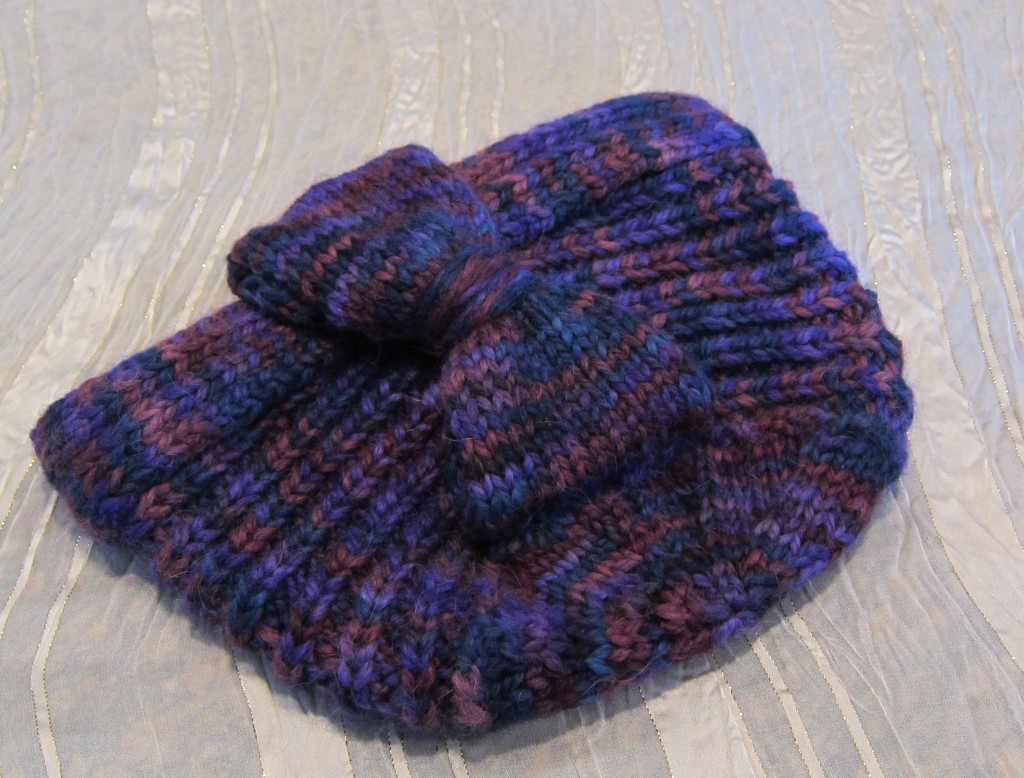
Turnover and cinch the bow fabric together in the center with a piece of yarn to create the bow tie shape.

Turn the bow so that the right side is facing upwards. Place a piece of yarn under the center of the bow and tie it together to cinch the bow together in the middle.

Gather together , cinch and tie yarn on the backside to form bow.

Bow should be about 6 inches in length.

You have created a fat puffy little bow about 6 inches long. Smooth the edges and both sides of the bow with your fingers to make the shape pretty.

Place bow on side seam of hat to check the fit.

Set it over the seam of the hat to be sure it is long enough to cover the sewn seam and conceal it.

Wrap yarn tightly around middle of bow several times to create the center. Tie securely on back side and tuck in ends.

Next: Wrap a generous length of yarn around the center of the bow several times tightly to create the middle section of the bow. Tie it firmly on the back side so it will stay put. Tuck in the yarn ends. Your bow is now finished and ready to sew onto your hat.

Center the bow over the side seam and make sure one narrow edge is along the edge of the brim fold and the other is along the edge where you picked up and knit the stitches to create the crown of the hat. I think it is a good idea to try the hat on at this point and make sure you like the position of the bow.

Place bow on hat and sew in place.

When you are satisfied with the placement sew the bow to the hat using yarn and a large yarn needle. Sew the bow on securely but only sew through the bottom layer of the bow fabric so that the top layer of the bow fabric is free and stays puffy and full. I sewed my bows to the center along the side seam of the hat and sewed it down along both short ends ~ sewing along the bottom of the brim and attaching the other end of the bow to the joining stitches along the crown.

Only sew the bottom part of the bow loops to the hat. Leave the top sides of the bow free and open so that you can put your fingers inside to plump up the bow.

I left the top loops of the bow free so that I can shape the bow with my fingers by reaching inside them to plump up the bow.

The bow will cover the side seam and the wearers right ear when the hat is worn.

When wearing the hat the bow should be placed over your right ear. It should completely cover and hide the side seam of the hat.

This type of bow can also be attached to a barrette or hair comb and used as a hair ornament. You can make these bows larger or smaller and use them to decorate hair ornaments, hats, gloves, the backs of little girl’s dresses, and sweaters, even gift boxes! Knitted bows are very pretty and very easy to make. Small ones can even be used to decorate mittens and booties or baby shoes! I made one and applied it to the back of a little girl’s knitted coat at the top of a pleat. They are easy to make and have many uses.

The Edward Hopper Inspired Portrait Cloche Hat in two color ways designed by Lady Violette de Courcy

Share

Edward Hopper Inspired Portrait Cloche Hat and Free Knitting Pattern ~ Part 1, by Lady Violette de Courcy

Tuesday, February 11th, 2014

Edward Hopper Inspired Portrait Cloche Hat Designed by Lady Violette de Courcy

I created this Edward Hopper Inspired Portrait Cloche Hat to attend an art museum opening of Edward Hopper’s paintings. I wanted to make a hat in the style of the ones the women in his paintings wore. I also wanted it to look like a proper 1920’s – 30’s formed felt cloche hat, rather than a knitted cap so I made it very thick and sculptural with a turned back rim and graduated shaping. I made a very thick sculptural bow to cover the right side seam of the hat. It comes down over the right ear and has the added benefit of being like a very warm ear muff!


This hat is very thick and warm, but I may have to try making one with a bow earmuff on both sides now! I’m thinking of ways to keep even warmer on my 4th day of being completely snowed in! And it is still snowing out! We are in the middle of a huge snowstorm in Seattle and I am taking advantage of using this time to post my recently knitted stuff on Ravelry! You can take a look at my  Lady Violette Ravelry project page here .


I’m really happy with the way this hat turned out. The construction was an experiment that fortunately turned out perfectly and is exactly what I had in mind. I am writing the pattern so I can offer it to other knitters who would like to make one. I am making this pattern available to you as a free pattern ~ a kind of Happy Valentine to all you knitters out there. I hope you enjoy it.

I wear this one with a vintage navy blue 1930’s coat in wool gaberdine and a purple wool dress. The outfit is totally inspired by the women in Hopper’s paintings who are always dressed in strong clear distinctive colors. I get a lot of inspiration for my clothing from painters. I like to recreate the moods of the paintings in the way I dress. I can also wear this hat with a purple wool wrap coat with a big ruffled collar. This is more of a 1970’s look, but also very successful.

Size: This hat is made with slight negative ease. I made it to fit myself with a 21 inch head but it fit a 22 inch and 23 inch head just fine as well because it stretched, comfortably, to fit. Note: When you fold the brim back you should try on the hat and adjust the amount of fabric you fold back to the individual wearers preference and your opinion as to what amount of fabric turned back looks the best. Based on my knitting experience I do not think you will find it necessary to adjust the number of stitches or the gauge to fit people within the above size ranges for a comfortable and attractive fit. That is between a 21 – 23 inch head circumference. Please note: I am very finicky about patterns being written clearly and correctly. I have tested this pattern by making it twice myself. I have finished knitting a brown one as well and will photograph it to add to this post within the next few days.

Yarn: Use a BULKY weight yarn.  I used Baby Alpaca Grande Hand Dye from Plymouth Yarn in the color way of Blue/ Purple. This is a Bulky weight yarn. The hat and big bow took 2 skeins. Thus the yarn for this hat cost $40 plus sales tax! Each ball retails for $19.95. Rather expensive for a knitted hat but soft, warm and really beautiful so well worth it. The hat itself takes well over 1 skein of yarn and with the bow you will use about 1 and 7/8 skeins. These skeins are 110 yds each. If you are substituting another bulky yarn with the same gauge you should begin with 220 yds.I plan to use the small amount of left over yarn to make small bows like the one on the hat to decorate a pair of purple gloves I have made. There is just the right amount left over to accomplish this.

Needles:  sizes: US 10.5 – 6.5mm, US 10 – 6 mm, US 9 – 5.5 mm, US 8 – 5 mm, US 7 – 4.5 mm. ( Yes! You will need all 5 sizes of needles to create the sculptural shaping required for this hat!) I used 10 inch long sets of straight needles for the brim of the hat and a set of longer size 9 needles for the crown. I think they are 15 inches long. They are the long old fashioned straight needles and I found it really helpful to have the extra length to handle all the stitches at the beginning of the crown section.

EDWARD HOPPER INSPIRED PORTRAIT CLOCHE HAT

Using 10 inch long straight needles as I did or your choice of alternatives:

Work the BRIM:

1) Begin by casting on 42 stitches on size US 10.5 needles

2) Change to size US 10 needles to work the brim:

Mark wrong side with a small safety pin to help you keep track of your work:

Row 1: (Wrong Side) *K2, p1,: repeat from * to last 3 sts, k3.

Row 2: ( Right Side) Work stitches as they appear.

Repeat Rows 1 and 2 until fabric measures 14 and 1/2 inches from beginning edge;

Change to size US 9 needles and continue in ribbing as established until fabric measures 16″ from beginning edge;

Change to size US 8 needles and continue in ribbing as established until fabric measures 17.5 ” from beginning edge;

Change to size US 7 needles and continue in ribbing as established until fabric measures 20″ from beginning edge.

Bind off all stitches in established rib pattern still using the size 7 needles.

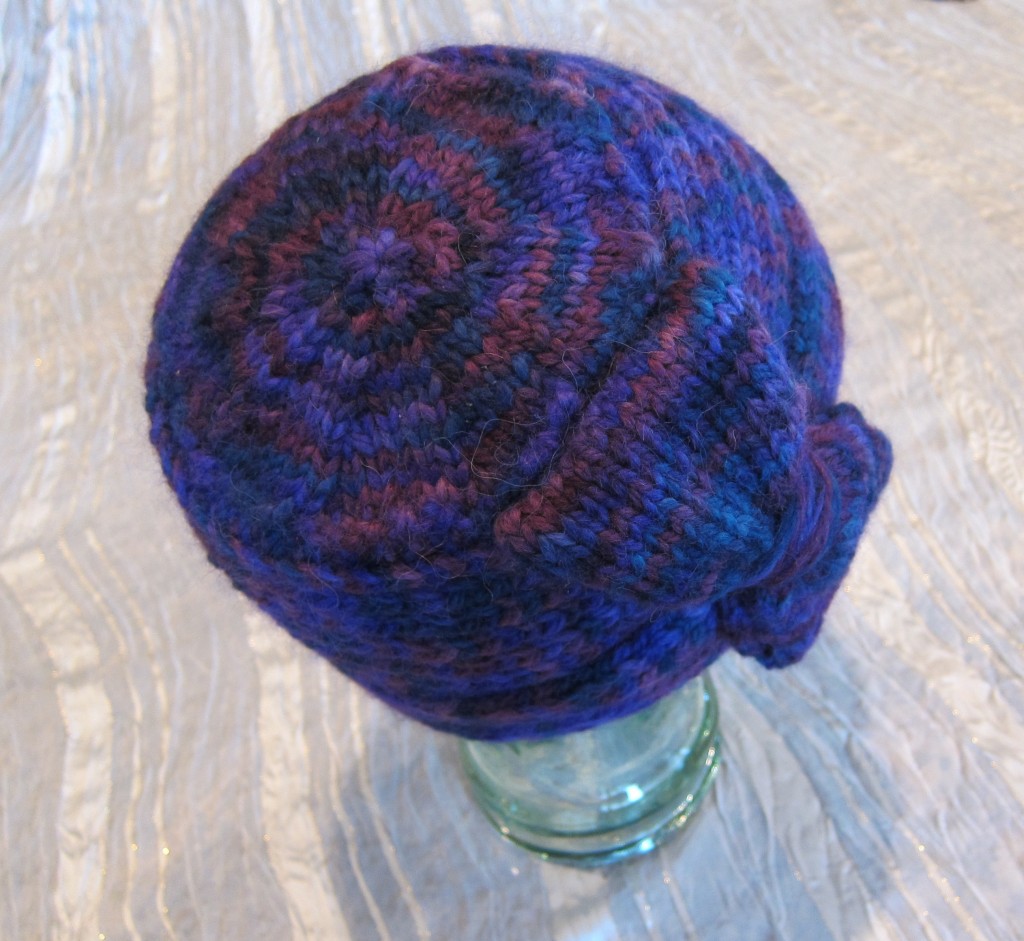
The Crown will look like this from the top when finished !

Work the CROWN:

Using long set of straight US #9 needles, Right side facing, begin at Cast On edge and Pick Up and Knit 68 stitches evenly divided along the selvedge to the Bind Off edge.

Rows 1,3,5,7, and 9 : ( Wrong Side) Purl.

Decrease Rows:

Row 2: K1, *k4, k2tog; repeat from * to last stitch, k1 = 57 stitches total.

Row 4: K1, *k3, k2tog; repeat from * to last stitch, k1 = 46 stitches total.

Row 6: K1, *k2; k2tog; repeat from * to last stitch, k1 = 35 stitches total.

Row 8: K1, * k1, k2tog; repeat from * to last stitch, k1 = 24 stitches total.

Row 10: K1; *k2tog, repeat from * to last stitch, k1 = 13 stitches total.

Row 11: P1, *p2tog; repeat from * to last 2 stitches, p2 = 8 stitches total.

Break the yarn, leaving a 10″ tail. Weave tail through remaining 8 stitches twice, then tie off on inside.

SEW SIDES OF HAT TOGETHER:

Thread yarn on a large eye yarn needle and sew sides of hat, including the sides of the crown, together in method of your choice,  being careful to match the lines of ribbing together.

FITTING AND FOLDING BACK EDGE OF BRIM:

Try on hat. The seam should  be on the right side. The narrower portion of the graduated size ribbing should be in the front of the hat. Turn edge of brim back approximately 1.5 to 2 Inches. It should be turned back the same amount all the way around. How much is a matter of desired preference. I turned the brim back so that the edge rested on the lower portion of the 6th ridge of ribbing. Make sure it is evenly turned back all the way around and the hat and brim are adjusted to your preference. Thread yarn needle with yarn and starting on Inside of hat, under the folded back brim, insert needle all the way through the brim inside of a ribbing channel. Then insert needle from front to inside so that you are making one invisible stitch through all the layers of the brim to tack it down securely and hold the folded back brim in place. Tie this single tacking stitch down, then cut the yarn and repeat the process about 4x evenly spaced inside of the hat to keep the folded brim securely, but invisibly in its folded back position.

MAKE BOW:

Using US #8 needles cast on 18 stitches. Work in Stockinette Stitch until piece measures 12 Inches in length. Bind Off. Sew the two 18 stitch long edges together.  Fold so that the seam is inside and  underneath and in the middle of the piece. Take a generous length of yarn and wrap this piece in the middle cinching it together to form a stylized bow. Secure on the wrong side under the seam. Place this bow over the side seam of the hat vertically and sew it down firmly to completely cover the seam on the turned back section of the brim and the side seam of the hat above it. Sew it down firmly all the way around. It should be worn placed over your right ear.

I have added a Part 2 to this pattern, The Knitted Bow Tutorial

FINI

The bow sewn into place covering the right side seam of the hat. Bow is placed over the right ear when hat is worn.


Share

Lady Violette’s Starbuck’s Coffee Shop Violet Adventure

Friday, February 7th, 2014

The Violet Bros in Their Matching Violet Coats


You absolutely cannot predict the interesting adventures having a personal color will bring you. My personal color is Violet of course. All things violet catch my attention, make me take a second look. Every now and then I see some interesting version of violet street fashion and do a double take

I was at the Alderwood Mall in Lynnwood, WA to do some errands, and needing a coffee stopped in at the Starbuck’s Cafe across from the movie theaters. I got my coffee “for here” because I detest the taste of paper cups. When I sat down at one of the tables, I could not help but notice two young men wearing matching long violet colored coats! I had to say something! I introduced myself and explained that violet is my personal color. I commented on their coats and violet fashion sense and asked if I could take their pictures for my Lady Violette blog. They were delighted to oblige !

They call themselves The Violet Bros, they harken from Bremerton, WA

One thing led to another and they decided to show me their tattoos! Right there, in the middle of  Starbucks with all the conservative Lynnwood, WA suburban shoppers gaping. Their story? They are members of the US  Coast Guard, and they had a day off so they came to the mall to buy some fun clothes and see a movie.

Thanks Guys! And no matter what, keep wearing Violet!

I feel much safer knowing Violet Bros are guarding the oceans!

It was hilarious! and innocent and a good time and much laughing was had by all! And a few shocked suburban shoppers got  jolt to their blood pressure which was undoubtedly good for them! Here are the pictures! I did promise to post them.


Violet Bros Tattoo, Starbuck's Alderwood Mall, Lynnwood, WA

A Violet Bros Tattoo

Yet Another Violet Bros Tattoo

A Violet Bros - Showing Off a Torso Tattoo in Starbuck's Cafe - Alderwood, WA

Giggling Sailor - One of The Violet Bros

Violet Bros Tattoo - The Sailor's Back

One of the Violet Bros - Portrait By Request of The Other Violet Bro


It was hilarious! and innocent and a good time and much laughing was had by all! And a few shocked suburban shoppers got  jolt to their blood pressure which was undoubtedly good for them! Here are the pictures! I did promise to post them.

Share