Image 01

Lady Violette

The Romantic Lifestyle

Posts Tagged ‘Knitted Hats’

Edward Hopper Inspired Portrait Cloche Hat Pattern by Lady Violette de Courcy , Part 2 ~ Knitted Bow Tutorial

Wednesday, February 12th, 2014

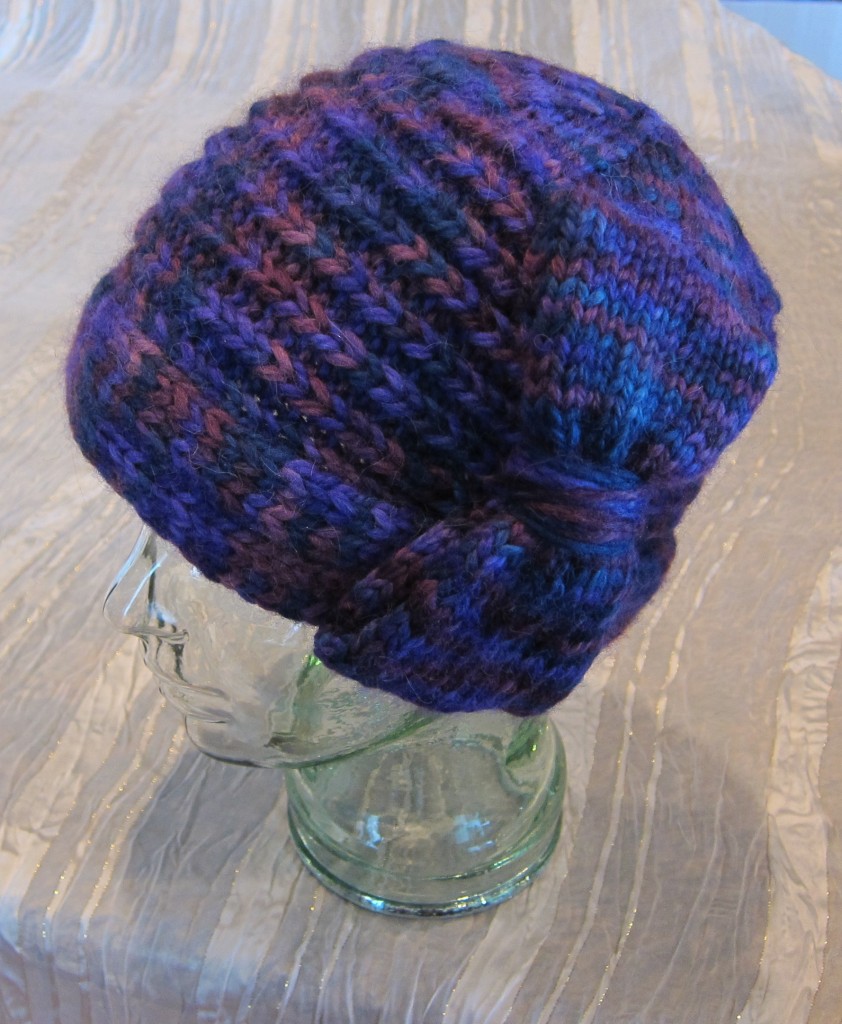
My Edward Hopper Inspired Portrait Cloche Hat Decorated with a Knitted Bow

The Edward Hopper Inspired Portrait Cloche Hat is trimmed with a knitted bow which both adds a decorative vintage touch to the hat and conveniently covers and conceals the side seam over the right ear. The pattern for this hat is in yesterday’s blog post here.

Cast on 18 stitches on Size 8 US needles and work 12 inches of stockinette stitch to make a piece of fabric for the bow.

To make the bow cast on 18 stitches on size 8 US needles in the same bulky weight yarn as you use for the hat. Work in stockinette stitch for 12 inches, then bind off. (Stockinette stitch is Knit one row, Purl one row.) Cut the yarn but leave a tail of yarn about 12 inches long to sew the center seam of the bow together.

Do not block the piece of fabric you have made for the bow. You will want the selvedge edges to curl in order to create a nice soft plump looking bow.

Sew the center seam together on what will be the back underside of the bow when it is attached to the hat. 

Turn the bow and fold ends inward toward the center. Sew the ends together along the center seam which will be on the underside of the bow when it is sewn to the hat.

Turnover and cinch the bow fabric together in the center with a piece of yarn to create the bow tie shape.

Turn the bow so that the right side is facing upwards. Place a piece of yarn under the center of the bow and tie it together to cinch the bow together in the middle.

Gather together , cinch and tie yarn on the backside to form bow.

Bow should be about 6 inches in length.

You have created a fat puffy little bow about 6 inches long. Smooth the edges and both sides of the bow with your fingers to make the shape pretty.

Place bow on side seam of hat to check the fit.

Set it over the seam of the hat to be sure it is long enough to cover the sewn seam and conceal it.

Wrap yarn tightly around middle of bow several times to create the center. Tie securely on back side and tuck in ends.

Next: Wrap a generous length of yarn around the center of the bow several times tightly to create the middle section of the bow. Tie it firmly on the back side so it will stay put. Tuck in the yarn ends. Your bow is now finished and ready to sew onto your hat.

Center the bow over the side seam and make sure one narrow edge is along the edge of the brim fold and the other is along the edge where you picked up and knit the stitches to create the crown of the hat. I think it is a good idea to try the hat on at this point and make sure you like the position of the bow.

Place bow on hat and sew in place.

When you are satisfied with the placement sew the bow to the hat using yarn and a large yarn needle. Sew the bow on securely but only sew through the bottom layer of the bow fabric so that the top layer of the bow fabric is free and stays puffy and full. I sewed my bows to the center along the side seam of the hat and sewed it down along both short ends ~ sewing along the bottom of the brim and attaching the other end of the bow to the joining stitches along the crown.

Only sew the bottom part of the bow loops to the hat. Leave the top sides of the bow free and open so that you can put your fingers inside to plump up the bow.

I left the top loops of the bow free so that I can shape the bow with my fingers by reaching inside them to plump up the bow.

The bow will cover the side seam and the wearers right ear when the hat is worn.

When wearing the hat the bow should be placed over your right ear. It should completely cover and hide the side seam of the hat.

This type of bow can also be attached to a barrette or hair comb and used as a hair ornament. You can make these bows larger or smaller and use them to decorate hair ornaments, hats, gloves, the backs of little girl’s dresses, and sweaters, even gift boxes! Knitted bows are very pretty and very easy to make. Small ones can even be used to decorate mittens and booties or baby shoes! I made one and applied it to the back of a little girl’s knitted coat at the top of a pleat. They are easy to make and have many uses.

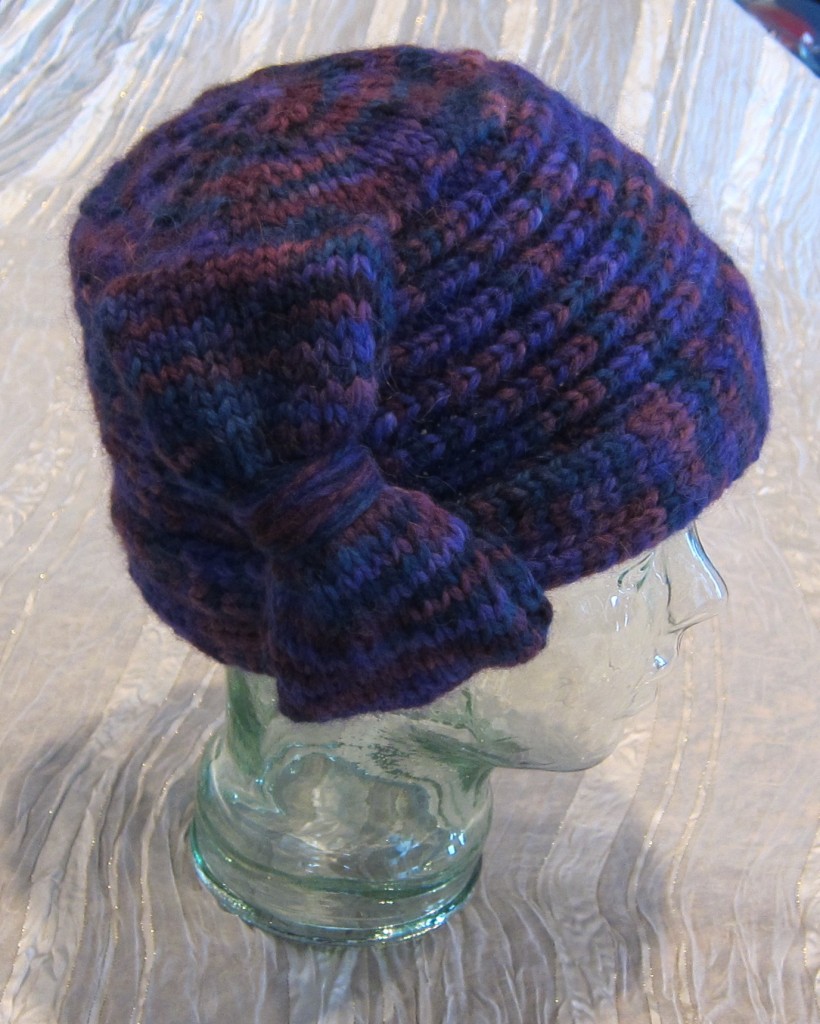
The Edward Hopper Inspired Portrait Cloche Hat in two color ways designed by Lady Violette de Courcy

Share

Edward Hopper Inspired Portrait Cloche Hat and Free Knitting Pattern ~ Part 1, by Lady Violette de Courcy

Tuesday, February 11th, 2014

Edward Hopper Inspired Portrait Cloche Hat Designed by Lady Violette de Courcy

I created this Edward Hopper Inspired Portrait Cloche Hat to attend an art museum opening of Edward Hopper’s paintings. I wanted to make a hat in the style of the ones the women in his paintings wore. I also wanted it to look like a proper 1920’s – 30’s formed felt cloche hat, rather than a knitted cap so I made it very thick and sculptural with a turned back rim and graduated shaping. I made a very thick sculptural bow to cover the right side seam of the hat. It comes down over the right ear and has the added benefit of being like a very warm ear muff!


This hat is very thick and warm, but I may have to try making one with a bow earmuff on both sides now! I’m thinking of ways to keep even warmer on my 4th day of being completely snowed in! And it is still snowing out! We are in the middle of a huge snowstorm in Seattle and I am taking advantage of using this time to post my recently knitted stuff on Ravelry! You can take a look at my  Lady Violette Ravelry project page here .


I’m really happy with the way this hat turned out. The construction was an experiment that fortunately turned out perfectly and is exactly what I had in mind. I am writing the pattern so I can offer it to other knitters who would like to make one. I am making this pattern available to you as a free pattern ~ a kind of Happy Valentine to all you knitters out there. I hope you enjoy it.

I wear this one with a vintage navy blue 1930’s coat in wool gaberdine and a purple wool dress. The outfit is totally inspired by the women in Hopper’s paintings who are always dressed in strong clear distinctive colors. I get a lot of inspiration for my clothing from painters. I like to recreate the moods of the paintings in the way I dress. I can also wear this hat with a purple wool wrap coat with a big ruffled collar. This is more of a 1970’s look, but also very successful.

Size: This hat is made with slight negative ease. I made it to fit myself with a 21 inch head but it fit a 22 inch and 23 inch head just fine as well because it stretched, comfortably, to fit. Note: When you fold the brim back you should try on the hat and adjust the amount of fabric you fold back to the individual wearers preference and your opinion as to what amount of fabric turned back looks the best. Based on my knitting experience I do not think you will find it necessary to adjust the number of stitches or the gauge to fit people within the above size ranges for a comfortable and attractive fit. That is between a 21 – 23 inch head circumference. Please note: I am very finicky about patterns being written clearly and correctly. I have tested this pattern by making it twice myself. I have finished knitting a brown one as well and will photograph it to add to this post within the next few days.

Yarn: Use a BULKY weight yarn.  I used Baby Alpaca Grande Hand Dye from Plymouth Yarn in the color way of Blue/ Purple. This is a Bulky weight yarn. The hat and big bow took 2 skeins. Thus the yarn for this hat cost $40 plus sales tax! Each ball retails for $19.95. Rather expensive for a knitted hat but soft, warm and really beautiful so well worth it. The hat itself takes well over 1 skein of yarn and with the bow you will use about 1 and 7/8 skeins. These skeins are 110 yds each. If you are substituting another bulky yarn with the same gauge you should begin with 220 yds.I plan to use the small amount of left over yarn to make small bows like the one on the hat to decorate a pair of purple gloves I have made. There is just the right amount left over to accomplish this.

Needles:  sizes: US 10.5 – 6.5mm, US 10 – 6 mm, US 9 – 5.5 mm, US 8 – 5 mm, US 7 – 4.5 mm. ( Yes! You will need all 5 sizes of needles to create the sculptural shaping required for this hat!) I used 10 inch long sets of straight needles for the brim of the hat and a set of longer size 9 needles for the crown. I think they are 15 inches long. They are the long old fashioned straight needles and I found it really helpful to have the extra length to handle all the stitches at the beginning of the crown section.

EDWARD HOPPER INSPIRED PORTRAIT CLOCHE HAT

Using 10 inch long straight needles as I did or your choice of alternatives:

Work the BRIM:

1) Begin by casting on 42 stitches on size US 10.5 needles

2) Change to size US 10 needles to work the brim:

Mark wrong side with a small safety pin to help you keep track of your work:

Row 1: (Wrong Side) *K2, p1,: repeat from * to last 3 sts, k3.

Row 2: ( Right Side) Work stitches as they appear.

Repeat Rows 1 and 2 until fabric measures 14 and 1/2 inches from beginning edge;

Change to size US 9 needles and continue in ribbing as established until fabric measures 16″ from beginning edge;

Change to size US 8 needles and continue in ribbing as established until fabric measures 17.5 ” from beginning edge;

Change to size US 7 needles and continue in ribbing as established until fabric measures 20″ from beginning edge.

Bind off all stitches in established rib pattern still using the size 7 needles.
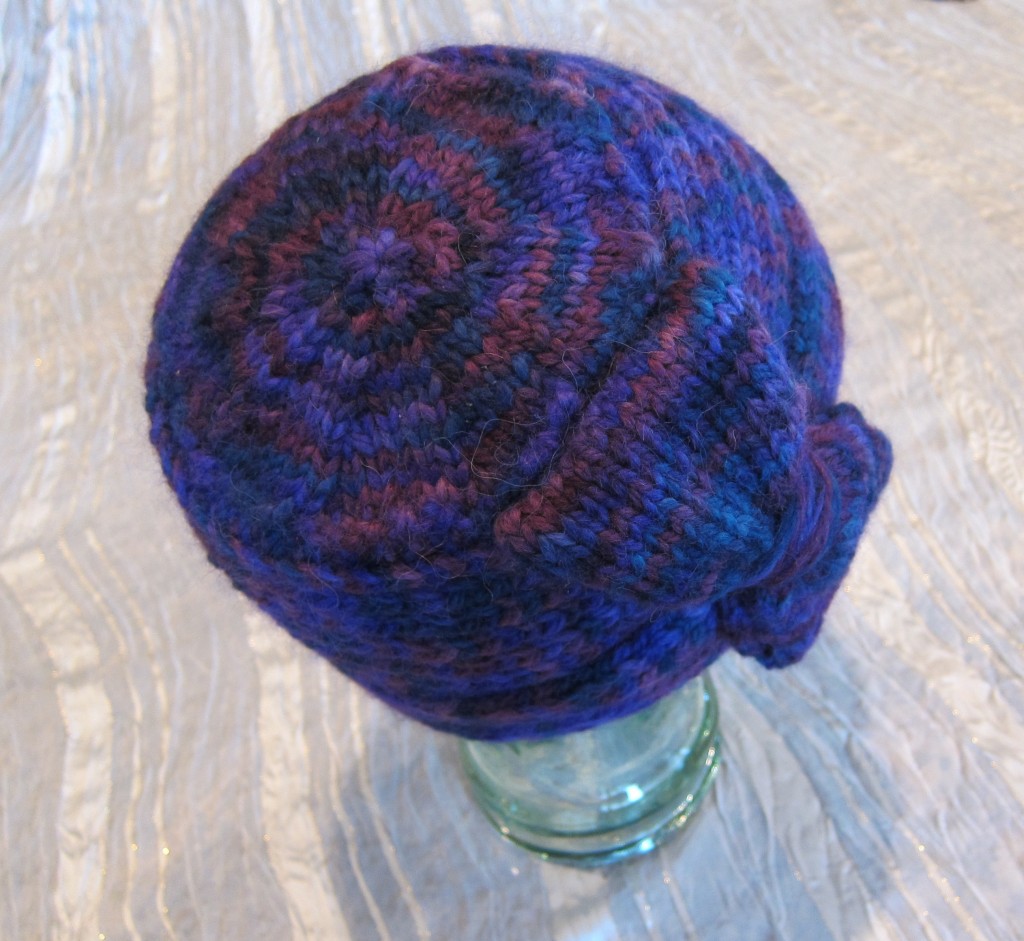
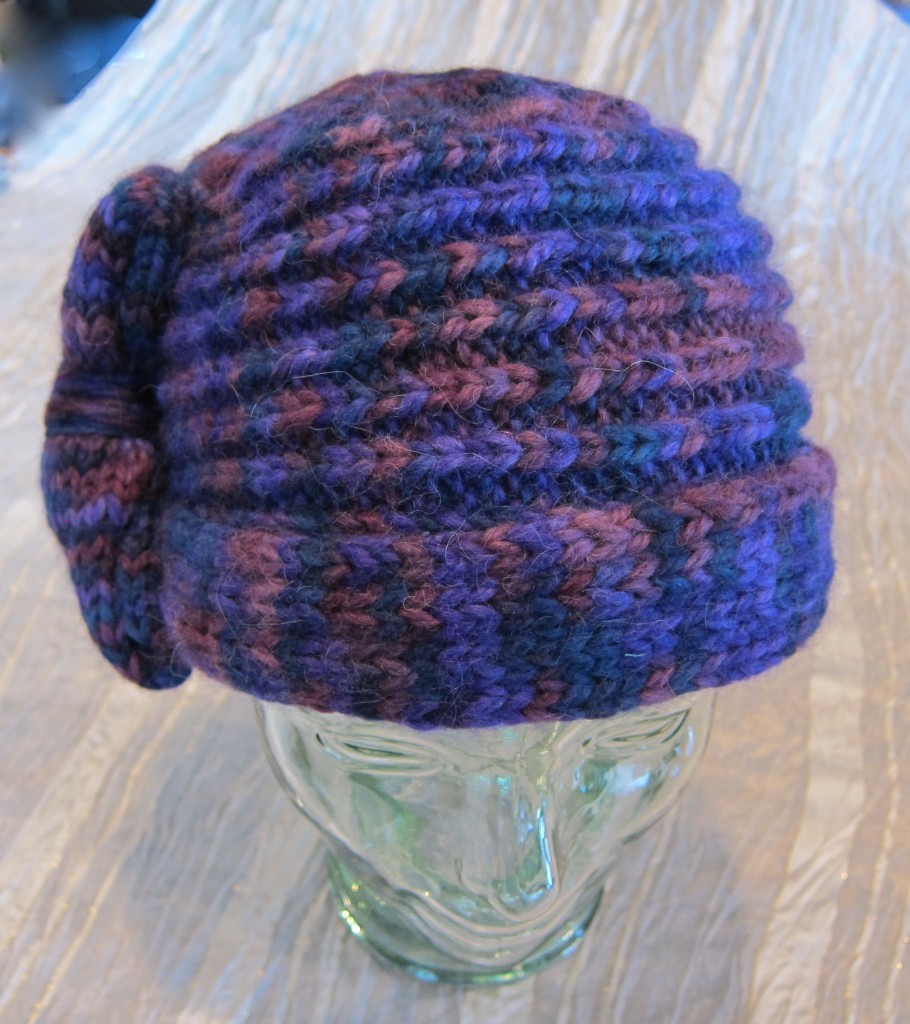
The Crown will look like this from the top when finished !

Work the CROWN:

Using long set of straight US #9 needles, Right side facing, begin at Cast On edge and Pick Up and Knit 68 stitches evenly divided along the selvedge to the Bind Off edge.

Rows 1,3,5,7, and 9 : ( Wrong Side) Purl.

Decrease Rows:

Row 2: K1, *k4, k2tog; repeat from * to last stitch, k1 = 57 stitches total.

Row 4: K1, *k3, k2tog; repeat from * to last stitch, k1 = 46 stitches total.

Row 6: K1, *k2; k2tog; repeat from * to last stitch, k1 = 35 stitches total.

Row 8: K1, * k1, k2tog; repeat from * to last stitch, k1 = 24 stitches total.

Row 10: K1; *k2tog, repeat from * to last stitch, k1 = 13 stitches total.

Row 11: P1, *p2tog; repeat from * to last 2 stitches, p2 = 8 stitches total.

Break the yarn, leaving a 10″ tail. Weave tail through remaining 8 stitches twice, then tie off on inside.

SEW SIDES OF HAT TOGETHER:

Thread yarn on a large eye yarn needle and sew sides of hat, including the sides of the crown, together in method of your choice,  being careful to match the lines of ribbing together.

FITTING AND FOLDING BACK EDGE OF BRIM:

Try on hat. The seam should  be on the right side. The narrower portion of the graduated size ribbing should be in the front of the hat. Turn edge of brim back approximately 1.5 to 2 Inches. It should be turned back the same amount all the way around. How much is a matter of desired preference. I turned the brim back so that the edge rested on the lower portion of the 6th ridge of ribbing. Make sure it is evenly turned back all the way around and the hat and brim are adjusted to your preference. Thread yarn needle with yarn and starting on Inside of hat, under the folded back brim, insert needle all the way through the brim inside of a ribbing channel. Then insert needle from front to inside so that you are making one invisible stitch through all the layers of the brim to tack it down securely and hold the folded back brim in place. Tie this single tacking stitch down, then cut the yarn and repeat the process about 4x evenly spaced inside of the hat to keep the folded brim securely, but invisibly in its folded back position.

MAKE BOW:

Using US #8 needles cast on 18 stitches. Work in Stockinette Stitch until piece measures 12 Inches in length. Bind Off. Sew the two 18 stitch long edges together.  Fold so that the seam is inside and  underneath and in the middle of the piece. Take a generous length of yarn and wrap this piece in the middle cinching it together to form a stylized bow. Secure on the wrong side under the seam. Place this bow over the side seam of the hat vertically and sew it down firmly to completely cover the seam on the turned back section of the brim and the side seam of the hat above it. Sew it down firmly all the way around. It should be worn placed over your right ear.

I have added a Part 2 to this pattern, The Knitted Bow Tutorial

FINI
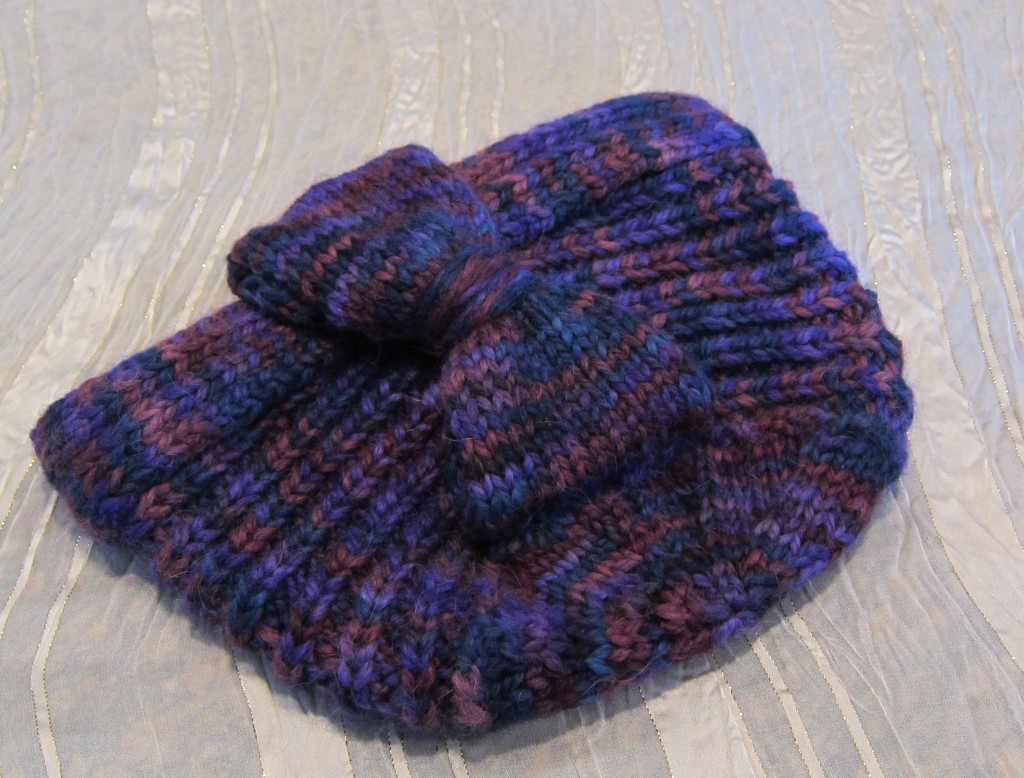
The bow sewn into place covering the right side seam of the hat. Bow is placed over the right ear when hat is worn.


Share

A Knitted Kaliedescope of Colored Lace is a Work of Art Hat in Japenese Artist Eisaku Noro’s Fine Art Yarn

Saturday, January 21st, 2012

I am fascinated with the Yarn Art of Japanese painter Eisaku Noro. He hand dyes his yarns which are all organic and made of fibers from silk, through cashmere, wool, cotton, bamboo, etc. He dyes and spins the yarn in small batches all produced by hand – and they are absolutely amazing. I see his yarns, fall in love with one and must make something from them! They can be used any way a fiber artist/designer wants to use them – the sky is the limit and the possibilities are endless. I have made several garments from his yarns and have several batches of it stashed for future work. It comes out in extremely limited amounts so you must get it when you see it.

Kaliedescope of Colors in a Spiral Lace Knit Hat in the Making by Lady Violette de Courcy

Currently I am working on another knitted hat – my first experiment using Noro Yarn in a millinery project. I got the yarn, last Monday, came home and stayed up most of the night casting on and knitting until I had to get a little sleep. I woke up and started to knit immediately until I ran out of yarn! I had put more on hold, but I could not get to the yarn store to buy it as I was snowed in completely, now going on a week! But I cannot wait! I have to show you this as a WIP (work in progress) as I am so excited by the way it is turning out!

I am making this in Noro’s Silk Garden Yarn – a very soft blend of silk and wool. That is not a dark hole on the left side in the brown stripe! Just an indent in the lace prior to finishing and blocking the hat. The crown, which isn’t done yet, will be a round burst of all the current colors on the top in a spiraling snowflake~like shape. I underestimated the amount of yarn needed. In a project like this you never know until you make it. It is hard to tell now, but this again will have a 1920’s ~ 30’s vintage vibe to it when I am finished. And I’ll be adding a special surprise at the very end.

I hope I can get out of the house, off my steep Telegraph Hill like hill and back to the yarn store this weekend. Or early next week. The snow is not coming down now but we are experiencing really high winds. Branches are banging against the house and the trees are weaving and swaying. I can hear branches crunching and breaking off from time to time. This could be worse than the snow has been. Winds are whistling through the house too! When this happens here trees often fall across the roads and they are shut off. There is inevitable loss of electricity in the area as well. This is already up to 4,000 homes now which translates to a lot more people. My power is currently on – but It has failed 4x already. I will not be surprised if we are without power again! In nearby areas it has been out for three or four days and they cannot predict when it will get back on. The wind is so loud and violent it was impossible for me to sleep ~ so I got up and wanted to knit, but I am out of yarn on two current projects!

So I decided to write this blog post instead amidst the whistling wind. I imagine Wuthering Heights was like this. It feels very bleak! And it is dark and drafty and cold! I am feeling really housebound. I’m bundled up in knitted tights, mufflers and cloaks to stay warm and I haven’t been to the grocery store for over a week! The food choices are dwindling! Just like the yarn! This storm is difficult for someone who usually goes to the yarn store as often as she goes to the grocery store! At first the snow was nice, but now everything has turned to black ice and it is very dangerous. School has been cancelled for four days.

I am going to cook some old fashioned oat meal now. I am burning off calories trying to stay warm and I am really feeling hungry!

For more information on this hat in the works visit me at ladyviolette on Ravelry and check back to see this piece when I get it finished. The yarn is by Noro and the lace  pattern I have adapted is designed by Linda Medina. Details, including yarn sources and the lace pattern are available on Ravelry, the social website for knitters and  fiber artists.


Share

Lady Violette ~ Erte Inspired 1920’s Style Hand Knitted Cloche With Pearly Vintage Accent

Friday, January 20th, 2012

Lady Violette's Rambler Spiral 1920's Cloche Hand Knitted in Cashmere and Silk

Another of My Recent Creations in the 1920’s Mode is a Hand Knitted Rambler Spiral Patterned Forget~Me~Not Luxury Fiber Flapper Style Cloche Hat With Pearly Vintage Accent. I am currently exploring making and wearing elegant knitted hats as feminine fashion pieces as they did in the 1920’s ~ 40’s. Versus the knitted granola hat destined for the ski slope, skate board park or shapeless grunge fashion accent  There are so many beautiful yarns out now that I cannot resist making something gorgeous out of them to put on my head!

I had to attend a 1920’s themed party so I made this little Erte inspired hat to wear with my blue 1920’s vintage dress of the same color rayon brocade combined with a darker blue velvet. I also wore many pearls so I trimmed the hat with a vintage pearly and blue trim piece that I had. I love the way this turned out! And I am already in process making it in two more colors – a dusky berry and a woodsy brown. I have two other stitch variation in mind to try out as well.This is such a cute shape I want to make several of them in many colors ~ perhaps a full bouquet! I am fantasizing about opening a drawer full of them overlapping each other in a rainbow of pretty yarns in many colors!

I used Sublime Cashmerino Silk Aran 10 ply yarn from England and found the basic cloche pattern in  Sublime’s Aran Hand Knits Books. You can use the basic hat pattern with any stitch variation you like. Like all vintage British patterns this one is written to be knitted flat on straight needles and seamed together down the back in finishing. It fits perfectly and looks adorable on. It required 2~50 gram balls of Aran weight yarn but I’m sure I have enough left over to make a knitted flower corsage to pin on one side of the hat. I think that will make a nice accent ~ instead of the pearl piece – when I want a different look. This is definitely a pretty hat design one can wear in the summer!

It’s still snowing here! And very dark outside! When I have the corsage finished and the snow has melted I will get a friend to photograph me wearing the hat and post pictures of it again. I wore it to the 1920’s themed party and it was a hit.

The pearl accent piece is not a vintage brooch. It is 3 vintage buttons wired together in the back and meant to be sewn onto something as an accent. It is a great idea to wire any number of buttons together to make such a “garnish” which is what I have decided to all it. You could also do the same thing with clip earrings. You can untwist the wires anytime to use the buttons as originally intended too! Such a garnish could be used on a coat, jacket, hat, dress, stole, even in your hair! The idea is probably something women came up with during the mend and make do era when they needed to whip up an embellishment in lieu of a jewel to trim an outfit before going out. It is very clever and a great use for pretty vintage buttons.

You can visit my site on Ravelry to find out more about my knitting and see more of my projects. I am ladyviolette on Ravelry. I post photos of the item, yarn and pattern information there so that you can find it if you want to create the same or similar article. If you are a knitter or interested in knitting I urge you to visit Raverly. It is a terrific resource for people with interests in knitting and crochet.

Share

Lady Violette Design ~ Portrait Cloche in Honor of Edward Hopper

Thursday, January 19th, 2012

I know, you have been wondering where I am and what I have been up to. I haven’t been idle! Here is some of the stuff I have been doing!

I have been working really hard on knitting and designing hats, mittens and gloves over the last three weeks. This is a new discipline for me. I have never made gloves or hats before January 1, 2012! And I made a New Year’s Resolution to do so this year! As I mentioned yesterday I am taking classes in these subjects. And, as it is my best personal mode of learning, I am just jumping in and doing some designs of my own at the same time. I feel ready to share a few of them now. So, starting tonight, I’ll unveil one to show you!

Lady Violette's Design ~ A Portrait Cloche in Honor of Edward Hopper

Voila! I created this hat which I am calling my ” Portrait Cloche in Honor of Edward Hopper.” It is hand knitted of hand dyed 100% alpaca which is incredibly soft and warm. Pure Luxury!

I designed and made it to attend an art museum opening of Edward Hopper’s paintings. I wanted to make a hat in the style of the ones the women in his paintings wore. I also wanted it to look like a proper 1920’s ~ 30’s formed felt hat, rather than a knitted hat so I made it very thick and sculptural with a turned back rim and graduated shaping. I made a very thick sculptural bow to cover the left side of the hat. It comes down over the left ear and has the added benefit of being like a very warm ear muff! You could place the bow over the right ear instead if you preferred to do so.

The Overhead View of the Crown of Lady Violette's Portrait Cloche In Honor of Edward Hopper

This hat is very thick and warm, but I may have to try making one with my trademark earmuff bow on both sides now! I’m thinking of ways to keep even warmer on my 4th day of being completely snowed in! And it is still snowing out! We are in the middle of a huge snowstorm in Seattle and I am taking advantage of using this time to post my designs and knitting projects and related stuff on the knitting website Ravelry! (Honestly, I would rather be knitting!)

I’m really happy with the way this hat turned out. I wasn’t exactly sure of what I was doing as I made it but it is perfect and exactly what I had in mind. I am considering writing the pattern so I can offer it to other knitters who would like to make one, but, to do that, I must make another one and carefully write down the steps as I go. I think I should do it in a lighter color so the details really show up. As usual I kept copious design and construction notes on this one, but nobody but me can understand them! I always work the initial design out that way, then redo it for a final run through and perfection test to be sure somebody else can understand and follow them. I probably should point out that this hat requires good technical sewing skills as well as knitting skills.

I wear this one with a vintage navy blue 1930’s coat in wool gaberdine and a purple wool dress. The outfit is totally inspired by the women in Hopper’s paintings who are always dressed in strong clear distinctive colors. I get a lot of inspiration for my clothing from painters. I like to recreate the moods, styles, and colors of the paintings in the way I dress.

Lady Violette's Portrait Cloche In Honor of Edward Hopper ~ Viewed From the Front ~ Features Deep Sculptural Horizontal Ribbing, a Turned Back Brim for Double Thick Forehead Warmth, & Her Trademark Thick Earmuff Bow

My “Portrait Cloche in Honor of Edward Hopper” also reminds me of Dorothy Parker, the brilliant writer, who also dressed really well. She was known for her feminine suits and adorable accent hats like this one. I just know she would have wanted to wear one of these! Do you English majors out there who are interested in fashion agree with me?

I can also wear this hat with a deep purple wool crossover wrap and tie coat with a big ruffled collar. This is more of a 1970’s look, but also very successful. It looks great with this hat. In fact, once I finished the hat I found quite a number of interesting things in my closet that I could use it with. So many I want to go out! I am feeling so horribly house bound! I haven’t been able to get out to go anywhere since last Saturday night. I’d love to get bundled and dressed up in my purple and blue winter ensemble and go to some elegant cafe wearing my “Portrait Cloche.” As soon as I can get out of here I will and I’ll get someone to take a proper photograph of me in the Portrait Cloche In Honor of Edward Hopper in the right atmosphere worn with the right era vintage clothes. This may still be a few days off as it is still snowing like mad! The airports are closed and the streets are blocked off! My classes have all been cancelled.

We only get snow like this in Seattle once every 2 or 3 years. It is inconvenient, but I also love it! I like the opportunity to stay home because I must and get some other things done. And I love the cold and the whiteness and the excitement in the air that the snow brings with it. A lot of people get very upset about their busy schedules getting interrupted, but I don’t. I see it as an opportunity to slow down and get a few things done that I normally do not have time for. Like making a couple of new hats! And setting up my Ravelry knitting site – which is a hugely time consuming project.

And, of course, get back to posting on my blog. So, back to the blog, as I promised and back to the “Portrait Cloche” : Let’s look at some pictures of it from all angles so you can really see what it looks like.

A Profile Shot From the Right Side of Lady Violette's Portrait Cloche In Honor of Edward Hopper. Here I have turned the hat and placed the bow on the right side and toward the back to show a different way to wear it!

I used Baby Alpaca Grande Hand Dye from Plymoith Yarn to make this hat because I happened to already have two balls of it in the perfect colorway of Blue/ Purple. I had hoped to get the hat and big bow out of one skein, but no such luck! It took about 1 and 3/4 altogether. Thus the yarn for this hat cost $40 plus sales tax! Expensive for a hat! But worth it to me. It is very stylish, warm and soft. Alpaca yarn is very luxurious and not at all scratchy. Even people with wool allergies can often wear it successfully. It is important to select non-scratchy or itchy yarn for a hat. I have made the mistake of using 100% wool that caused my forehead to itch and gave me a rash after a half hour. That quickly ruins the hat I spent hours making for me!

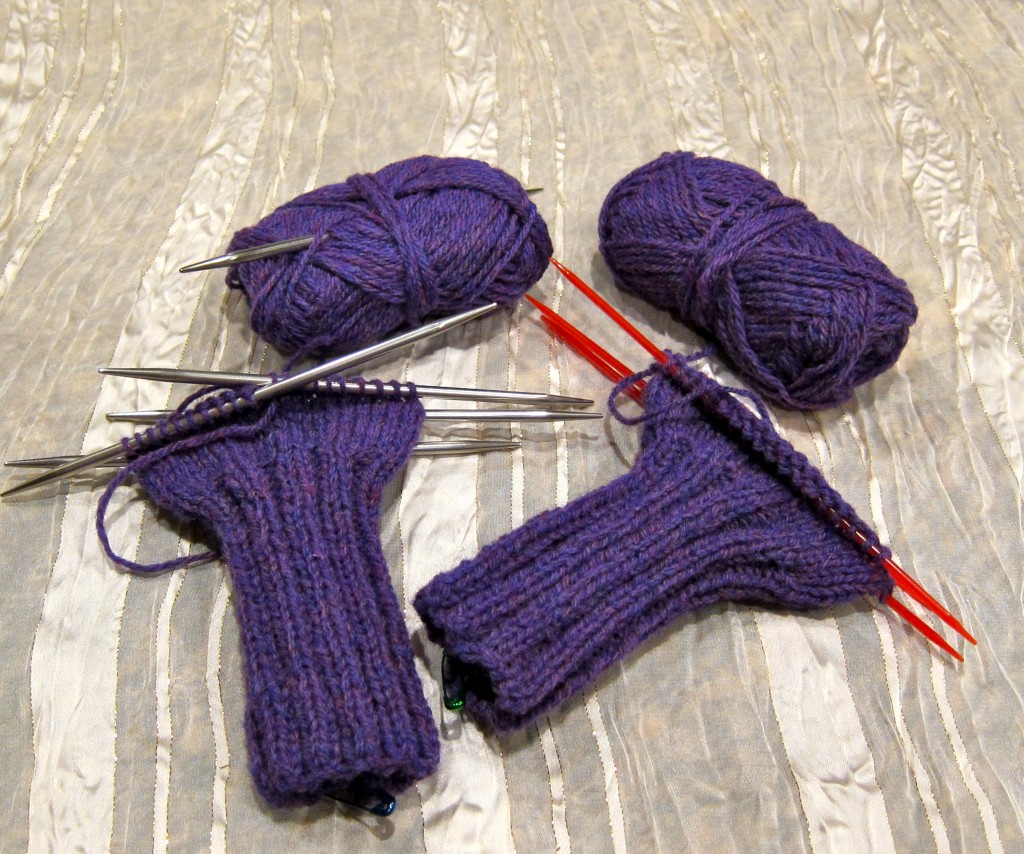
I plan to use the small amounts of left over alpaca yarn to decorate the violet tweed gloves I am currently making with little bows to co-ordinate with this hat. That should be really feminine and appropriate to the era that inspired me. And the gloves will be beautiful with the two ensembles I have described above. Here is a picture of them now as works in progress. I am finding it really interesting to construct them on the tiny tiny needles

Violet Tweed Five Finger Gloves With Bracelet Length Cuffs. This is the first pair of Five Finger Gloves I have ever made!

I am going to try to find another suitable yarn to make a spring/summer version of this hat – hopefully using one ball of a nice looking yarn and costing under $25 to make. I want to offer beautiful patterns that can be made up in affordable yarn. Anybody have any good suggestions? This one needs to be really bulky!

I keep trying to make hats out of one ball of yarn but I keep running out and needing to get a second one. This has happened on the Noro Spiral Beanie hat I am currently making as well. (See my work in progress in Noro Silk Garden in pastel colors and gray. I’ll post a picture of that here tomorrow.)

I am about to begin writing up several of my personal knitting pattern designs so other knitters can make them. I know cost of yarn and supplies is an issue for many people so I am planning to suggest several types of yarns in different price ranges so people have a choice. I am always making new things out of old ones and creating new things out of found fabrics and supplies – so this issue is always on my mind. I’d love to hear suggestions from readers of alternate materials you think would work as well. I’ll seriously consider them.

Lady Violette's Portrait Cloche In Honor of Edward Hopper Folds Flat For Convenient Packing

I will be writing out the design and instructions for making Lady Violette’s Portrait Cloche In Honor of Edward Hopper Soon. When it is done & available I will post it here and on Ravelry. Check back if you want the pattern. We could even do a supervised knit along to make it here on my blog if a few people are interested.

If you are  interested in making this hat let me know.  It is not hard to make. In addition to the ability to read a knitting pattern, you only need  these basic knitting skills:

1) Cast On

2) Knitting,

3) Purling

4) Decreasing

5) Binding Off

6} Sewing a straight knitted seam together in mattress stitch

7) Picking up & Knitting stitches

8) Steam Blocking

About Ravelry. It is a knitting and crocheting social networking website, like Facebook for knitters and crocheters. In order to access it it is necessary to join it, even if you are not a knitter or crocheter or other needle worker. However, it doesn’t cost you anything to join. It is am amazing resource and I feel it is well worth joining even if you  currently simply enjoy looking at what other crafters and fiber artists are doing.

It is also the last word on finding information and sharing your work.  I am ladyviolette on Ravelry.

If you visit me on Ravelry you can view all my current projects in these areas and see pictures and read about my past work in those disciplines.

I’d love it if you come by and see me sometime. So will you, I guarantee it!


Share