Image 01

Lady Violette

The Romantic Lifestyle

Posts Tagged ‘Hats’

Edward Hopper Inspired Portrait Cloche Hat Pattern by Lady Violette de Courcy , Part 2 ~ Knitted Bow Tutorial

Wednesday, February 12th, 2014

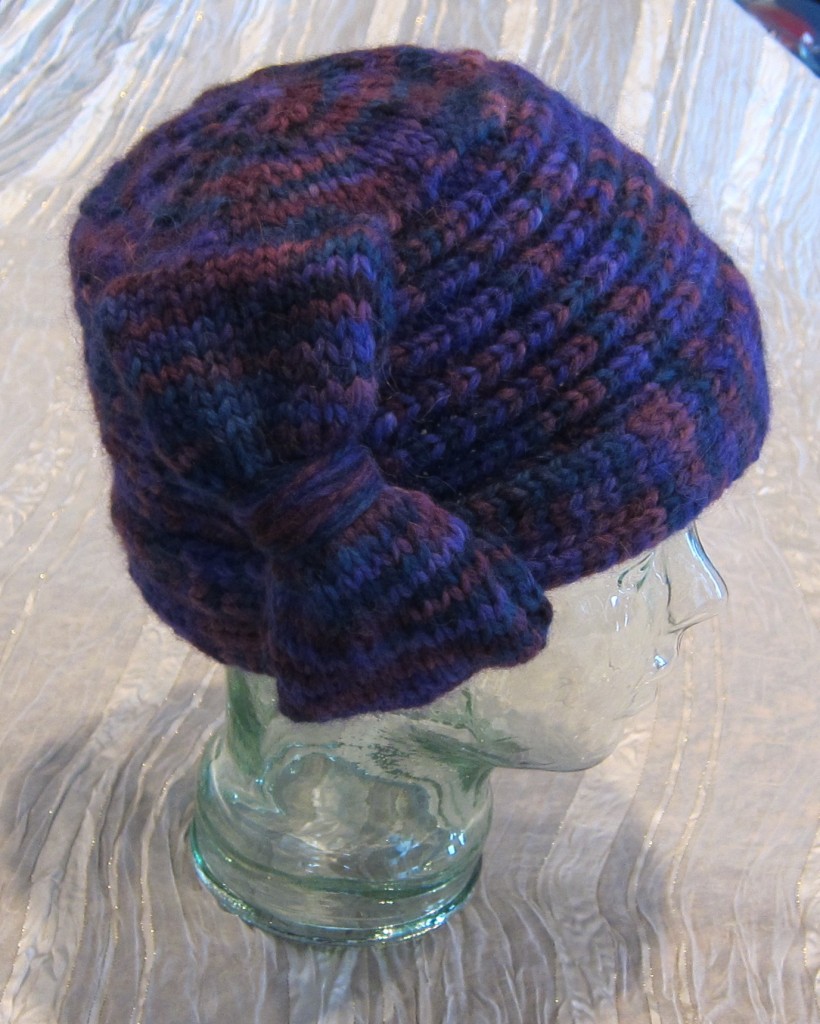
My Edward Hopper Inspired Portrait Cloche Hat Decorated with a Knitted Bow

The Edward Hopper Inspired Portrait Cloche Hat is trimmed with a knitted bow which both adds a decorative vintage touch to the hat and conveniently covers and conceals the side seam over the right ear. The pattern for this hat is in yesterday’s blog post here.

Cast on 18 stitches on Size 8 US needles and work 12 inches of stockinette stitch to make a piece of fabric for the bow.

To make the bow cast on 18 stitches on size 8 US needles in the same bulky weight yarn as you use for the hat. Work in stockinette stitch for 12 inches, then bind off. (Stockinette stitch is Knit one row, Purl one row.) Cut the yarn but leave a tail of yarn about 12 inches long to sew the center seam of the bow together.

Do not block the piece of fabric you have made for the bow. You will want the selvedge edges to curl in order to create a nice soft plump looking bow.

Sew the center seam together on what will be the back underside of the bow when it is attached to the hat. 

Turn the bow and fold ends inward toward the center. Sew the ends together along the center seam which will be on the underside of the bow when it is sewn to the hat.

Turnover and cinch the bow fabric together in the center with a piece of yarn to create the bow tie shape.

Turn the bow so that the right side is facing upwards. Place a piece of yarn under the center of the bow and tie it together to cinch the bow together in the middle.

Gather together , cinch and tie yarn on the backside to form bow.

Bow should be about 6 inches in length.

You have created a fat puffy little bow about 6 inches long. Smooth the edges and both sides of the bow with your fingers to make the shape pretty.

Place bow on side seam of hat to check the fit.

Set it over the seam of the hat to be sure it is long enough to cover the sewn seam and conceal it.

Wrap yarn tightly around middle of bow several times to create the center. Tie securely on back side and tuck in ends.

Next: Wrap a generous length of yarn around the center of the bow several times tightly to create the middle section of the bow. Tie it firmly on the back side so it will stay put. Tuck in the yarn ends. Your bow is now finished and ready to sew onto your hat.

Center the bow over the side seam and make sure one narrow edge is along the edge of the brim fold and the other is along the edge where you picked up and knit the stitches to create the crown of the hat. I think it is a good idea to try the hat on at this point and make sure you like the position of the bow.

Place bow on hat and sew in place.

When you are satisfied with the placement sew the bow to the hat using yarn and a large yarn needle. Sew the bow on securely but only sew through the bottom layer of the bow fabric so that the top layer of the bow fabric is free and stays puffy and full. I sewed my bows to the center along the side seam of the hat and sewed it down along both short ends ~ sewing along the bottom of the brim and attaching the other end of the bow to the joining stitches along the crown.

Only sew the bottom part of the bow loops to the hat. Leave the top sides of the bow free and open so that you can put your fingers inside to plump up the bow.

I left the top loops of the bow free so that I can shape the bow with my fingers by reaching inside them to plump up the bow.

The bow will cover the side seam and the wearers right ear when the hat is worn.

When wearing the hat the bow should be placed over your right ear. It should completely cover and hide the side seam of the hat.

This type of bow can also be attached to a barrette or hair comb and used as a hair ornament. You can make these bows larger or smaller and use them to decorate hair ornaments, hats, gloves, the backs of little girl’s dresses, and sweaters, even gift boxes! Knitted bows are very pretty and very easy to make. Small ones can even be used to decorate mittens and booties or baby shoes! I made one and applied it to the back of a little girl’s knitted coat at the top of a pleat. They are easy to make and have many uses.

The Edward Hopper Inspired Portrait Cloche Hat in two color ways designed by Lady Violette de Courcy

Share

Edward Hopper Inspired Portrait Cloche Hat and Free Knitting Pattern ~ Part 1, by Lady Violette de Courcy

Tuesday, February 11th, 2014

Edward Hopper Inspired Portrait Cloche Hat Designed by Lady Violette de Courcy

I created this Edward Hopper Inspired Portrait Cloche Hat to attend an art museum opening of Edward Hopper’s paintings. I wanted to make a hat in the style of the ones the women in his paintings wore. I also wanted it to look like a proper 1920’s – 30’s formed felt cloche hat, rather than a knitted cap so I made it very thick and sculptural with a turned back rim and graduated shaping. I made a very thick sculptural bow to cover the right side seam of the hat. It comes down over the right ear and has the added benefit of being like a very warm ear muff!


This hat is very thick and warm, but I may have to try making one with a bow earmuff on both sides now! I’m thinking of ways to keep even warmer on my 4th day of being completely snowed in! And it is still snowing out! We are in the middle of a huge snowstorm in Seattle and I am taking advantage of using this time to post my recently knitted stuff on Ravelry! You can take a look at my  Lady Violette Ravelry project page here .


I’m really happy with the way this hat turned out. The construction was an experiment that fortunately turned out perfectly and is exactly what I had in mind. I am writing the pattern so I can offer it to other knitters who would like to make one. I am making this pattern available to you as a free pattern ~ a kind of Happy Valentine to all you knitters out there. I hope you enjoy it.

I wear this one with a vintage navy blue 1930’s coat in wool gaberdine and a purple wool dress. The outfit is totally inspired by the women in Hopper’s paintings who are always dressed in strong clear distinctive colors. I get a lot of inspiration for my clothing from painters. I like to recreate the moods of the paintings in the way I dress. I can also wear this hat with a purple wool wrap coat with a big ruffled collar. This is more of a 1970’s look, but also very successful.

Size: This hat is made with slight negative ease. I made it to fit myself with a 21 inch head but it fit a 22 inch and 23 inch head just fine as well because it stretched, comfortably, to fit. Note: When you fold the brim back you should try on the hat and adjust the amount of fabric you fold back to the individual wearers preference and your opinion as to what amount of fabric turned back looks the best. Based on my knitting experience I do not think you will find it necessary to adjust the number of stitches or the gauge to fit people within the above size ranges for a comfortable and attractive fit. That is between a 21 – 23 inch head circumference. Please note: I am very finicky about patterns being written clearly and correctly. I have tested this pattern by making it twice myself. I have finished knitting a brown one as well and will photograph it to add to this post within the next few days.

Yarn: Use a BULKY weight yarn.  I used Baby Alpaca Grande Hand Dye from Plymouth Yarn in the color way of Blue/ Purple. This is a Bulky weight yarn. The hat and big bow took 2 skeins. Thus the yarn for this hat cost $40 plus sales tax! Each ball retails for $19.95. Rather expensive for a knitted hat but soft, warm and really beautiful so well worth it. The hat itself takes well over 1 skein of yarn and with the bow you will use about 1 and 7/8 skeins. These skeins are 110 yds each. If you are substituting another bulky yarn with the same gauge you should begin with 220 yds.I plan to use the small amount of left over yarn to make small bows like the one on the hat to decorate a pair of purple gloves I have made. There is just the right amount left over to accomplish this.

Needles:  sizes: US 10.5 – 6.5mm, US 10 – 6 mm, US 9 – 5.5 mm, US 8 – 5 mm, US 7 – 4.5 mm. ( Yes! You will need all 5 sizes of needles to create the sculptural shaping required for this hat!) I used 10 inch long sets of straight needles for the brim of the hat and a set of longer size 9 needles for the crown. I think they are 15 inches long. They are the long old fashioned straight needles and I found it really helpful to have the extra length to handle all the stitches at the beginning of the crown section.

EDWARD HOPPER INSPIRED PORTRAIT CLOCHE HAT

Using 10 inch long straight needles as I did or your choice of alternatives:

Work the BRIM:

1) Begin by casting on 42 stitches on size US 10.5 needles

2) Change to size US 10 needles to work the brim:

Mark wrong side with a small safety pin to help you keep track of your work:

Row 1: (Wrong Side) *K2, p1,: repeat from * to last 3 sts, k3.

Row 2: ( Right Side) Work stitches as they appear.

Repeat Rows 1 and 2 until fabric measures 14 and 1/2 inches from beginning edge;

Change to size US 9 needles and continue in ribbing as established until fabric measures 16″ from beginning edge;

Change to size US 8 needles and continue in ribbing as established until fabric measures 17.5 ” from beginning edge;

Change to size US 7 needles and continue in ribbing as established until fabric measures 20″ from beginning edge.

Bind off all stitches in established rib pattern still using the size 7 needles.
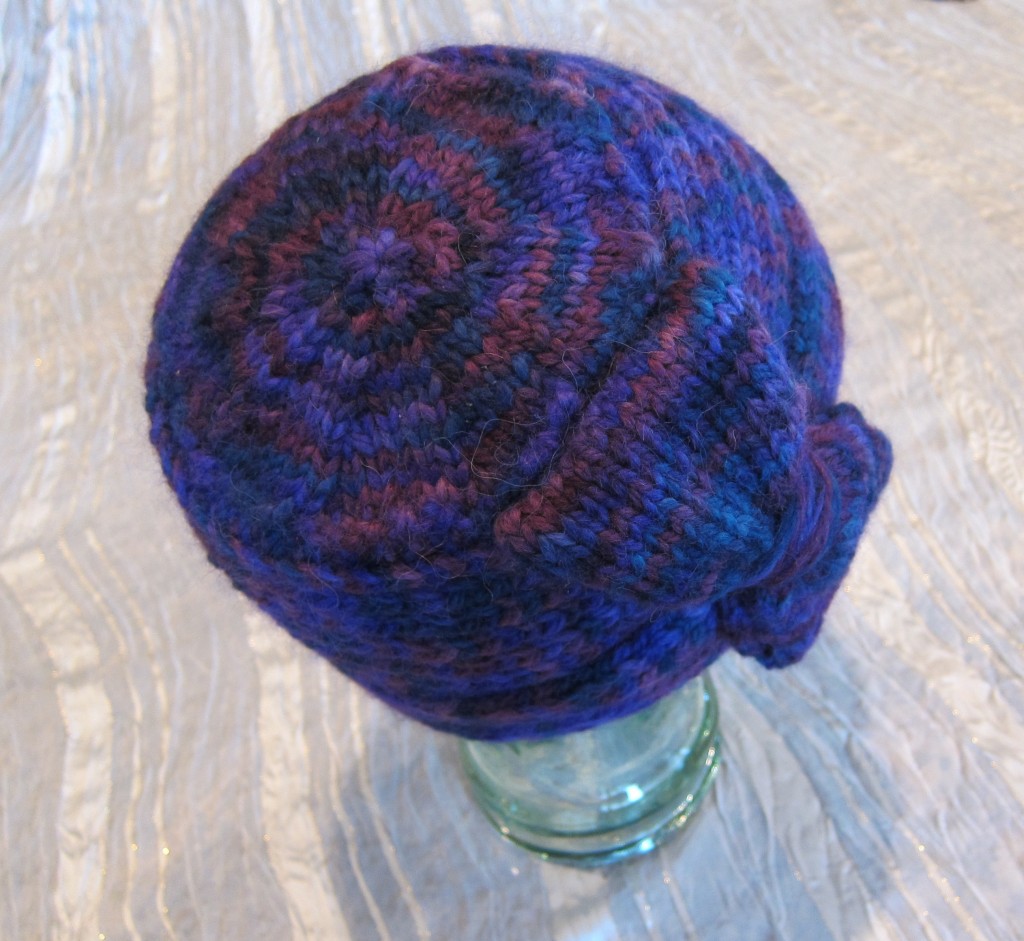
The Crown will look like this from the top when finished !

Work the CROWN:

Using long set of straight US #9 needles, Right side facing, begin at Cast On edge and Pick Up and Knit 68 stitches evenly divided along the selvedge to the Bind Off edge.

Rows 1,3,5,7, and 9 : ( Wrong Side) Purl.

Decrease Rows:

Row 2: K1, *k4, k2tog; repeat from * to last stitch, k1 = 57 stitches total.

Row 4: K1, *k3, k2tog; repeat from * to last stitch, k1 = 46 stitches total.

Row 6: K1, *k2; k2tog; repeat from * to last stitch, k1 = 35 stitches total.

Row 8: K1, * k1, k2tog; repeat from * to last stitch, k1 = 24 stitches total.

Row 10: K1; *k2tog, repeat from * to last stitch, k1 = 13 stitches total.

Row 11: P1, *p2tog; repeat from * to last 2 stitches, p2 = 8 stitches total.

Break the yarn, leaving a 10″ tail. Weave tail through remaining 8 stitches twice, then tie off on inside.

SEW SIDES OF HAT TOGETHER:

Thread yarn on a large eye yarn needle and sew sides of hat, including the sides of the crown, together in method of your choice,  being careful to match the lines of ribbing together.

FITTING AND FOLDING BACK EDGE OF BRIM:

Try on hat. The seam should  be on the right side. The narrower portion of the graduated size ribbing should be in the front of the hat. Turn edge of brim back approximately 1.5 to 2 Inches. It should be turned back the same amount all the way around. How much is a matter of desired preference. I turned the brim back so that the edge rested on the lower portion of the 6th ridge of ribbing. Make sure it is evenly turned back all the way around and the hat and brim are adjusted to your preference. Thread yarn needle with yarn and starting on Inside of hat, under the folded back brim, insert needle all the way through the brim inside of a ribbing channel. Then insert needle from front to inside so that you are making one invisible stitch through all the layers of the brim to tack it down securely and hold the folded back brim in place. Tie this single tacking stitch down, then cut the yarn and repeat the process about 4x evenly spaced inside of the hat to keep the folded brim securely, but invisibly in its folded back position.

MAKE BOW:

Using US #8 needles cast on 18 stitches. Work in Stockinette Stitch until piece measures 12 Inches in length. Bind Off. Sew the two 18 stitch long edges together.  Fold so that the seam is inside and  underneath and in the middle of the piece. Take a generous length of yarn and wrap this piece in the middle cinching it together to form a stylized bow. Secure on the wrong side under the seam. Place this bow over the side seam of the hat vertically and sew it down firmly to completely cover the seam on the turned back section of the brim and the side seam of the hat above it. Sew it down firmly all the way around. It should be worn placed over your right ear.

I have added a Part 2 to this pattern, The Knitted Bow Tutorial

FINI
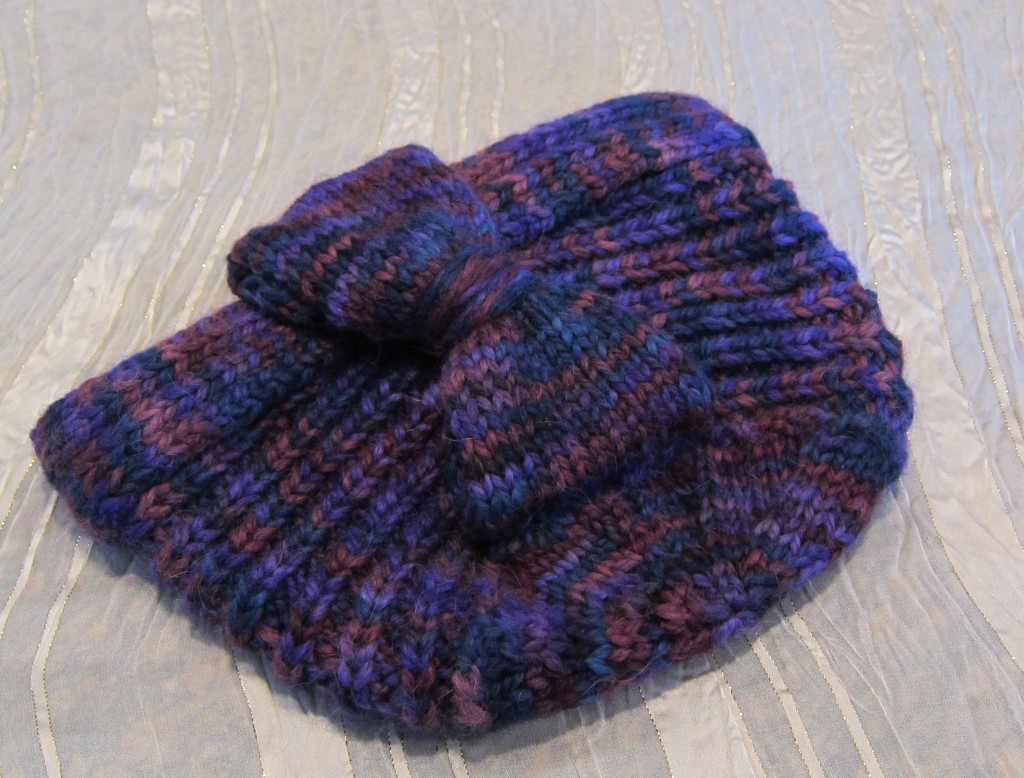
The bow sewn into place covering the right side seam of the hat. Bow is placed over the right ear when hat is worn.


Share

Jane Austin Discussing Her Hat

Monday, January 27th, 2014

From Jane Austin – Letter to Cassandra, 1798

“Next week shall begin my operations on my hat, on which you know my principal hopes of happiness depend.”

Just began knitting a new hat and remembered this delightful quote from Jane! Times haven’t changed. If this turns out well I, too, shall be very happy!

Share

It’s Spring So Let’s All Get Inpired to Wear Hats Again & Consider the Princess WOW! Hat Collection Funding Campaign on Indiegogo, too!

Tuesday, March 5th, 2013

A Classic Handmade Feather Beret From Lady Violette's Personal Hat Collection in Brown and Green Handmade by Millinery Artist/ Designer Princess WOW!

I was going through my own collection of hats this weekend while getting out some pretty ones for the spring season when I received a notice from my milliner friend Princess WOW! about her Indiegogo campaign efforts. She wanted my help to spread the word. I am glad to do so through this post, but I also want to get people back into the mood to wear hats! Easter is around the corner – a classic time to wear a pretty hat and hats just generally inspire people, cheer them up and make them feel better. As the flowers begin to bloom again in the spring women should take inspiration from them to bloom beautifully in pretty hats and colorful scarves as well! It is a wide open opportunity to express ourselves in the performance art of wearing a hat which is always fun, easy and a lift for the spirits of both the wearer and those viewing her wearing the hats! Hats, are an innocent and easy way to bring people pleasure. Wearing a hat is fun and takes some personal style and confidence – as demonstrated by the young lady in the picture at the end of this post.

Making hats is a special skill ,as is marketing them, as you can find out by reading this: Mindy Fradkin attended New York’s prestigious Fashion Institute of Technology to learn to make hats in the classic way from old school masters of the craft. She is now Princess WOW! – A Milliner Extraordinaire –  working to raise money for her new collection of beautiful artistic hats through an Indiegogo fundraising campaign. This is a worthy cause if you love hats, hat makers and designers and you can participate on a small or large level. Here is the link to the campaign which is an interesting thing to know about in itself. I am hearing more and more about artists and businesses raising money for their projects in this manner and having read her funding campaign now understand more about how these work. If you are curious about that as well as helping her raise the funds she needs I suggest you check it out too! Mindy Fradkin is Princess WOW! the hat designer, and she has done a good job putting her proposal together. I have known her for years and own over 20 of her beautiful timeless hats myself.  I can testify to her design brilliance and reliability. Of course it costs money to put together a collection and even more to attend high end craft shows where people can go to see and buy your hats. There is much more detail to the millinery business than putting decorations on a hat! Go here to read about what she needs to do and gain appreciation for the business side of millinery as well the beauty of handmade hats.  //igg.me/at/princesswowhats.

I love wearing hats myself and have amassed quite a collection of artist made and vintage ones over the last two decades. I have been a personal client of Princess WOWS! hats since the early 1990’s! I wrote an article about what happens to me when I wear one of her hats for a magazine in New York years ago.  Here it is again, to get you into the mood of wearing a Princess WOW! hat yourself.

“Confessions of a Head Turner” – or What Happens When I Wear a Beautiful Hat.

“Confessions of a Head Turner ” was originally  written by Lady Violette for Princess WOW! when she was primarily  known as Mindy Fradkin’s Important Hats. It was published in 1995 in Breukelen Magazine in NYC  with accompanying photos of  Lady Violette wearing Mindy’s hats. It still holds true and it is still fun, so we decided to bring it out for contemplation if you find yourself considering wearing hats again this spring and summer as we do. (We being Lady Violette & Princess WOW! and our young model Mademoiselle Coco.)

Over the years we became good friends through out mutual love of hats and our design work together. It is also interesting to note that, years after I originally wrote this piece, Princess WOW! met her husband, artist Roland Mousaa, because he saw her wearing one of her hats while waiting in a line to be seated at a restaurant. Just as I wrote, something special always happens when you wear her hats! A real life adventure!

Now Mindy Fradkin is Princess WOW! and her main focus has changed from making hats to her work for The Smile Revolution but she still makes and wears her own hats in her concerts and performances and for private clients. Lady Violette has taken good care of all her Important Hats and Princess WOW! hats and still wears them regularly. We love hats! And spring is coming! A new hat for Easter has always been a tradition! So, it has gotten me  thinking a lot about hats ~  Hats off to Princess WOW!  And a stroll down memory lane with ~

“The Confessions of  Head Turner”

I love to wear Mindy’s Important Hats. I never go without an Important Hat. I have two dozen of them. They make adventures happen.

I meet men. Men follow me. I feel mysterious, like a heroine in a novel. Like Zelda Fitzgerald or Greta Garbo. In an Important Hat you create an indelible impression… you become an enigma, unforgettable, memorable…

It’s evocative of romance and another time. A hat is an emphatic statement. Jewelry is more subtle, smaller, meant for close up. A hat can be seen across a street or restaurant. At a distance in a gallery or museum. It casts the wearer’s magic spell…

In giving up hats, women gave up coquetry. Mindy’s hats bring it back, but they are not vintage, not ingenue. They are totally modern & sophisticated, they’re history, too…

They’re true art, completely original form and construction. The simplest looking design transforms a face.

She is the Rodin of the sculptured hat.

When you wear her hats heads turn.

I began collecting Mindy’s hats if 1992. Now I can’t stop!! Each hat represents a different facet of my inner personality to the viewer. They allow me to express the different aspects of my character.

Together Mindy and I continue to discover more ~ a great talent in a designer for her client.

Thank you Mindy for presenting my many inner characters to me and to the the world… To love me you (I mean anyone,) must know me. Your hats project aspects of my inner soul to the outside world (when I choose to do so by wearing one.)

Lady Violet de Courcy, Ballet Dancer, Jewelry Designer, Writer and Mindy’s Muse

Mindy Fradkin-Mousaa, now The Princess of WOW! & renowned hat designer and comedienne performs using her hats, in shows and concerts and at “Hat Happenings” regularly around New York City. She also currently works for The Smile Revolution raising conscious awareness for the healing power of a genuine smile. She is a singer, songwriter, and concert promoter but still creates wonderful extravagant hats for private clients and participates in select craft shows  You can contact her at:

www.theprincessofwow.com

For INSPIRATION here is something to think about! Madamoiselle Coco below, who is 4 years old, wisely says, “You can wear hats anytime and all the time.”  Here she wears a white vintage hat with a veil while out doing errands on a Saturday morning.  She says “You can always wear a hat. It makes every occasion special. You do not need a special event or an occasion such as a wedding to wear one! ” Here she is getting a manicure at the local village salon where her unique personal style and lovely vintage veiled hat garnered quite a few compliments! This stylish young lady already has a collection of special hats! “When you wear a lovely hat people smile at you and stop to talk to you and compliment you on it. They tell you how much they like it and they want to meet you! Sometimes they even tell you that seeing you in your hat makes them feel happy! Wearing a hat is definitely worthwhile!”

A lovely young lady - Mademoiselle Coco - wearing a vintage hat with veil shows us that we can wear hats as we go about our regular activities everyday!

Share

Marlene Dietrich in a Fabulous Fur Hat ~ “Fur is Fabulous” Isn’t it?

Monday, January 14th, 2013

Marlene Dietrich in a Fabulous Fur Hat!

“Fur is Fabulous” is my personal favorite quote ~ I made it up myself for myself ~ and tonight I came across a great photo of Marlene Dietrich in a fur hat that I want to share with you. I suspect this might actually be a fur muff that she plopped on top of her head like I did to create a fur hat during a photo session. Anyway, I like it!

Fur is Fabulous~ photo by Leigh LeDare

Just for fun, here is my own Fur is Fabulous picture of me wearing my black fox fur cuff spontaneously plopped on top of my head during a photo session as a hat.

Share