Image 01

Lady Violette

The Romantic Lifestyle

Posts Tagged ‘Sewing’

Lady Violette’s “Belted Half Dress Drape” ~ A New Scarf Style ~ How to Wrap It & Wear It & Transform a Dress!

Wednesday, April 13th, 2011

Necessity is the mother of invention. I needed to figure out something impressive and dramatic to wear to a midday meeting with a producer/ presenter. I needed to look creative and talented and be memorable. I wanted to look ultra feminine as well because I feel that works to my advantage. I wanted to look both business-like and artistic. I felt that sensual and attractive would work, but I did not want to look not overtly sexy. Although it is spring it is also still cold out and I needed to be warm. I find that wearing tights and  layering scarves and shawls over dresses traps air and creates a cozy layer of practical extra warmth. I cannot think and relax if I am cold! It has been in the 30’s all week. It has been wet and windy, even snowing and hailing. And it has been drafty everywhere, both inside and out. All these thoughts were at work in the back of my mind. And this was only what I had to be thinking about what I was going to wear! The other things on the agenda were on my mind as well, but I felt I had them under control. I just wanted to figure out something to wear in which I would feel comfortable and confident, and have my outfit and accessories all worked out in advance.

Browsing through the Nieman Marcus online catalogue for ideas yesterday I found an immense Oscar de la Renta scarf and a wide belt that I loved. Alas, the scarf was $850 and the belt was $395. I couldn’t buy that right now, but I was determined to have the look! So I sorted through my things to find my biggest scarf and a belt of similar width. They don’t give the size or the shape of the Nieman Marcus scarf, only the price! It looked big and it looked like a square.

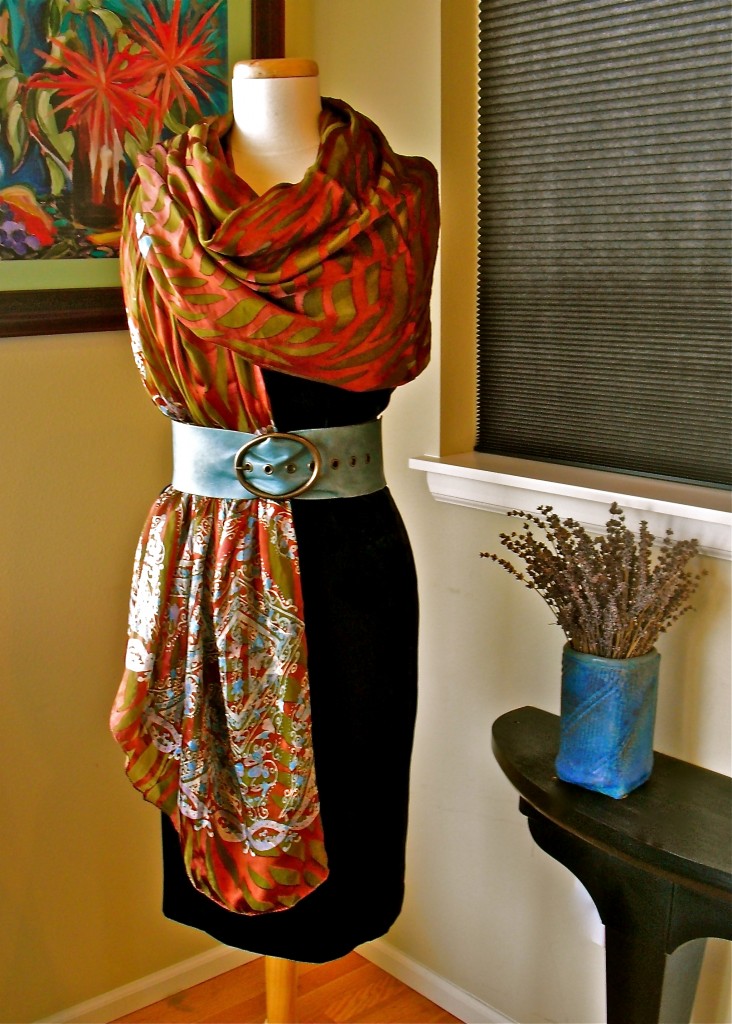
Front View of the "Belted Half Dress Drape" Achieved ~ Transforms a Dress with Just One Wrap & a Wide Belt!

I don’t currently have a gigantic square, but I do have a brown and olive green gigantic oblong silk scarf that measures 45″ x 96″. It is basically an 8′ x 45″ wide piece of fabric, but it is printed with a blue and white floral design at both vertical ends like a border print, so it was designed to be a scarf, shawl. or stole. I also found that I had a blue leather belt about 3 inches wide.

The idea I had was to make what I have named a “Belted Half Dress Drape” using the gigantic oblong silk scarf  and securing it with the wide color co-ordinated belt. I wanted to transform my basic sheath dress into a cinch waist draped silk dress by using one simple to do wrap and belting it! I wanted the finished style to look like one of the very expensive European or American designer silk draped sheath dresses I have been seeing in fashion magazines and stores lately.

Thus I concocted my “Belted Half Dress Drape”  Scarf Style.

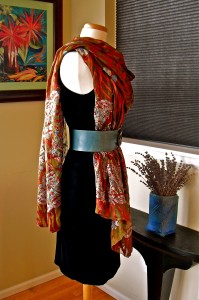
3/4 or Right Side/Front View of the "Belted Half Dress Drape"

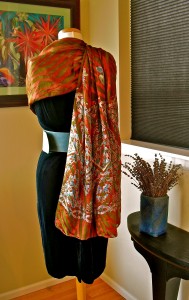
I think it worked quite well and it was amazingly easy to do! I have taken photos from all angles so you can see that my new “Belted Half Dress Drape” scarf design actually looks nice and works as a dress from back, side and front views!

As you can see the “Belted Half Dress Drape” is beautiful from all angles.

I think wearing a scarf beautifully is one of the ultimate feminine arts!

Step #1) Drape Scarf Over Shoulders, Left side Longer Than Right as Shown.


To create this sensual style all you do is:

Step #1) Drape 96″ long or longer scarf around the back of your neck and over your shoulders, Left side longer than Right as shown. Right side reaching almost to the hemline of your dress. Spread the Right side out to fan over your body from the center to the Right side seam of your dress.
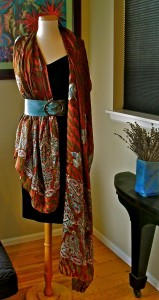
Step #2) Fasten the Belt Around Your Waist with Right Shorter Side of Scarf Underneath It & Left Longer Side Hanging Free.

Step #2) Fasten the wide belt around your waist with Right shorter side of scarf underneath it and Left longer side of scarf on the outside of belt hanging free over your Left shoulder. Arrange the folds of the scarf to your taste like a little half dress that covers the right side of your body.

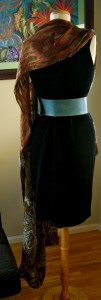
Step #3) Check the Back View in a Hand Mirror After Putting on the Belt. It Should Look Like This!

Step #3) The back will look like this! I found it helpful to look at the way things were arranged in the back in a full length mirror using a hand mirror. Be sure that only the Right front shorter side is tucked under the belt. The Left longer side should be hanging freely off to the Left side in a casual manner like this.

I experimented with the arrangement of the front folds and found that I preferred them to be uneven and arranged like a gathered skirt in the front. This was softer, prettier and more feminine than a straight across the bottom hemline. I pictured a Grecian draped effect as my goal. It may be helpful to strive for that as you arrange your folds.

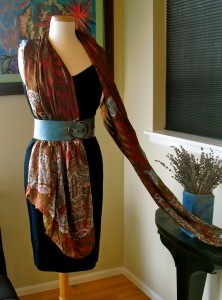
Step #4) Gather Up the Long Left Side of the Shawl and Drape it Over Your Right Shoulder!

Step #4) Finally gather up all the fabric in the long Left side of the shawl and drape it loosely and casually over your Left shoulder around your neck and over your Right shoulder letting the long drape of fabric hang down your back! You will need to arrange the drape in your own individual manner in a way that is pleasing to you.

I was able to do this on myself in about three minutes! I wore it around the house for a couple of hours and it actually stayed put and maintained the original look while I tested it out. I did not pin it in place, but you could use a brooch on the Right shoulder to hold the finished drape in place or just decorate it if you want to.

I encourage you to experiment until you find the way that is comfortable for you. I try things out the night or day before I plan to wear them if they are new looks for me. This way, if I need a supply to hold myself together, (or who knows what!) I have time to get it ready in advance.

I’ve written instructions on making your own gigantic scarf like this one on my next blog post. Check it out!
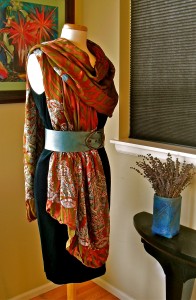
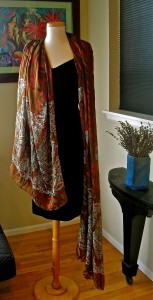
Step #5) To Finish the Beautiful "Belted Half Dress Drape" Scarf Style, Arrange the Way the Fabric Loops Around Your Neck and Adjust the Folds and Gathers in the Half Draped Skirt to Flatter Your Face and Figure and Please Yourself.

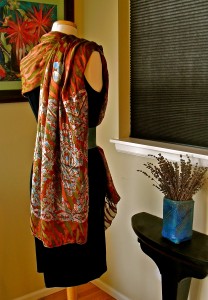
Finished Back Right Over the Shoulder Shoulder View of the "Belted Half Dress Drape" Scarf Style

Finished Back View of "Belted Half Dress Drape" Scarf Style

Finished Right Side View of the "Belted Half Dress Drape" Scarf Style

Share

I got a spinning wheel! I knit, I sew, and I want to spin my own yarn!

Monday, April 11th, 2011

The Wonderful Spinning Wheel I Got at the Children's Hospital Auction

Yes, I got a spinning wheel. am I crazy? As if I don’t have enough to do already! But I have always been interested in spinning. I love using vintage sewing machines and other tools and have a penchant for acquiring them, renovating them if need be and learning to work with them. Almost all my appliances are vintage and I seem to be going further and further back in time with what I am acquiring lately!

It’s fascinating! Maybe it is a good way to fight aging! It keeps me so absorbed I don’t think about that! Plus it takes me back to my own childhood experiences.

I spent summers on my grandparent’s sheep and cattle ranch in southern Idaho as a child. My grandmother raised sheep for the wool and had her shorn pelts washed and carded at the Pendelton Woolen Mills, then sent back to her so that she could spin her own yarn. It was soft and luxurious.

She taught me the basics of knitting when I was 5 years old. I learned on five needles in the round. I learned fair Isle multi-stranded and multi-colored techniques and I learned on small needles. I do not recall her owning any needles larger than a size 2! I was fascinated by knitting then, as I am now, and found it difficult to put it down once I got started. There was a long period in my adult life when I was too busy with other things to do much of it but I always managed to go back to it again and am heavily involved in it now.

Knitting is slow going but the best way to handle stress I have ever discovered. And there is always more to learn.

Yarns are also gorgeous. I didn’t learn to spin from my grandmother but I always wished I had.

I happened to stop into the Children’s Orthopedic Hospital Thrift Store when they were holding a silent auction and saw this beautiful wheel in perfect condition with all it’s parts in tact. It had been very well cared for. It was on a triple bill with a treadle sewing machine, also in great condition, and a beautiful old rocking chair. You had to bid on all three together. I did it. But I really didn’t think I’d win. I wasn’t able to place a very high bid.

As it turned out I was the only person who placed a bid! I ended up winning all three items. All of them were from the same donor, are in very good condition and are complete. I was really lucky. All I have to do is get a new belt for the treadle sewing machine which I intend to do in the summer. The machine is a White and it is in a lovely oak cabinet. I learned to sew on one of these as well. My grandparents had their original treadle and several Singer electric machines. Everyone sewed a lot so they kept them all.

I don’t know what ultimately happened to their old machinery. It either went to other family members when they died or was disposed of. I was far away in other parts of the country when that happened.

But, ultimately, I think I was lucky to have been taught all these skills growing up. I think about my grandmother and everything she taught me whenever I work on any of the projects I do using those skills. She was a very good teacher, but I was so young I think I also absorbed these skills through osmosis just being around her. She said she taught us how to sew and knit so that she could keep us busy while she was doing it and get her work done. She taught me, my brother and my cousins all the basics about sewing, knitting, gardening, cooking, and animals. She loved animals and had a multitude of pets ~ dogs, cats, peacocks, horses, chickens, sheep, goats, etc. ~ as well as farm animals. She was also a woman of great style as she had trained in Switzerland to be a couturier before marrying a rancher. Long story, more later….

And I’ll post pictures of the rocker and the treadle sewing machine later as well.


Share

Was this One of Greta Garbo’s Mata Hari Film Costumes? Or an Evening Dress Inspired by Dietrich in Shanghai Lily?

Tuesday, April 5th, 2011

Charming Pagoda Sleeves

An amazing 1930’s vintage evening dress has recently found it’s way into my collection of wearable vintage oddities! It reminds me of something Greta Garbo would have worn in Mata Hari! Where else could it have come from? It is not Siamese but has  Siamese and/or Thai influences. It looks like some designer was inspired by both exotic oriental costumes and Hollywood’s rendition of such for films like Mata Hari and Shanghai Lily starring Greta Garbo and Marlene Dietrich respectively.


Mata Hari Inspired 1930's Evening Dress

The dress is outrageous and fun! It is not in the best condition, but I am sharing it with you as found before I do any restoration and repairs on it. The thread is old and rotted and it rips when the dress is tried on. It is made of silk brocade. From a distance and in a photograph it looks alright, but close up it has serious problems. It is coming apart at the seams as they say! It is watermarked or something like tea or coffee or wine has been spilled on it. So it is badly splotched in large areas, but it blends in well because of the print and the colors of the gown and you cannot see these problems unless you inspect the dress closely in person.


Mata Hari 1930's Evening Dress Backview

I don’t think the fabric is strong enough to withstand dry cleaning. And I don’t think it is safe to wash it because it is silk brocade. It could be worn on the stage or for photographs because the stains do not show up at a distance. However, the fabric and the seams might rip if an actress were to move while wearing it! I had to handle it very carefully when trying it on myself and when putting it on the mannequin to photograph it. It felt, and sounded, ready to give out at any moment. By sounded I mean I could hear little threads stretching and tearing with the slightest bit of strain put on them. And you cannot put anything on without exerting some strain on the fabric and the seams.


Mata Hari 1930's Evening Gown Featuring Fitted Bodice and 28 Jeweled Buttons

Given all these negative condition issues this piece is probably best relegated to the category of a study piece. That is a piece of vintage attire or a historical costume that is fragile but worthwhile to keep as is for study and reference. Sometimes I make completely new copies of such pieces if I really want to be able to wear them.This can be done for theatrical costumes as well. I think this one is a perfect candidate for a copy made in the orient by a professional tailor. To measure of course, so it would fit perfectly. I think such a tailor could improve on the construction of this type of dress using his or her traditional techniques.

It is designed to be figure hugging through the bodice, waist and hips, then the skirt flares outward. It has amazing jeweled buttons! 28 of them! In perfect condition without a single stone missing! Wow! These are very high quality buttons which would cost a fortune now! There are 26 down the front and one on each sleeve for accents. These close the front of the dress with self fabric loop buttonholes made for closures.


Seductive Cut Out Back of Mata Hari 1930's Evening Dress

The skirt is beautifully shaped ~ smoothly over the hips, then flaring outward to achieve a lovely fuller skirt that is longer in the back. ~ note the shape from the back! Also take notice of the shape of the cutout back! Gorgeous! Isn’t it?


Topstitching on Sleeves & Collar

Then there are the amazing sleeves! I call them Pagoda sleeves! They remind me of little pagodas. They are open at the top and buttoned together. I love the way they stick out to the sides and point up. They are heavily topstitched in many narrow rows as is the super pointy butterfly collar!

Mata Hari 1930's Evening Dress with 26 Buttons Down the Front and 1 on each Sleeves

The dress was found in an estate sale in London by two friends of mine who shop there for their vintage furniture store. They think it is from the 30’s. So do I. There is no designer’s label or fabric content label to help us identify its origins.

Vintage Glass Jeweled Buttons & Fabric Loop Buttonholes

The buttons look like European ones made in the 1920’s and 30’s of base metal and glass. It is a small size. Approximately a size 2 and designed to fit a woman of petite stature.

Waistline Slopes to Point in Back

I love the way the waist slopes down to a point in the back, If you click on the full length and torso length pictures to open them you will be able to see this better, It always slims the waist beautifully to do this! The front of the bodice at the waistline slopes into zigzag points on this dress as well. You can see this in the very first picture at the beginning of the posting and in the photo showing the line of buttons down the front of the bodice. Notice how the fabric is beautifully laid out in the back so that both sides match exactly! This was common in older clothing and is something often overlooked by today. I appreciate this detail. It is one of the major reasons I love vintage – the care with which the clothes were made, the fabric was matched, the stripes and plaids lined up, etc. When the pattern pieces are matched on both sides the body appears balanced.

If anyone has any knowledge of the backstory on this dress or has seen another one of them would they please notify me?  I really would like to know more about it if possible, eventually.

Share

Vintage Coat ~ Found at The Goodwill, Then Refurbished, Repaired and Restored, What’s Involved ?

Wednesday, March 30th, 2011

1940's Plaid Wool Vintage Coat

Well, here it is. Finally finished and I have been wearing it for a few days. And people are saying it is so neat and I am so lucky to find such wonderful things. Then they tell me they look but never find anything so cool.

This was not as you see it now when I found it. So I want to explain what was involved.

It was extremely dirty, the lining was rotted and torn. When I slipped the coat on to try it for style and size the lining tore. It was essentially decomposing. The coat was missing several but not all of its buttons. They were same cloth as the coat covered ones rimmed in brass metal.

I decided the coat was worth attempting to restore style wise. Step number one was buy it. It cost $19.99. Take it home, quickly remove the lining, and wash it by hand to use as a pattern for making a new lining. Then package the coat in plastic, in case it had any moths living in it. I never risk letting moths come into my home and get into my clothing. Then, I immediately put it in my car and next day took it to the dry cleaners.

It cost $20 to clean the coat. While that was being done i shopped for lining fabric. I got a shiny satin like milium lining in a rust orange color. I removed all the seams in the lining I had removed and washed. I pressed it. Then I laid them out and pinned them down to my new lining fabric like pattern pieces and cut out my new lining. I sewed it together. And pressed a narrow hem into the raw edges all the way around.

I picked up the coat at the cleaners. It was not looking bad! But it needed some reweaving where the weaving of the tweed, which is a loose weave needed to be reinforced. And some of the seams needed to be redone as the old fabric and thread was beginning to rot. I re-stitched most of the seams for this reason. some by machine and many by hand.

Then I inserted the new lining and hand stitched it into the coat at all the edgings. This was quite time consuming actually! But it was looking good and seeming worth the effort.

The last thing that needed to be addressed was the buttons. I looked at modern ones. I went to four fabric stores looking! They just didn’t cut it. So I ended up moving two of the original 6 covered buttons onto the cuffs. I went though my huge stash of vintage buttons and, luckily I found three strange giant brown ones either plastic or bakelite, that had a perfect accurate 1940’s feel to them – because of course they were from that era! Nothing newer, that I could find would work on this coat.

I decided that it was OK to use different buttons on  the cuffs and on the front of the coat! So that is what I did. I have two covered buttons on  the cuffs and the big authentic 40’s ones down the front. The coat is finished!

It is lovely and warm because the collar buttons up to the neck snugly. The plaids are perfectly matched in he way the pattern was put together and sewn. The colors look very good on me. I’ve gotten a lot of compliments on the coat! Such as, yesterday in an elevator somebody said to me, “Wow! You’ve totally nailed that vintage look!” (That’s a compliment.)

The coat is wonderful now because I saw its potential and I was willing to put the time, money and effort into restoring and repairing it. I didn’t just buy it off the shelf that way! I have seldom found any piece that didn’t require restoration. I put many hours into sewing it back together and looking for the lining fabric and buttons.  All that and the expensive professional dry cleaning! I won’t wear anything used with out washing it or having it cleaned. You never know where it has been or what it has been through when you get it at these places.

So, I paid about $23 for the coat with tax, same for the dry-cleaning$23 with tax , then for the new lining fabric we can safely say another $25, the 3 special large vintage buttons I used on the front would easily be $8 apiece at a bargain. – that gets us up  another  $27 including tax had I had to buy them. (I had them on hand but had bought them earlier.) When all of this is accounted for I have spent about $100 for the coat plus my time, knowledge and tailoring expertise to reline and reassemble it. I know this would have cost at least $100 if you had to have a tailor do it.

I do have a fabulous vintage wardrobe, but probably because I have been collecting things and repairing them over many years. Not because I walk in and buy them that way at the Goodwill or Salvation Army.

I have bought some things that were not strong enough to make it through cleaning. When that happens it is just a risk you took. And when that happens you have lost the money you paid for the article plus the cost of cleaning and you have nothing for it! It can be very disappointing!

I do not see my plaid 40’s coat as a bargain! I think I paid quite a lot for it in terms of time, effort and money. I really like it and it is a very warm practical unique coat so it is completely worth it to me.

Contrary to what some people think you don’t often buy vintage items off the rack ready to wear. There is often a lot of work of be done to get old garments to that point.


Share

A Fun Day of Sewing Charming 1950’s Styles in Crispy Printed Cotton

Sunday, March 27th, 2011

Butterfly Apron ~ Original 1952 Design

The Feminine Arts in Action


Today I made a couple of fun and easy ultra feminine vintage goodies out of flower and butterfly and polka dot printed cotton. It is so fun and relaxing to work with compared to slinky slithery silks! And it goes so much faster. Very rewarding!

I made a 1952 Vintage Vogue Apron from currently available Vogue pattern number 8643 ~ view A. I love the giant super functional pockets, the practical length and the fact that it required 3 packages of bright pink rick~rack! That is 7 and 1/2 yards! Wow!

Great Big Piockets with Great Big Rick~Rack!

It is so springy and cheerful! I am currently in love with colorful aprons and pinafores and printed cotton dresses! The fabrics are so cute and the styles are so girly. I want to start wearing them as accessories all the time while I am working at home. They make me feel good, like wearing perfume does, or having a bouquet of fresh tulips on the kitchen table. They are so colorful and so uplifting! Easy to make too. It is no wonder they were so popular in the 50’s! They make you feel good. Psychologically!

Little Girl's Twirly Skirt


I also made an adorable size 3T full circle skirt in bright pink polka dotted cotton, with green butterfly pockets, waistband and bow from leftover apron material. I made miles of handmade bias tape for the hemline of this little skirt out of a third pink and green printed fabric.

Pleated Butterfly Pocket Trimmed with Custom Made Bias Tape and Button


It runs along the top of the pockets and around the bottom of the hem of the skirt. It shows up better in person than in this little photo. And it is a really nice touch in person. The pockets  also have pleats and are trimmed with little pink buttons. This little girl’s skirt is made from currently available Simplicity pattern 2356.

I had a special request for a butterfly skirt! And just enough fabric left over from the apron to make two pockets with the butterflies strategically positioned with one on each side and tilted a bit so they look like they are in flight. I think it is a hit! It is going to be a surprise and I am quite sure the little three year old fashion plate I made it for will absolutely love it! I have enough leftover fabrics to make her some matching doll clothes too!  I intend to do a doll skirt just like the little girl’s skirt!

Interesting Front T~Panel Construction

This kind of sewing is so much fun. I love mixing the fabrics, and adding as many girly details as I possibly can. That would be multiple pink and green printed cottons, pockets, bias binding, decorative buttons, top stitching, inventive pockets, and, of course bows!

The apron features a front T~panel construction which eliminates gathers across the stomach and creates a very slimming look while allowing the side gathers to give the impression of a lushly gathered full skirt.

Women were so conscious of their prettiness in the 1950’s. I say we should look this good around the house! I’m sure it will make us look better and I think it will make us feel better!

Little girls naturally want to wear flowered skirts and butterfly prints and bows and pink ~ grown up women should get back into it as much as possible again! All these vintage touches bring back femininity. They are artistic and they make us feel good. It’s those feminine arts doing their positive work! Bringing sensual pleasure and beauty to life!

A Lovely Twosome!

Nice Crisp Bow in the Back

Share