Image 01

Lady Violette

The Romantic Lifestyle

Posts Tagged ‘Pattern’

Lady Violette’s Dji~Dji Hand Knitted Winter Scarf of Vintage Boucle Mohair & Fine Fingering Yarn ~ A Complimentary Lady Violette Knitting Pattern!

Monday, April 18th, 2011

The Dji-Dji Scarf Designed by Lady Violette

The Dji-Dji Scarf Designed by Lady Violette

The Dji~Dji Scarf is 42" Long, but You Can Make it as Long as You Like!

I had about 2 & 1/2 balls of old vintage mohair boucle yarn called Dji~Dji in a heathery purple and grey melange. They were not complete balls and the yardage was unknown. I also had a bit of skinny grey wool yarn, fingering weight, but not enough to make a pair of socks. I wondered if I had enough to make a scarf? It was a gamble, but I decided to try it. I knit a small swatch holding the two yarns together. I used size 8 needles and they worked fine. I wanted texture, so I made up a simple pattern and knit until I ran out of yarn! I am posting this as a complimentary knitting pattern that anyone may use! Enjoy making & wearing it!

Here’s the pattern for the Dji~Dji Scarf! I used size 8US straight knitting needles.

To Make: Cast on 32 stitches.

1st & 3rd rows:(K2,P2) to end

2nd & 4th rows: (P2,K2) to end

These 4 rows form the pattern.

Repeat until you nearly run out of yarn or the scarf is the length you like. I was able to knit to 42 inches. Then cast off. C’est fini!

You can use any yarn or combination of yarns held together that will give you an approximate gauge of 4 stitches and 4 rows to an inch. You can make the scarf any length you like from about 40 inches to 96 inches! The Blackberry scarf I posted earlier is 96 inches long including the fringe if you wish to use the way it looks as a guideline. The good think about scarves is that you can easily take them off the needles and try them on to decide what length you actually like and want to make!

A Close Up Showing the Texture of the Yarn & the Pattern Stitch & the Pair of Hair Sticks Used as Shawl Pins!

I didn’t block this piece because I wanted to retain it’s lofty nature. It is a little short for tying so I simply crossed it over at the front of my neck and stuck two hairsticks in it, one above the other, to hold it closed. You can use children’s chopsticks as well. They are shorter than adult ones and make great shawl pins. I have a shawl pin that would also work just like a hair stick! I like the look of two hair sticks slightly juxtaposed one above the other. Chopsticks make great scarf pins or shawl pins which is really scarf/shawl jewelry. You can wear them in your hair too to keep it pinned up when knitting! And I encourage you to try hair accessories such as these, lobster clips, and barrettes to hold your scarves and shawls in place. Hair jewelry can often double as scarf  and shawl jewelry!

This scarf is great over a high necked sweater or tucked inside the collar of a woolen coat. The double layer of crossed over knitted wool or mohair keeps your chest cozy and warm. It’s easy to make, looks good with black or any co-ordinating color. It’s a good solution to keeping warm and looking stylish at the same time!

Depending on the color and type of yarn you use this can be used as a man’s or a woman’s scarf. It is extremely easy to knit. And the results look very professional. This would make a great first scarf pattern!

Please feel free to use and enjoy it with my compliments! If you do so please credit me and refer people to my blog. And, if you make it, please send photos and I’ll try to post them for others to view. I recently sent photos of a finished project and the link to my blog to a designer  whose sweater pattern I knit and she wrote back thanking me. It was very encouraging getting that feedback!

Share

Short Ribbed Poncho/Capelet/Shawl/Scarf – Hand Knit of Noro’s Iro Self-Striping Yarn in the Brown Color Way by Lady Violette

Friday, April 15th, 2011

Hand Knitted Ribbed Poncho of Noro's Iro Yarn in the Browns Color Way

This is a short ribbed poncho or capelet that just covers the neck, chest and shoulders. Sort of like a scarf, actually, but in a circle so it stays on. Vogue has put out a knitting pattern book with scarves, shawls and ponchos so they, too, feel they are all in the same category. The keeping warm stylishly category!

The pattern is called Cat and is in the book Naturally Noro by Jane Ellison beginning on page 44.  It is hand knit of Noro’s Iro self-striping yarn in shades of brown.

It takes 300 Grams which is 3 skeins of Iro yarn in the color of your choice and is worked on size 10.5 US needles. It is an easy pattern and is very quick to knit. The poncho is a very cozy cover for the upper body. I like wearing it to grocery shop because I get really cold  in the super cold store grocery stores! The yarn is a little scratchy so I wear a tight cotton turtle neck sweater under it.

This Poncho is knitted in one piece on straight needles and seamed together down the back.

Handcrafted Scatter Pins Made From Vintage Buttons & Seed Beads

I felt the poncho needed a little embellishment so I made three accent scatter pins to decorate the left shoulder. These are very easy to make out of  vintage buttons stacked together, then glued and attached to a metal craft brooch pin. The flower pin is made of seed beads strung on thin wire, twisted into the shape of a flower and, attached to a craft brooch pin.

Pins like this are very lightweight so they won’t stretch out and damage hand knits. They also make excellent personalized embellishments for hand knitted or felt hats.

The book, Naturally Noro, by Jane Ellison is full of cute modern knitting patterns. I have finished two scarves out of it and am working my way through a vest and a sweater now. The designs are fairly easy to make, and are casual and wearable. Maybe I will be able to knit them all! I’m trying!


Share

Lady Violette’s Hand Knitted Blue Violet Striped Cardigan Sweater

Thursday, April 14th, 2011

Lady Violette's Blue Violet Striped Top Down Circular Needle Hand Knitted Cardigan

This is the first cardigan I have ever knitted using the top down circular knitting technique. I used scrap yarns in blues and purples left over from years of projects people in my family had knitted. Thus my name for it:Lady Violette’s Blue Violet Striped Cardigan!  The yarns were in many different weights so I had to adjust the needle size to maintain the gauge throughout the project. Sometimes I knitted with one strand, sometimes 2 or 3 combined or held together, and I used sizes 6,7,and 8 US needles. There was a lot of guess work and re-knitting involved. Fortunately I’m pleased with the finished results.

Blue Violet Striped Top Down Cardy Sweater ~ Back View

The shape looks a bit odd on my mannequin, but it looks good on my body as I fill it out in the right places and I actually have shoulders and arms! Those are required to make the sweater look good. The arms look long in the photos but they actually fit me. I have measured and carefully worked to get the sleeves to be the correct length. Of course real human arms fill them out and pull them up to make them look the proper length and  shape. And a lot better! Someday I hope to get a mannequin with arms! Meanwhile this will have to do.

The Blue Violet Striped Top Down Cardy Can Also Be Worn Unbuttoned

I’m taking these photos by myself and don’t have equipment to photograph myself in the sweaters so the mannequin will have to do as my model until someone is here to photograph me modeling my sweaters.

It is better to take these photos than none! It has taken me forever to get around to photographing my finished knitting projects. I think that is because I am very concerned that I do a good job! I do not like seeing photos of knitted garments that do not do them justice.

I also would rather be knitting than photographing and posting photos of my knitting! Knitting is the most relaxing thing in the world. Photographing knits and writing about them is not as pleasant in my opinion. It requires discipline! However, now that I am blogging I want to get them up and I want to post them on the knitting website Ravelry.

I created this pattern myself as I went along. I kept notes, but I think it would be very hard to recreate the pattern and rewrite the instructions for someone else as I did  many try-ons for fitting and adjustments as I knitted along. Also, having used many old yarns which no longer had their labels and are of mysterious identity even to me, I would find it hard to write the pattern and advise people on exactly what currently available yarns to use.

If you want to make something like this I suggest you find a plain sweater pattern that you like. Then dive in! Decide what you want to use for the ribbing and front bands, start there, and add yarns when and where it looks good to you to create the stripes as you work. That is how I did it!

Blue Violet Top Down Cardy Knit on Circular Needles From a Medley of Scrap Yarns

I have also used self striping yarns such as Noro and Tonalita for other striped sweater projects. I love them because there are no ends to weave in or splice! And no gauge changes to calculate. You can safely knit them mindlessly going along and end up with excellent striping results. The yarn makers have dyed the yarn to make the stripes for you. If you want to make a striped sweater similar to this, with less work, I advise you to choose a Noro yarn in the color way of your choice and knit a plain cardy. You could use a solid color yarn of the same weight to make the ribbing and button bands if you chose to. Using a self-striping yarn for a sweater like this would be an intermediate level project. Using the varied yarns as I did is more challenging and I would rate it as an advanced level project.

I will post a brown striped cape/shawl soon to illustrate how one of the Noro Iro self striping yarn works up.

Share

How to Make (or buy) the Gigantic Scarf I Used for My “Belted Half Dress Drape” Long Oblong Scarf Style.

Wednesday, April 13th, 2011

I know how hard it is to find a giant scarf, or a great scarf! Especially one that is affordable or in the fabric, the color or the shape that I want. Therefore I have started making my own so that I can have whatever I need!

Gigantic Scarf 96" x 45"


This is the scarf I used to create the “Belted Half Dress Drape” scarf style demonstrated in my post yesterday. It is simply a 96″ long piece of 45″ wide fabric narrowly hemmed on each end. In this case with a rolled hem stitched by machine using a narrow hemmer foot. You can do it on a machine or by hand. The hand method is called a narrow rolled hem.

When selecting fabric something very light works best. This scarf is made of silk chiffon. It is border printed on each end because it was originally intended to be made into a scarf, but any all over print or a solid color will work just as well. Silk or polyester chiffon, china silk, lightweight silk crepe, rayon, or very lightweight cotton batiste would also be appropriate.

You will need to buy between 8 and 9 feet of fabric total. You want it to be sure the fabric is cut straight across the end before you hem it. Fabric stores do not always cut off the pieces they sell in exact straight lines with the grain of the fabric. Check for this before you sew the hem and, if necessary even it out.

Shops that sell Indian saris carry the kind of fabric I used. I have seen border prints, printed on each end like this one, or on just one end. My scarf is 96 inches long, That is 8 feet. I am 5″ 7″ tall and I found the length to be adequate. However, if I could I would get a little longer piece, such as 9″ that would give me a bit longer drape hanging down the back when I have finished the tie. If you are very tall I advise a 9 ‘ long scarf. That is all there is to it! It is quite easy and you can make your own “designer ” scarf in just the size, shape and fabric you need quite reasonably! Appropriate fabrics will cost from $3 per yard to about $40 per yard in fabric shops.

I have found chiffon on discount tables for $3 – $5 per yard. The sari silk scarf cut I used in the picture was a true bargain for $5 found in a thrift shop. They are also available in Indian shops and are not terribly expensive. I have also seen silk in fabric shops for $20 – $40 per yard. If you do not sew yourself, just purchase the fabric you like and take it to a tailor or dressmaker and ask them to hem it for you. Or ask the staff if anyone there would be willing to do it. I know that many women who work in fabric also sew for people.

Share

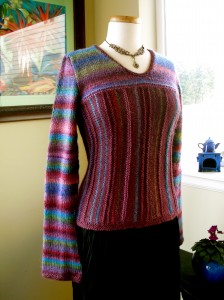
Lady Violette’s Interpretation of the Hand Knitted Poppy Sweater in the Iris Color Way ~ Just Finished and Successfully Figure Fitted Like a Corset Through the Use of Negative Ease

Saturday, April 9th, 2011

My Iris Color Way Hank Knit Sweater

I have just finished knitting this beautiful blue, purple and green striped sweater from the pattern for the Poppy sweater in the book Yarnplay by Lisa Shobana Mason. Poppy was originally done in reds and browns using Noro yarns Silk Garden and Cash Iroha. I substituted Tonalita for the striped sleeves and the striped portion of the yoke and body and an old unlabeled purple mystery yarn in a silk and wool blend for the solid red sections in the original pattern. The mystery yarn was given to me by a friend and I had it for years without any tags or labels so I have no idea what it is. I do know it is an old yarn and isn’t carried by yarn stores now as I have taken it around to several with me and no one recognizes it. I luckily had just enough for this project!

I am calling this my Iris sweater, because it is done in blue and purple iris colors, not red poppy colors. They are both named after flowers though, which was one of my attractions to the design ~ being Lady Violette and having an interest in all things floral!

The original pattern was knit of scratchy yarns and I chose to do mine out of very soft yarns. I cannot wear rough yarns. They are way too itchy for me, even during the knitting process. I did use yarns that worked up at the same gauge. I had to adjust the pattern to fit me and measure and make adjustments constantly as I was working. It was a difficult project. I only recommend undertaking it if you are an advanced knitter and have a great deal of patience to see it through to finishing. I had to stop and work on other projects that were not so demanding, then pick it up again and continue several times before I finished it. It is beautiful now that it is finally done so I guess it was worth it!
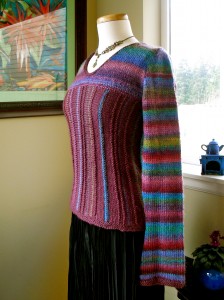
Fashionably Long Hand Covering Sleeves in Tonalita Knit In the Round on Five Douple Pointed Needles

The sleeves may appear long in the pictures. That is because they are designed to be the trendy long type of sleeve that goes over the palm of the hand. They are also taken up when worn so they really do fit perfectly. The bottom edges of the sleeves cover my hands and reach the bases of my fingers exactly. This is very pretty and very cozy ~ but definitely makes for a dressy sweater rather than one you would wear for cooking or doing the dishes! ( A great excuse for avoiding those activities!)

The bottom part of the sweater is knit in a strip from side to side in stockinette stitch with occasional stripes in garter stitch and stockinette stitch. The knitter adds these whenever and wherever she likes, so each rendition of this pattern is unique. I put in a lot more stripes than the original designer did ~ originally to be sure I would have enough of the solid purple color to finish the body ~ ultimately because I really liked the design better that way!

I knit the sleeves in the round on double pointed needles in order to avoid seams. I made the stripes on both sides match each other as well ~ on the yoke and both sleeves. This required cutting the yarn and reattaching it and carefully keeping track of the rows worked in each color. I did the back yoke on mine with a lot more texture and garter stitch worked into it than the designer used in hers as well. I tried to do the same method in the front but it didn’t work out as well there! So my yoke ended up being highly textured in the back and smooth stockinette stripes on the front. this was risky, but it worked.
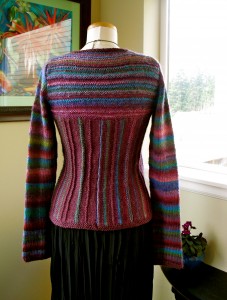
The Back of the Iris Sweater Featuring Garter Stitch Stripes in Two Directions


All in all this sweater was a huge experiment. I added a double row of garter stitch around  the bottom to tie it in better with the edging around the neck. The designer originally finished off her edges with a line of single chain crochet! Because I used different yarns and am a different knitter, my Iris sweater almost looks like a different sweater than the original Poppy design. This often happens when you knit something in very different yarns and make fitting and design adjustments along the way.

My Iris Sweater is an interesting project that evolved using bits and pieces of leftovers from two other projects. And using a lot of determination! It is sometimes fun to see what you can do working with limitations. In this case only having small amounts of two types of yarn that weren’t even the ones called for in the pattern. If I had gotten stuck without enough to finish I would probably have added yet another yarn or changed the design to accommodate my limitations.

I was anxious to photograph it and post it. After the agony of finishing it I am anxious to get some feedback from other knitters and designers! Of course I am interested in the opinions of non knitters as well. I photographed it with a black pleated skirt, but, for a more casual look I plan to wear it with dark green or dark blue vintage jeans and dark green boots or a dark purple skirt and purple tights that I have.
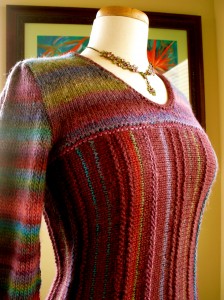
Corset~Like Figure Forming Fit

I knit my Iris sweater to be very fitted with a slight negative ease. To me the body of the sweater has a corset~like effect with the shape of the body and the slimming vertical stripes simulating the stays of a corset. This is form fitting and figure flattering. The yarn is fairly fine in quality and certainly in feel, so I wanted a refined looking fitted  sweater rather than a loose fitting one. It is possible to make fitted knits when you make them custom to fit yourself or another person for whom you are knitting. The trick to achieving that is negative ease. I made the sweater tighter than the designer did hers. I achieved a dressier more formal look. Her looser fitting one is more casual.

Knitting is an art form, and in making art, each artist’s interpretation is individual and unique, even when using a pattern. In knitting I find a pattern is really just a guide to get me started. I rarely make any pattern the exact way it is written with the same materials the writer used. In fact I do not know if I ever have.
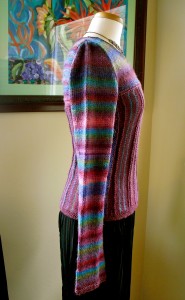
 

Side View of beautifully Shaped Iris Sweater

I always wonder if people who do not knit have any idea how complicated making something like this sweater is. Think about it! Every single stitch is made by hand and has to be counted and kept track of while you go! It requires a tremendous amount of concentration and time and self discipline. Hand knitting takes a lot more time than sewing.


It breaks my heart when I see a beautiful hand knit sweater that someone lovingly made somebody given to a thrift store. I have found them and It is my personal mission to rescue them whenever I do. It is on the same level as rescuing an abandoned animal for me! Knitting is an art form and to do it well is an amazing accomplishment. It takes hundreds of hours to make a hand knitted garment. I will be pleased if people who didn’t understand anything about what was involved in knitting before reading my blog develop an interest in it from reading what I write and looking at the pictures I post. Not only does the knitting take a lot of time and expertise, but the yarns and fibers themselves are amazing, fascinating and very valuable. I will write more about that in the future.
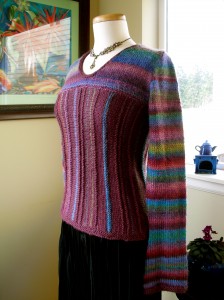
Fitted Knit ~ Like a Corset Through the Torso

The Original Poppy Pattern, in red yarns is pictured below. More photos in red can be seen on the blog of Lisa Shobhana Mason and can be found in her book Yarnplay, available from Amazon. This sweater is photographed on the cover of her book and directions begin on page 98. It is rated  advanced level for experienced knitters. I would definitely agree with that rating! You can find photos of other knitters completed versions of this pattern on Ravelry if you would like to see how their interpretations of the same original pattern turned out. I always enjoy seeing them!  You can see them on Ravelry (requires free account). I just looked at these other knitters works – and what fun it was to see how they differed from mine! This is always the case with the feminine arts like quilting, knitting, sewing, crocheting, embroidery, etc. – each woman’s personality comes out in her needlework. Check it out, you will see what I mean! The sweater has been made up in many different yarns, colors and sizes.

Incidentally Ravelry is a great place to get ideas and find patterns for knitting and see other peoples work.
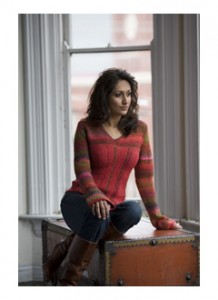
 

Original Poppy Sweater in Red by Lisa Shobhana Mason

If you want to make a fitted garment with negative ease experiment with the following suggestions. Knit a size smaller than you normally would. Be sure to make the pattern pieces long enough though! You will want them to end up tighter around but not a lot shorter! Try knitting on a size smaller needles than the pattern calls for. This will create a tighter knit, thus smaller, piece of knitting. Be sure, again, that the length is adequate. In this case I experimented and ended up using one size smaller needles than originally called for in the pattern and adding length by knitting a few extra rows to get the length I needed through the torso. I knit sections, take them off the needles and try them out by holding them up to my body or that of the person I am knitting for. I put them back on the needles and make any necessary adjustments, then continue. I sometimes have to take out fairly large sections and redo them, but I do it because I want perfect results. The trick to avoiding having to redo large sections is to try things on to test the size and figure out the measurements fairly often. theoretically you should be able to do this by calculating it out on paper, but that is not the same thing as a try on! The only true test is actual fitting on the body of the person for whom you are making the garment. It is always worth the extra time it takes.


Share