Image 01

Lady Violette

The Romantic Lifestyle

Posts Tagged ‘Knitting’

The Flock – A Group Portrait with Violet Knit Hat & Scarf

Friday, March 9th, 2012

The Flock ~ Valcero, Zheed of Estonia, & Measuring Sheep

These are my toy sheep. Like many knitters, I have a collection of them as mascots to the art of knitting.

Valcero is the big one with a black face and paws who is modeling a new knit hat.

The medium sized shaggy white one is Zheed of Estonia.

And the little one is Measuring Sheep. (He has a tape measure that roles up inside him!)

Valcero is modeling a knit hat made of Rowan’s Plaid yarn in a color called Sea Grass which is actually a mix of violet, pale green and bright dark pink.

Measuring Sheep is posed atop the matching scarf in progress.

Did you know that, in Mexico, having a few toy sheep in your home is supposed to bring comfort, financial success and security? I suppose this is based on the fact that having a few real sheep did this for you in the old days – as their fleece gave you wool for warm clothing and you could sell what you didn’t use yourself for income. the larger a flock you got the better off you would be!

They are also good friends. Mine keep me going when the knitting projects gets challenging! Plus they are soft and comfy.

Everyone should have a sheep mascot in their home – even if they don’t knit!

Share

Violet Gloves ~ Knitting Work in Progress ~ Continuation Part #2

Sunday, January 29th, 2012

Violet Shetland Woll Gloves - A Handknitting Work in Progress Using Five Double Pointed needles Per Glove.

What an undertaking making gloves is! I’m finally through the palm and have begun the fingers. I worked the little finger first. Next, a bit more on the palm to get up to the beginning of the fingers, then each finger one by one. Each finger is knit as a little cylinder of about 12 stitches that are divided up onto four needles with 3 stitches on each that you knit with the fifth needle. When the finger is the desired length, you insert a darning needle threaded with the end of yarn into the remaining stitches, gathering them up at the tip to close off the finger.Then you weave the end of thread/yarn invisibly and securely inside the end of the finger where it will not show.

It is quite a feat to maneuver all these needles at once without creating an immense tangle of yarn and needle danger! But it is fun and challenging in a weirdly interesting way. I am glad to be accomplishing it. I will forever more appreciate and understand the way knitted gloves are made!

I’m not delighted with this wool. It is rough and scratchy like a loofah treatment! I wanted a strong yarn to make a tough pair of gloves for my first pair. I was afraid I might destroy a more fragile delicate yarn if I was ripping out my knitting and redoing it to get the proper effect. Sure enough I have had to reknit some sections several times to get the construction method right.

One Advantage to Making Your Own Gloves is Being Able to Try Them On As You Knit to Adjust The Fit to be the Way You Like It. And It Is Admittedly Fun Trying to Keep All the Wicked Looking Knitting Needles In Place

This takes way more time than it is worth! Of course! It is no wonder people seldom knit their own gloves anymore! Unless you want something really special. I am only interested in doing it again if I can design and make unique and beautiful gloves. This time around is only for learning purposes – to become familiar with the construction methods.

We have learned how to make the gusset for the thumb and divide the stitches for the individual fingers, etc. All worthwhile knowledge that is only understandable once you have gone through it preferably with a teacher and other students also struggling. I initially tried to understand and make a couple of patterns for these things on my own, but both of them were missing crucial steps in the explanation! No wonder they didn’t work!

After knitting the thumb gusset I removed the needles from the thumb section to use them on main the hand section. I held the live thumb stitches ~ so they would not unravel ~ tied off on the contrasting colors of yarn ~ in this case pink and red ~ while I continued to work on the hand.

As I struggle with this challenge I am reminding myself of all the beautiful vintage glove designs I am hoping to make once I accomplish this skill! There are a lot of beautiful vintage glove patterns still in existence. That is my goal. I know it looks far off as I struggle here with my initial attempt!

Note: I am using 6″ double pointed needles here. they are too long. I must get some shorter ones for my next serious attempt of glove and sock knitting. These are too unwieldy for knitting tiny circles of stitches like fingers and toes. I am searching for a set of short 3 ~ 4 inch long DPNs in a selection of sizes. They are hard to find. four shops in my city are out of them and several online stores are currently back 0rdwred. Any tips on finding good quality double pointed knitting needles will be appreciated.

PS: This is serious business for which one needs the best tools!

Share

Learning to Knit Gloves ~ Living Up to My 2012 New Year’s Resolution ~ Getting Started ~ Part #1

Thursday, January 26th, 2012

Knitting Gloves? Well Yes, that is one of the things I resolved to do in 2012. I love gloves. I have small hands with long fingers and new gloves never fit me as they usually come in one size fits all or med. & large only. And vintage gloves are hard to find. I figure if I learn to knit my own I can make the hands and wrists small enough, the fingers long enough, and choose the styles and colors I really want.
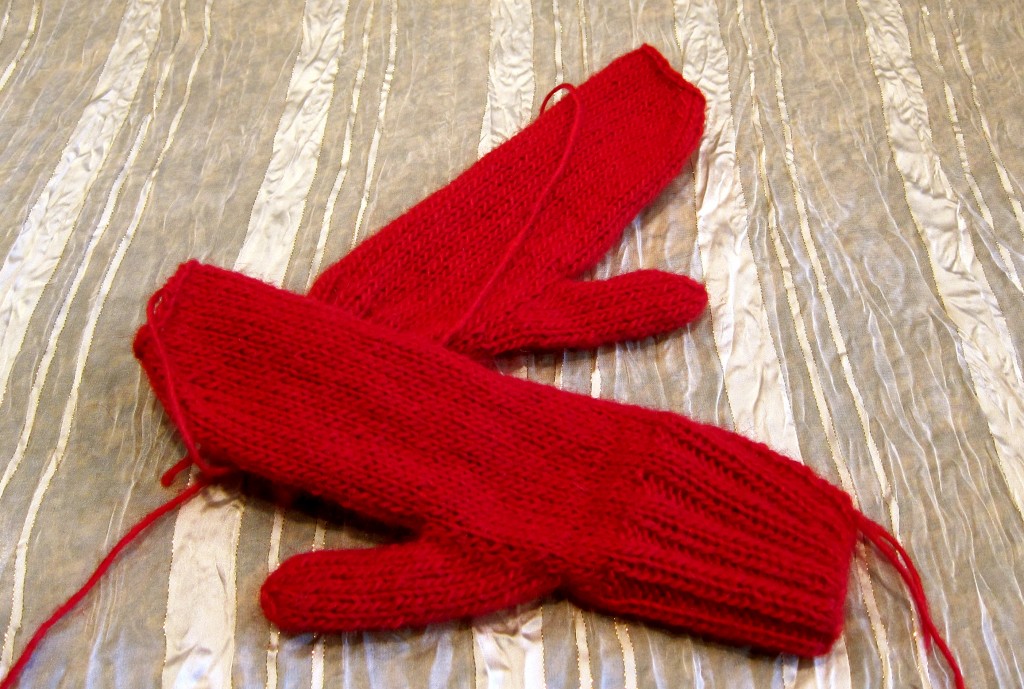
Red Fuzzy Mittens All Knit Up on Two Needles - Flat Technique - Ready to be Sewn Up & Finished

I really am learning to d it. It is a challenge! Fortunately I already know the basics of knitting. I began with a pair of red mittens – so I could learn to understand the basic structure and how to shape thumb gussets before attempting to do 5 fingers. I knit a pair of two needle mittens, on size 6 needles, in the red yarn, now all knit up and ready to be sewn together using mattress stitch so that they can be worn. Hopefully I get that done within the next couple of days. Blocking them and sewing them up all around is all that is left to do. I may also add a decoration of some sort to make them not so basic.

Next, I am knitting a pair of basic 5 finger gloves in violet Shetland wool. My purpose being to learn how to do the thumb and fingers perfectly on a plain pair of basic gloves before I take on making lace or decorative stitch fancy gloves.

Violet Shetland Wool Hank Knitted Gloves In Progress

Here they are, so far! I have done the ribbing for the cuffs, making them four inches long on size #4US needles, then transferred to size #6US needles for the section of the glove up to where the thumb gusset will begin. Next comes the thumb gusset, then the thumb, after that, the little finger, then a bit more knitting around on the hand to bring it up to the base of the other fingers, then each individual finger – each one has to be knitted using four double pointed needles in the round in a tiny circle to form a cylinder. The silver needles are my working set, the red needles are just being used as holders for the live stitches on the other resting glove. I am doing each section on one glove, trying it on to be sure of the fit, then moving over to the second glove so I do the same thing on it, then switching back to the first glove again to continue with the next step. It is very fiddly! Especially since it is being done on a set of 5 double pointed needles in the round instead of two needles, flat, as I did the red mittens above.

Gloves are definitely harder to make than two needle mittens. I highly recommend learning on a mitten first, then graduating to a harder glove with double pointed needles and five individually knitted fingers. I am using Jamieson Shetland DK weight wool here at a gauge of 6 sts per inch. This is a rather large gauge for gloves, but I wanted to be able to make them relatively quickly as my practice set, before moving into a more challenging tiny gauge fine yarn – which is my ultimate intention. I want to “graduate” to knitting fine gloves in refined styles in beautiful colors ~ using many of the interesting fingering weight sock yarns which are very well suited to gloves as well!

I love the yarns! I can hardly wait! Discipline, discipline! I have 2 skeins of lovely yarn picked out, on hold, for my next 2 pairs of gloves, but I won’t buy them until I get these finished. They will be my reward for getting through these first two projects!

I am off to do more work on these today, so will keep you posted with my progress. I am determined to finish them this week! I have to stay on schedule here to accomplish my goals! My first goal is to finish knitting the red mittens and the purple gloves shown above during this January. Then to move forward throughout the remainder of the year by knitting a pair of gloves every month. Each pair must be increasingly more difficult to knit so that I make technical progress. I feel that I will be quite a good glove knitter by next New Years 2013 if I manage to accomplish this. Plus, I will have a good collection of hand made gloves made up from practicing!

After I finish these two pairs I will be looking for glove patterns or a book of gloves to make! I want to make authentic vintage styles, of course! This is only the beginning!

Share

A Knitted Kaliedescope of Colored Lace is a Work of Art Hat in Japenese Artist Eisaku Noro’s Fine Art Yarn

Saturday, January 21st, 2012

I am fascinated with the Yarn Art of Japanese painter Eisaku Noro. He hand dyes his yarns which are all organic and made of fibers from silk, through cashmere, wool, cotton, bamboo, etc. He dyes and spins the yarn in small batches all produced by hand – and they are absolutely amazing. I see his yarns, fall in love with one and must make something from them! They can be used any way a fiber artist/designer wants to use them – the sky is the limit and the possibilities are endless. I have made several garments from his yarns and have several batches of it stashed for future work. It comes out in extremely limited amounts so you must get it when you see it.

Kaliedescope of Colors in a Spiral Lace Knit Hat in the Making by Lady Violette de Courcy

Currently I am working on another knitted hat – my first experiment using Noro Yarn in a millinery project. I got the yarn, last Monday, came home and stayed up most of the night casting on and knitting until I had to get a little sleep. I woke up and started to knit immediately until I ran out of yarn! I had put more on hold, but I could not get to the yarn store to buy it as I was snowed in completely, now going on a week! But I cannot wait! I have to show you this as a WIP (work in progress) as I am so excited by the way it is turning out!

I am making this in Noro’s Silk Garden Yarn – a very soft blend of silk and wool. That is not a dark hole on the left side in the brown stripe! Just an indent in the lace prior to finishing and blocking the hat. The crown, which isn’t done yet, will be a round burst of all the current colors on the top in a spiraling snowflake~like shape. I underestimated the amount of yarn needed. In a project like this you never know until you make it. It is hard to tell now, but this again will have a 1920’s ~ 30’s vintage vibe to it when I am finished. And I’ll be adding a special surprise at the very end.

I hope I can get out of the house, off my steep Telegraph Hill like hill and back to the yarn store this weekend. Or early next week. The snow is not coming down now but we are experiencing really high winds. Branches are banging against the house and the trees are weaving and swaying. I can hear branches crunching and breaking off from time to time. This could be worse than the snow has been. Winds are whistling through the house too! When this happens here trees often fall across the roads and they are shut off. There is inevitable loss of electricity in the area as well. This is already up to 4,000 homes now which translates to a lot more people. My power is currently on – but It has failed 4x already. I will not be surprised if we are without power again! In nearby areas it has been out for three or four days and they cannot predict when it will get back on. The wind is so loud and violent it was impossible for me to sleep ~ so I got up and wanted to knit, but I am out of yarn on two current projects!

So I decided to write this blog post instead amidst the whistling wind. I imagine Wuthering Heights was like this. It feels very bleak! And it is dark and drafty and cold! I am feeling really housebound. I’m bundled up in knitted tights, mufflers and cloaks to stay warm and I haven’t been to the grocery store for over a week! The food choices are dwindling! Just like the yarn! This storm is difficult for someone who usually goes to the yarn store as often as she goes to the grocery store! At first the snow was nice, but now everything has turned to black ice and it is very dangerous. School has been cancelled for four days.

I am going to cook some old fashioned oat meal now. I am burning off calories trying to stay warm and I am really feeling hungry!

For more information on this hat in the works visit me at ladyviolette on Ravelry and check back to see this piece when I get it finished. The yarn is by Noro and the lace  pattern I have adapted is designed by Linda Medina. Details, including yarn sources and the lace pattern are available on Ravelry, the social website for knitters and  fiber artists.


Share

Lady Violette ~ Erte Inspired 1920’s Style Hand Knitted Cloche With Pearly Vintage Accent

Friday, January 20th, 2012

Lady Violette's Rambler Spiral 1920's Cloche Hand Knitted in Cashmere and Silk

Another of My Recent Creations in the 1920’s Mode is a Hand Knitted Rambler Spiral Patterned Forget~Me~Not Luxury Fiber Flapper Style Cloche Hat With Pearly Vintage Accent. I am currently exploring making and wearing elegant knitted hats as feminine fashion pieces as they did in the 1920’s ~ 40’s. Versus the knitted granola hat destined for the ski slope, skate board park or shapeless grunge fashion accent  There are so many beautiful yarns out now that I cannot resist making something gorgeous out of them to put on my head!

I had to attend a 1920’s themed party so I made this little Erte inspired hat to wear with my blue 1920’s vintage dress of the same color rayon brocade combined with a darker blue velvet. I also wore many pearls so I trimmed the hat with a vintage pearly and blue trim piece that I had. I love the way this turned out! And I am already in process making it in two more colors – a dusky berry and a woodsy brown. I have two other stitch variation in mind to try out as well.This is such a cute shape I want to make several of them in many colors ~ perhaps a full bouquet! I am fantasizing about opening a drawer full of them overlapping each other in a rainbow of pretty yarns in many colors!

I used Sublime Cashmerino Silk Aran 10 ply yarn from England and found the basic cloche pattern in  Sublime’s Aran Hand Knits Books. You can use the basic hat pattern with any stitch variation you like. Like all vintage British patterns this one is written to be knitted flat on straight needles and seamed together down the back in finishing. It fits perfectly and looks adorable on. It required 2~50 gram balls of Aran weight yarn but I’m sure I have enough left over to make a knitted flower corsage to pin on one side of the hat. I think that will make a nice accent ~ instead of the pearl piece – when I want a different look. This is definitely a pretty hat design one can wear in the summer!

It’s still snowing here! And very dark outside! When I have the corsage finished and the snow has melted I will get a friend to photograph me wearing the hat and post pictures of it again. I wore it to the 1920’s themed party and it was a hit.

The pearl accent piece is not a vintage brooch. It is 3 vintage buttons wired together in the back and meant to be sewn onto something as an accent. It is a great idea to wire any number of buttons together to make such a “garnish” which is what I have decided to all it. You could also do the same thing with clip earrings. You can untwist the wires anytime to use the buttons as originally intended too! Such a garnish could be used on a coat, jacket, hat, dress, stole, even in your hair! The idea is probably something women came up with during the mend and make do era when they needed to whip up an embellishment in lieu of a jewel to trim an outfit before going out. It is very clever and a great use for pretty vintage buttons.

You can visit my site on Ravelry to find out more about my knitting and see more of my projects. I am ladyviolette on Ravelry. I post photos of the item, yarn and pattern information there so that you can find it if you want to create the same or similar article. If you are a knitter or interested in knitting I urge you to visit Raverly. It is a terrific resource for people with interests in knitting and crochet.

Share