Image 01

Lady Violette

The Romantic Lifestyle

Posts Tagged ‘How To Make a Scarf’

Fluffy Vintage Lynx Fur Collar Repurposed as a Long Fur Scarf

Friday, December 28th, 2012

Fluffy Vintage Lynx Collar Re-purposed as a Long Modern Scarf or Muffler

This beautiful fluffy blond colored fur piece is lynx. I found it in a thrift store attached to a ratty old sweater in size XXXL ! The sweater was awful acrylic and covered with natty balls. This gorgeous fur piece had been hastily basted onto it along the collar edge. I did a double take on the fur and after inspection determined it had probably been removed from a coat. It is professionally lined by a furrier with a tasteful gold/beige silk satin. I quickly purchased the ratty old sweater for $9.99 and removed the fur from it as soon as I got it out to my car! I always carry a sewing kit with me for emergencies and separating this lovely lynx collar from the old synthetic sweater to which it was attached called for immediate emergency surgery. I threw the disgusting old sweater away in the thrift store dumpster.

The Lynx Fur Can Be Wrapped Around the Neck as a Deliciously Soft and Cozy Muffler

I wrapped the cozy lynx around my neck in my car. As I drove home I debated whether I should try to sew this new fur prize to a coat or cape in my collection or make something new to use it on. It was incredibly soft, lightweight and warm. I was really comfortable and toasty by the time I got home. I immediately experimented with it in front of a full length mirror and tried it out on several coats, capes and sweaters in my collection. It looked good with everything. For this reason I decided not to sew it onto anything, but to re-purpose it as a modern style lynx fur scarf or muffler instead so I would have the greatest versatility. I carefully restitched the silk satin lining so that it was neatly attached all the way around. I actually like the way the gleaming silk satin side shows when the scarf is flipped around ~ I think the textural contrast of the shiny and soft silk lining with the lynx fur is pretty. The color of the fur and the golden beige silk satin look good with camel colored wools and gold jewelry. I have two vintage camel colored coats – one of camels hair and one of cashmere that both look great with this blond lynx worn casually draped around the neck as a scarf or muffler.

The Lynx Collar is Backed or Lined with an Attractive Beige/Gold Shiny Silk Satin Which Looks Nice & Also Feels Really Good Against My Neck

I am also experimenting with wearing it over a bare shouldered evening dress as a fur stole. It is amazingly warm and it is a nice cozy thing to wear at home instead of a cardigan sweater or a sweatshirt.  Perfect for cuddling up and reading at night in an upholstered armchair. I like to use my vintage furs at home during the winter to keep the chills off in my drafty old house. This allows me more opportunities to use and enjoy my vintage furs and makes me feel glamorous in the old Hollywood manner. I consciously seek out ways to feel elegant and luxurious in my daily life and wearing my furs at home is one really good way. I often wear one while writing or working at my computer because I live in a drafty house in a cold winter climate.

Another Way to Drape & Wear the Long Vintage Lynx Fur Collar as an Elegant Contemporary Scarf

There are many elegant modern ways one can drape, wrap and wear a long fur scarf or muffler. I think it will also work as a wrap over a bare shouldered evening gown or the right style and color evening dress as well as over more casual winter sports wear such as coats, jackets, and sweaters.

It Can Be Styled as a Casual & Versatile Lynx Fur Version of a Knitted Muffler or Scarf

It will also work tossed over a tailored skirt or pant suit in a modern version of the way women wore the fur stoles with ” heads,  tails and paws”  attached in the 1940’s. Here are just a few examples of ways one can drape this lovely and versatile vintage lynx fur piece. Personally I like to style my vintage furs in the ways they were originally intended to be worn and in new ways that look up to date with modern fashion sensibilities. I think vintage pieces worn in contemporary settings combined in unexpected new ways look wonderful. I am always searching for ideas and ways to style my vintage clothing to create a completely new and modern mix of old and new. I like the best of every era!

A Close Up Shot of My Incredibly Fluffy Vintage Lynx Fur Scarf

Close up my lynx fur looks like this. For the record this vintage lynx fur was inspected and identified as lynx by professional Swiss furrier Rene Vogel of Seattle, WA. Mr. Vogel was formerly the furrier for I. Magnin and Co. and for Nordstroms when they still had a fur salon. He now works independently caring for the furs of his remaining fur clients in the Seattle area. He is a second generation professional furrier trained in Switzerland with decades of experience in the fur business. I have him identify all my vintage furs so that I can be absolutely sure of what they are and where they come from. I will write another post soon explaining the characteristics of lynx fur and what to look for when identifying and buying it.

I have found that many vintage furs for sale online and in thrift shop environments are not identified correctly. One reason I am writing these posts in an effort to help readers correctly identify furs they have or may be considering buying. I am consulting Mr. Vogel for his professional opinions and correct identification of the fur types as well.

Share

Scarf Styling for Long Oblong Scarves ~ Two Ways Lady Violette Likes to Wear an Oblong Scarf ~ Simply Looped and Draped & in a Dramatic Double Side Wrap Style for a Long Scarf

Monday, April 25th, 2011

Step #1) Begin with Oblong Scarf Simply Draped -

I have a 96″ long crinkly green silk scarf with beaded fringe on both ends. Here Tricia James, International Scarf  Stylist, shows us one way she wraps and ties such a scarf It is lovely as is and can be worn in a simple elegant drape looped around the neck with both ends hanging down as shown in the first photo and Step #1 ~ You can wear the scarf simply looped just like this or begin with this drape as the first step of the dramatic double side wrap style.

With all the fancy scarf tying and embellishing experiments of late I still think the simple drapes are sometimes the most modern and sophisticated ways of wearing and showing off  beautiful scarf shapes and textiles. I like both elegantly simple and ornate ways of styling scarves and shawls. I want to wear them in different ways at different times. I like having both options and the skills for styling both of them.

This scarf is particularly long ~ eight feet long to be exact! It was given to me by someone who thought it was too long and awkward for her to handle! I was delighted to receive  it! It is silk, permanently pleated, and embellished with seed beads on both ends.

Because it is so very very long it is perfect for wrapping. Here is how to do this dramatic double wrap style ~ done the same way Tricia demonstrated on one side in the earlier post titled ~ How to Tie the Orange Pashima ~ but done on both sides to create this lovely style.

Step #2) Wrap End on Left Side Under & Around

Step #2) Begin with the Left side. All you do is wrap the end on one side under and pull it through…

Step #3) Pull it Through

Step #3) Then wrap it around again, repeating under and around and through…


Step #4) Wrap Fabric Around & Around Until You Reach the Bottom of the Front Draped Loop

Step #4) Continuing until you have wrapped the fabric around enough times to get to the bottom of your front drape loop.

Step #5) Repeat the Wrapping Process on the Right Side of the Scarf

Step #5) Repeat the exact same wrapping process on the Right side of the scarf.


Step #6) Voila! The beautiful finished Dramatic Double Side Wrap Style for an Oblong Scarf! Once again demonstrating that tying and wearing a scarf beautifully is definitely one of the foremost Feminine Arts! Thank you Tricia for demonstrating this beautiful style! You can visit Tricia James at ScarfGenie.com.

Step #6) The finished Dramatic Double Side Wrap Style for an Oblong Scarf!

Share

Lady Violette’s Dji~Dji Hand Knitted Winter Scarf of Vintage Boucle Mohair & Fine Fingering Yarn ~ A Complimentary Lady Violette Knitting Pattern!

Monday, April 18th, 2011

The Dji-Dji Scarf Designed by Lady Violette

The Dji-Dji Scarf Designed by Lady Violette

The Dji~Dji Scarf is 42" Long, but You Can Make it as Long as You Like!

I had about 2 & 1/2 balls of old vintage mohair boucle yarn called Dji~Dji in a heathery purple and grey melange. They were not complete balls and the yardage was unknown. I also had a bit of skinny grey wool yarn, fingering weight, but not enough to make a pair of socks. I wondered if I had enough to make a scarf? It was a gamble, but I decided to try it. I knit a small swatch holding the two yarns together. I used size 8 needles and they worked fine. I wanted texture, so I made up a simple pattern and knit until I ran out of yarn! I am posting this as a complimentary knitting pattern that anyone may use! Enjoy making & wearing it!

Here’s the pattern for the Dji~Dji Scarf! I used size 8US straight knitting needles.

To Make: Cast on 32 stitches.

1st & 3rd rows:(K2,P2) to end

2nd & 4th rows: (P2,K2) to end

These 4 rows form the pattern.

Repeat until you nearly run out of yarn or the scarf is the length you like. I was able to knit to 42 inches. Then cast off. C’est fini!

You can use any yarn or combination of yarns held together that will give you an approximate gauge of 4 stitches and 4 rows to an inch. You can make the scarf any length you like from about 40 inches to 96 inches! The Blackberry scarf I posted earlier is 96 inches long including the fringe if you wish to use the way it looks as a guideline. The good think about scarves is that you can easily take them off the needles and try them on to decide what length you actually like and want to make!

A Close Up Showing the Texture of the Yarn & the Pattern Stitch & the Pair of Hair Sticks Used as Shawl Pins!

I didn’t block this piece because I wanted to retain it’s lofty nature. It is a little short for tying so I simply crossed it over at the front of my neck and stuck two hairsticks in it, one above the other, to hold it closed. You can use children’s chopsticks as well. They are shorter than adult ones and make great shawl pins. I have a shawl pin that would also work just like a hair stick! I like the look of two hair sticks slightly juxtaposed one above the other. Chopsticks make great scarf pins or shawl pins which is really scarf/shawl jewelry. You can wear them in your hair too to keep it pinned up when knitting! And I encourage you to try hair accessories such as these, lobster clips, and barrettes to hold your scarves and shawls in place. Hair jewelry can often double as scarf  and shawl jewelry!

This scarf is great over a high necked sweater or tucked inside the collar of a woolen coat. The double layer of crossed over knitted wool or mohair keeps your chest cozy and warm. It’s easy to make, looks good with black or any co-ordinating color. It’s a good solution to keeping warm and looking stylish at the same time!

Depending on the color and type of yarn you use this can be used as a man’s or a woman’s scarf. It is extremely easy to knit. And the results look very professional. This would make a great first scarf pattern!

Please feel free to use and enjoy it with my compliments! If you do so please credit me and refer people to my blog. And, if you make it, please send photos and I’ll try to post them for others to view. I recently sent photos of a finished project and the link to my blog to a designer  whose sweater pattern I knit and she wrote back thanking me. It was very encouraging getting that feedback!

Share

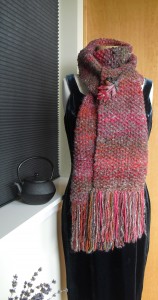
The Delicious Blackberry Scarf by Lady Violette ~ Making and Styling a Fabulous Extra~Long Handknitted Winter Scarf with Fringe! Made with Noro’s Yarns Using a Jane Ellison Pattern

Sunday, April 17th, 2011

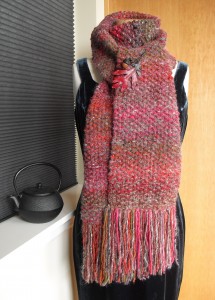
The Blackberry Hand Knitted Winter Scarf of Noro Yarns

Everything about this scarf is scrumptious! The yarn, the colors, the softness, the easy to execute pattern, the design, how warm and thick it is and how finally how elegant it looks! I love the name too! I think the stitch pattern is sometimes referred to as the blackberry stitch, but the Noro book doesn’t explain that. Anyway, it was easy to make. I am often working on really difficult knitting projects in which I have to concentrate closely on every stitch and row I make. This was a good break being a repetitive easy to do and remember pattern that I could work on while talking to people, watching a film, waiting for an appointment, etc.

Because I was only knitting with two types of yarn it was also an easy to carry around project! I need to take on more like this. It is hard to lug around a basket of 50 different colors and types of yarns when I want to knit away from home. All serious knitters usually have several different kinds of projects on needles and in the works at any given time. Of late I have been finishing a lot of things and don’t have something easy that I gan grab as I leave the house and work on when I get a chance while out. It is time to set up another one.


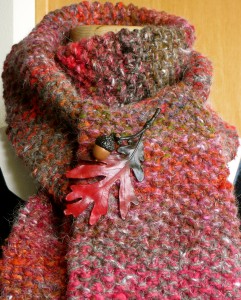
Close Up View of the Blackberry Stitch

The Blackberry is another pattern from the book Naturally Noro by Jane Ellison using Noro’s yarns. This is actually a booklet, rather than a book. It looks like a magazine. As far as I know these are not available from bookstores. I believe they are only sold by specialty yarn shops that also carry Noro’s yarns.

The yarns specified and the ones I actually used are Noro’s Iro in shade 9 and Noro’s Kochoran in shade 17. You work with one strand of each type, held together throughout the entire project. It is also done on giant size #13 US knitting needles so it knits up really quickly. That means instant gratification! I used Clover bamboo needles.

I have experimented with many types of needles and these are my favorites. I have found that stitches and the finished fabrics actually look very different knit on needles made of different materials. I recommend using the same type of needles made by the same company of the same material for your entire project.

I once made a pair of gloves on size 7 wooden needles. I had a pair of Clover and a pair of Brittany – both wood, both size 7. I wanted to make both gloves at the same time. I launched into the knitting. Unfortunately both gloves looked different! They were knit of the same yarn in the same technique, by the same person. The difference came from the two brands of needles made of the same type of wood. I showed them to many people at my local knit shop. They could all tell there was a pronounced difference. Caused by using two different brands of wooden needles in the same size! The one knit on Clover needles looked the smoothest. So I ripped out the other one and reknit the entire glove to match the better looking one done on the Clovers. A tough lesson learned the hard way! You don”t have to go through that because I am warning you ahead!

The Fabulous Dramatic Hand Made Yarn Fringe

This finished scarf is 96 inches long. It is mighty long and mighty thick and I love it that way! It’s very warm! Mighty warm! It also has fabulous fringe on both ends! I also love fringe! It is so dramatic! I love tossing it! This scarf is so long and big and thick that is is almost like wearing a coat! It does it’s job as a winter scarf! I also like having all the warm thickness of several layers of it cuddled up around my neck.

Noro’s yarn is hand dyed and hand spun in small batches in Japan! When they come out with a color it is usually not available very long. In fact I have had a lot of trouble actually getting enough of it in the same type and color to make entire sweaters – even size small women’s sweaters and children’s sweaters which is what I am usually making!

Noro, himself, is a painter who became a knitter and spinner. Working with his yarns is like painting. They are spectacular! To me at least. I actually like the immense amount of variation in each skein and the difficult to get enough of it aspect. I like the uneven spinning and unpredictable differences found in each small batch because It is like painting. I approach knitting with it like painting and I am willing to experiment and work with it’s unique qualities to achieve the effects I want. Incidentally these are unpredictable and they evolve as you work with the yarn. They cannot be planned in advance. There is an element of chance involved. I like that in my knitting. Even though I am a technical perfectionist! In the end, when I have finished knitting a garment out of Noro’s yarn I know I have a unique to me one of a kind piece!

The Fabulous Blackberry Scarf Designed by Jane Ellison & Knitted by Lady Violette with Yarns by Noro

Now I am all excited and I want to go buy yarn and start another one! I am worried about what may happen to Noro yarn given the Tsunami disaster in Japan. Of course I am more worried about other things in Japan, but the Noro yarns are definitely important elements in my work! They have always been hard to get and I am concerned that their availability may be seriously impacted. I am going to investigate this.

The oak leaf pin with an acorn looks like it is made of copper, then enameled. It is a vintage piece that I found at the Goodwill! It is a perfect accent on this scarf!

People often ask me how much it costs to make something like this. The kinds of yarns I use are luxury yarns of natural fibers. In the case of Noro all the steps of production are done organically. All of them! From raising the sheep to getting the ball of yarn onto a shop’s shelf! The fibers used are the best available and often rare. Consequently, Noro’s yarns are very expensive. These are $20.25 per skein and the sweater required 6 skeins total! So the yarn cost was $121.50 before tax, The pattern book is $24 and you will also need a pair of Clover bamboo or similar wooden knitting needles in size 13US which are about $10.  Allowing for a few other miscellaneous supplies and tax the project cost comes to about $170 just for the materials.

Blackberry Scarf Simply Wrapped

That is the cost to make this sweater if you knit it yourself! No allowance is figured in for the amount of time and expertise for an expert knitter to make if for you!  I am often asked why I do not sell the beautiful hand knits that I make on eBay or Etsy. It would not be worth it for me to do so. The honest truth is that people are not willing to pay what it costs to make them! Or to pay me anything for my time to make them! I have friends who knit and sell their work that way and I have watched the process. They make wonderful things but cannot charge enough to even cover the cost of using top quality yarns. I have had many discussions with fiber artists sharing their experiences selling in these venues. If they continue to do so they knit items in acrylic yarn and make only uncomplicated things that they can produce quickly. The online buying public is not willing to pay for hand knits in particular. Too few people who do not knit themselves understand what is involved and are, thus, unwilling to pay for it.

I have sold on eBay and Bonanza and I know how these systems work. It usually isn’t worth the effort involved. I have written an article about selling on eBay which I will intend post on my blog soon. I am quite willing to share what I have learned about that! I sold high end high quality vintage clothing on eBay for over a year. It was difficult and not worth the effort involved! More about that later!

The bottom line is that, if you want a really gorgeous hand knitted scarf like this one you will have to knit it yourself or find a friend who will do it for you. Or, better yet, teach you to knit! And that is a good thing as you will have the enjoyment of the knitting process for your time investment as well! Knitting is a wonderful fulfilling meditative calming, and grounding experience.

I honestly hope seeing this Blackberry scarf and the other projects I have posted inspires you to knit!

The Blackberry Scarf ~ A Wonderful Hand Knitted Winter Scarf


As far as I am concerned that is the big picture!  This is the softest, warmest winter scarf I own! The easy pattern is appropriate for a beginning knitter who knows how to knit, purl, cast on and off, and can read a basic pattern.

Scarves are worn in every culture and knitting is done all over the world. Every country has techniques and styles to contribute to the great knitting, scarf  design and styling repertoires available for us to draw from.   Interestingly the Blackberry is truly an International Scarf because the yarn is from Japan, the designer, Jane Ellison is British and it was knitted in the United States by Lady Violette! I find this crossover of influences fascinating and it adds interest to the scarf for me!

Share

Short Ribbed Poncho/Capelet/Shawl/Scarf – Hand Knit of Noro’s Iro Self-Striping Yarn in the Brown Color Way by Lady Violette

Friday, April 15th, 2011

Hand Knitted Ribbed Poncho of Noro's Iro Yarn in the Browns Color Way

This is a short ribbed poncho or capelet that just covers the neck, chest and shoulders. Sort of like a scarf, actually, but in a circle so it stays on. Vogue has put out a knitting pattern book with scarves, shawls and ponchos so they, too, feel they are all in the same category. The keeping warm stylishly category!

The pattern is called Cat and is in the book Naturally Noro by Jane Ellison beginning on page 44.  It is hand knit of Noro’s Iro self-striping yarn in shades of brown.

It takes 300 Grams which is 3 skeins of Iro yarn in the color of your choice and is worked on size 10.5 US needles. It is an easy pattern and is very quick to knit. The poncho is a very cozy cover for the upper body. I like wearing it to grocery shop because I get really cold  in the super cold store grocery stores! The yarn is a little scratchy so I wear a tight cotton turtle neck sweater under it.

This Poncho is knitted in one piece on straight needles and seamed together down the back.

Handcrafted Scatter Pins Made From Vintage Buttons & Seed Beads

I felt the poncho needed a little embellishment so I made three accent scatter pins to decorate the left shoulder. These are very easy to make out of  vintage buttons stacked together, then glued and attached to a metal craft brooch pin. The flower pin is made of seed beads strung on thin wire, twisted into the shape of a flower and, attached to a craft brooch pin.

Pins like this are very lightweight so they won’t stretch out and damage hand knits. They also make excellent personalized embellishments for hand knitted or felt hats.

The book, Naturally Noro, by Jane Ellison is full of cute modern knitting patterns. I have finished two scarves out of it and am working my way through a vest and a sweater now. The designs are fairly easy to make, and are casual and wearable. Maybe I will be able to knit them all! I’m trying!


Share