Image 01

Lady Violette

The Romantic Lifestyle

Posts Tagged ‘Gloves’

Violet Gloves ~ Knitting Work in Progress ~ Continuation Part #2

Sunday, January 29th, 2012

Violet Shetland Woll Gloves - A Handknitting Work in Progress Using Five Double Pointed needles Per Glove.

What an undertaking making gloves is! I’m finally through the palm and have begun the fingers. I worked the little finger first. Next, a bit more on the palm to get up to the beginning of the fingers, then each finger one by one. Each finger is knit as a little cylinder of about 12 stitches that are divided up onto four needles with 3 stitches on each that you knit with the fifth needle. When the finger is the desired length, you insert a darning needle threaded with the end of yarn into the remaining stitches, gathering them up at the tip to close off the finger.Then you weave the end of thread/yarn invisibly and securely inside the end of the finger where it will not show.

It is quite a feat to maneuver all these needles at once without creating an immense tangle of yarn and needle danger! But it is fun and challenging in a weirdly interesting way. I am glad to be accomplishing it. I will forever more appreciate and understand the way knitted gloves are made!

I’m not delighted with this wool. It is rough and scratchy like a loofah treatment! I wanted a strong yarn to make a tough pair of gloves for my first pair. I was afraid I might destroy a more fragile delicate yarn if I was ripping out my knitting and redoing it to get the proper effect. Sure enough I have had to reknit some sections several times to get the construction method right.

One Advantage to Making Your Own Gloves is Being Able to Try Them On As You Knit to Adjust The Fit to be the Way You Like It. And It Is Admittedly Fun Trying to Keep All the Wicked Looking Knitting Needles In Place

This takes way more time than it is worth! Of course! It is no wonder people seldom knit their own gloves anymore! Unless you want something really special. I am only interested in doing it again if I can design and make unique and beautiful gloves. This time around is only for learning purposes – to become familiar with the construction methods.

We have learned how to make the gusset for the thumb and divide the stitches for the individual fingers, etc. All worthwhile knowledge that is only understandable once you have gone through it preferably with a teacher and other students also struggling. I initially tried to understand and make a couple of patterns for these things on my own, but both of them were missing crucial steps in the explanation! No wonder they didn’t work!

After knitting the thumb gusset I removed the needles from the thumb section to use them on main the hand section. I held the live thumb stitches ~ so they would not unravel ~ tied off on the contrasting colors of yarn ~ in this case pink and red ~ while I continued to work on the hand.

As I struggle with this challenge I am reminding myself of all the beautiful vintage glove designs I am hoping to make once I accomplish this skill! There are a lot of beautiful vintage glove patterns still in existence. That is my goal. I know it looks far off as I struggle here with my initial attempt!

Note: I am using 6″ double pointed needles here. they are too long. I must get some shorter ones for my next serious attempt of glove and sock knitting. These are too unwieldy for knitting tiny circles of stitches like fingers and toes. I am searching for a set of short 3 ~ 4 inch long DPNs in a selection of sizes. They are hard to find. four shops in my city are out of them and several online stores are currently back 0rdwred. Any tips on finding good quality double pointed knitting needles will be appreciated.

PS: This is serious business for which one needs the best tools!
Share

Learning to Knit Gloves ~ Living Up to My 2012 New Year’s Resolution ~ Getting Started ~ Part #1

Thursday, January 26th, 2012

Knitting Gloves? Well Yes, that is one of the things I resolved to do in 2012. I love gloves. I have small hands with long fingers and new gloves never fit me as they usually come in one size fits all or med. & large only. And vintage gloves are hard to find. I figure if I learn to knit my own I can make the hands and wrists small enough, the fingers long enough, and choose the styles and colors I really want.

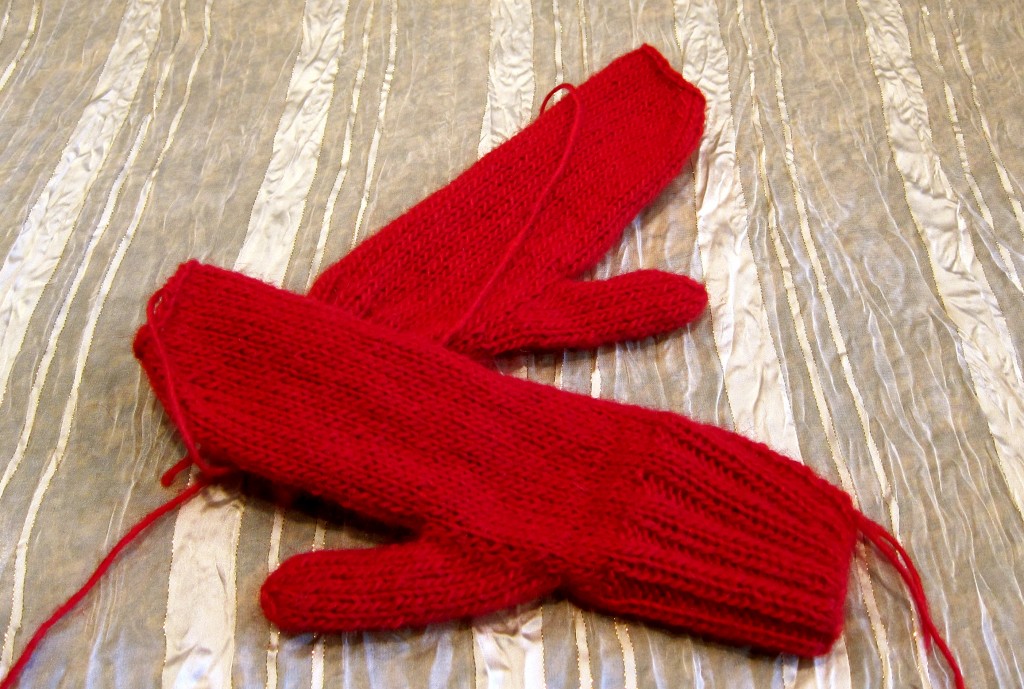
Red Fuzzy Mittens All Knit Up on Two Needles - Flat Technique - Ready to be Sewn Up & Finished

I really am learning to d it. It is a challenge! Fortunately I already know the basics of knitting. I began with a pair of red mittens – so I could learn to understand the basic structure and how to shape thumb gussets before attempting to do 5 fingers. I knit a pair of two needle mittens, on size 6 needles, in the red yarn, now all knit up and ready to be sewn together using mattress stitch so that they can be worn. Hopefully I get that done within the next couple of days. Blocking them and sewing them up all around is all that is left to do. I may also add a decoration of some sort to make them not so basic.

Next, I am knitting a pair of basic 5 finger gloves in violet Shetland wool. My purpose being to learn how to do the thumb and fingers perfectly on a plain pair of basic gloves before I take on making lace or decorative stitch fancy gloves.

Violet Shetland Wool Hank Knitted Gloves In Progress

Here they are, so far! I have done the ribbing for the cuffs, making them four inches long on size #4US needles, then transferred to size #6US needles for the section of the glove up to where the thumb gusset will begin. Next comes the thumb gusset, then the thumb, after that, the little finger, then a bit more knitting around on the hand to bring it up to the base of the other fingers, then each individual finger – each one has to be knitted using four double pointed needles in the round in a tiny circle to form a cylinder. The silver needles are my working set, the red needles are just being used as holders for the live stitches on the other resting glove. I am doing each section on one glove, trying it on to be sure of the fit, then moving over to the second glove so I do the same thing on it, then switching back to the first glove again to continue with the next step. It is very fiddly! Especially since it is being done on a set of 5 double pointed needles in the round instead of two needles, flat, as I did the red mittens above.

Gloves are definitely harder to make than two needle mittens. I highly recommend learning on a mitten first, then graduating to a harder glove with double pointed needles and five individually knitted fingers. I am using Jamieson Shetland DK weight wool here at a gauge of 6 sts per inch. This is a rather large gauge for gloves, but I wanted to be able to make them relatively quickly as my practice set, before moving into a more challenging tiny gauge fine yarn – which is my ultimate intention. I want to “graduate” to knitting fine gloves in refined styles in beautiful colors ~ using many of the interesting fingering weight sock yarns which are very well suited to gloves as well!

I love the yarns! I can hardly wait! Discipline, discipline! I have 2 skeins of lovely yarn picked out, on hold, for my next 2 pairs of gloves, but I won’t buy them until I get these finished. They will be my reward for getting through these first two projects!

I am off to do more work on these today, so will keep you posted with my progress. I am determined to finish them this week! I have to stay on schedule here to accomplish my goals! My first goal is to finish knitting the red mittens and the purple gloves shown above during this January. Then to move forward throughout the remainder of the year by knitting a pair of gloves every month. Each pair must be increasingly more difficult to knit so that I make technical progress. I feel that I will be quite a good glove knitter by next New Years 2013 if I manage to accomplish this. Plus, I will have a good collection of hand made gloves made up from practicing!

After I finish these two pairs I will be looking for glove patterns or a book of gloves to make! I want to make authentic vintage styles, of course! This is only the beginning!

Share

Lady Violette Single Handedly Vows to Bring Colorful Gloves Back in Style!

Tuesday, March 8th, 2011

Flower Colored Vintage Gloves From the 1950's

Gloves were made in all colors in the 1950’s and came in all kinds of fabrics and styles… You could really pick a glove like you could pick a flower! And wear it as an accent to your outfit every day like a corsage!

There was something available to go with every mood and every ensemble…

They were like beautiful colorful flowers!

I have arranged my collection of vintage circa 1950’s  gloves in gorgeous spring colors in a straw basket so I can easily pick a pair to accent an outfit.

Why not think of them as art as well and put them out where they can be seen and enjoyed as interior decor?

The colors are amazing! In this arrangement alone there are Lilac, Violet, Periwinkle, Bluebell, Lavender, Apple Blossom, Azalea. Rose, Cyclamen, Honeysuckle, Queen Anne’s Lace, Bells of Ireland, Mint, Dahlia, Tulip, Iris, Buttercup, Goldenrod, Delphinium, and more…

You see? Just like flowers! And there are many more varieties to be had! Why did women stop wearing pretty gloves? They were so attractive and so entertaining! Beautiful hands were a tremendous asset to women in bygone eras. They continue to be so today, its just that not many people take notice of them. However, if you wear a attractive glove or an elegant ring or colorful nail polish and take good care of your hands people will respond to them  in a positive manner. I have experimented with this and proven it to be so for myself. Why not try it and see what happens? It is another one of those Feminine Arts we so badly need to revive! For our own pleasure and well being!

I have found most of my gloves in thrift stores. I have dyed pure white ones, or slightly dingy with age white ones, pretty colors in the washing machine using Ritt dye. It is very easy to do. And it is not messy at all. You can throw in some lingerie and dye it to match at the same time as well. Vintage cotton and nylon dyes beautifully and easily. You an even over dye prints and get some very interesting effects.

You can find new gloves in bridal shops and costume supply stores. Bridal shops carry many colors in satins and laces to go with brides and bridesmaids dresses. The bridesmaids ones are usually very reasonably priced. You can decorate your gloves with little buttons or ribbons or beads. Let’s bring pretty gloves back and enjoy ourselves!

Easter ~ therefore Spring ~ has always been a traditional time to wear a new hat and a pair of gloves. If you don’t celebrate Easter you can always celebrate Spring! Celebrate the beauty of nature, the fruit tress coming into bloom, bulbs coming up and flowers blossoming… Join them in being colorful! They will love it!


Share

Beautiful “Violets are Blue” Gloves for Spring from Lady Violette’s Private Collection

Monday, March 7th, 2011

"Violets are Blue" 1950's Vintage Glove Collection

But of course Lady Violette has a blue violet glove collection! And strong opinions about gloves!

Here it is ~ my collection of dainty little blue vintage gloves for spring from the 1950s ~ when ladies still wore  gloves to protect their pretty hands almost all the time!

They wore them whenever they went outside and for activities such as  driving, when shopping (and they kept them on for that) when going out to lunch, tea or cocktails, definitely for church, for dinner, to dances. to the country club. There were special gloves for almost every occasion. From gardening to protect the hands from dirt and sun, to long elegant evening gloves for the glamourous evenings out.It was not unusual to switch back and forth and end up using five pairs of gloves per day.

The goal was to keep your hands young looking, white, and soft. You were to keep them out of the sun in summer and warm in winter. They often put petroleum jelly on their hands, then wore white cotton gloves over it while they slept. (I tried it. But I couldn’t sleep! It felt too weird!”) A bit of hand cream during the day and at bedtime is all I can manage.

It was a common practice to check ones fingernails each morning, file them carefully to points, lightly buff the surfaces, and apply fresh polish daily. My grandmother did this while having morning coffee and reading the newspaper as she let her nails dry. She pushed her cuticles back with an orange stick wrapped in cotton. She didn’t paint the moons. She insisted that oiling the cuticles and never cutting them was the secret to beautiful nails. She also took vast amounts of gelatin as she was sure it was beneficial to having both healthy hair and nails. Natural nails were considered beautiful.

The thick, extra long, fake looking acrylic ghetto-fabulous nails many women wear today would have horrified her! They look like talons! They are not lady-like! Feminine, pretty and healthy nails were the goal… And you must never look like you had to do any work with your hands. The goal was to give the impression that your husband or father was successful enough in business to afford household help. Amazingly women actually did do a lot of household work and cooking and still managed to maintain their hands nicely.

This has to have been due to their attention to taking care of their hands. Their dedication to wearing gloves, filing and buffing their nails, and moisturizing. Historically beautiful hands were greatly admired. Women made caring for their hands a priority.

Gloves are so utterly feminine, so perfectly girlish and charming! I have been collecting them for years. They are getting very hard to find. They don’t seem to be making them anymore! Anywhere that I know of. (If you know of a good source, please, let me know! ) You used to be able to walk into any fine department store and go to the glove bar where there would be a great selection of practical and dressy gloves available in a vast array of sizes. Not one size fits all! And every season an amazing array of high fashion and highly entertaining options would emerge.

There used to be glove bars and hat salons in major department stores. Those were the days! And those are the kind of gloves I covet! I want them in every length, color, style, and fabric. Vogue Patterns is offering vintage patterns for making your own now. I am going to try it.

I provide pictures and descriptions of the real thing now for inspiration.

The Blue Violet Vintage Gloves clockwise from the top:

1) Pale blue/gray nylon ruched elbow length gloves – size  small

2) Robin’s egg blue kidskin gloves from Italy – size 7

3) Palest  ice blue Kid gloves from France – size 7

4) Periwinkle blue nylon wrist length gloves size 7.

5) Blue super soft and velvety cotton gloves – size 7

Did you know that gloves fit the same way as shoes? A woman’s shoe and glove size is usually the same. Or within the range of 1/2  a size difference. Thus if you wear a size 6 1/2 shoe, you will most likely take a size 6 and a half glove – if you wart a size 8 shoe you will probably wear a size 8 glove.

!


Share

Lady Violette’s Design for Knitted Raspberry Colored Gauntlets

Friday, February 25th, 2011

Lady Violette's Lace Up LIke a Corset Raspberry Gauntlets

I have just finished designing and knitting this pair of gauntlets which cover the arm from wrist to elbow and are laced together like a corset which allows a flirtatious bit of skin to show through. These are made to fit with negative ease and it took me a couple of tries to get the sizing down (small enough) as I wanted a good tight fit with stress across the lacings to give me the best looking laced up effect.

This was an experiment. I was not sure if it would turn out! But I love them and will now make them again and carefully document the process so I can share it. The yarn I used is left over Manos del Uraguay Wool Classica and required less that one full skein. I recommend winding one skein into two balls of equal size before starting a pair of these so you are sure to end the first one before you have knit over 1/2 the skein’s worth of yarn. The same way one divides a skein of sock yarn.

I used Brown Sheep’s Lamb’s Pride Bulky for the Lacings. The stitches at the end of the gauntlets are left live on purpose. I laced the Brown Sheep Lamb’s Pride Bulky yarn through them so I could try on the gloves for fit and it looked so cute that I decided to leave them live and utilize the lace effect of those stitches rolling a bit and creating a tiny ruffle on the end.

These must be made to measure for the person they are for. You need to make them a very tight fit. I made these up as I knit and did not write down the pattern but they turned out really well after some initial struggle with the sizing, so I have bought some more yarn and will make another pair and document the pattern, then post it. I will then be able to give exact directions for making personalized measurements.(I do get mad at myself when I don’t document the pattern the first time through. But I get carried away with the process and don’t take good notes. It is actually easier for me to write a pattern when I make a thing the second time as I am doing it very deliberately so that someone else will be able to understand it. Now that I am posting it on my blog I will take pictures as I go to illustrate the process as well.

I find it hard to know if I am doing something correctly when I don’t have an in process photo to check my progress against. Most knitting patterns only give you a finished photo to look at. I want to provide a few pictures of the step by step process of a garment underway …. so I am going to experiment with that on this little gauntlet.

This is a nice small project as it can be done quickly, doesn’t require a huge investment in yarn and is fairly easy to make. Then there is the added cuteness factor!

I used size 7 and size 6 needles. Manos del Uraguay Wool Classica for the main part of the gauntlet and Brown Sheep’s Lamb’s Pride Bulky for the lacings. Any yarn of the similar weight should work and you could use ribbon for the laces instead of bulky yarn. I had intended to use ribbon, but when I did my try on with the Brown Sheep’s Lamb’s Pride Bulky yarn lacings I liked the way the yarns look together so much that I decided to leave it in.

I will post the pattern and a photo of the gauntlet on a model soon.

The cost to make a project is always a concern so I called The Weaving Works in Seattle where I often buy my yarns to check on the current cost of these yarns. Brown Sheep’s Lamb’s Pride Bulky costs $8.15 per skien. Manos del Uraguay’s Wool Classica costs $ $15.25 per skein in solid colors as I used here or $17.25 in varigated colors. My cost to make the gauntlets pictured was $15,25 for the ball of Manos. I used a bit of leftover yarn from my little Lady Violette Vintage Violet Clutch Purse for the lacings. The cost of yarn for that purse was $8.15. You can make both the gauntlets and the purse for a total yarn cost of $23.40! Not bad is it? I will post this information as “Cost of Knitting” with an additional photo of both projects shown together for those who are interested.

Share