Image 01

Lady Violette

The Romantic Lifestyle

Posts Tagged ‘Flowers’

Lady Violette’s Interpretation of the Hand Knitted Poppy Sweater in the Iris Color Way ~ Just Finished and Successfully Figure Fitted Like a Corset Through the Use of Negative Ease

Saturday, April 9th, 2011

My Iris Color Way Hank Knit Sweater

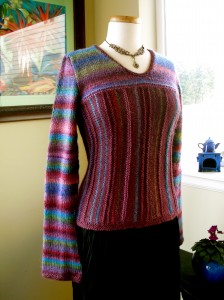
I have just finished knitting this beautiful blue, purple and green striped sweater from the pattern for the Poppy sweater in the book Yarnplay by Lisa Shobana Mason. Poppy was originally done in reds and browns using Noro yarns Silk Garden and Cash Iroha. I substituted Tonalita for the striped sleeves and the striped portion of the yoke and body and an old unlabeled purple mystery yarn in a silk and wool blend for the solid red sections in the original pattern. The mystery yarn was given to me by a friend and I had it for years without any tags or labels so I have no idea what it is. I do know it is an old yarn and isn’t carried by yarn stores now as I have taken it around to several with me and no one recognizes it. I luckily had just enough for this project!

I am calling this my Iris sweater, because it is done in blue and purple iris colors, not red poppy colors. They are both named after flowers though, which was one of my attractions to the design ~ being Lady Violette and having an interest in all things floral!

The original pattern was knit of scratchy yarns and I chose to do mine out of very soft yarns. I cannot wear rough yarns. They are way too itchy for me, even during the knitting process. I did use yarns that worked up at the same gauge. I had to adjust the pattern to fit me and measure and make adjustments constantly as I was working. It was a difficult project. I only recommend undertaking it if you are an advanced knitter and have a great deal of patience to see it through to finishing. I had to stop and work on other projects that were not so demanding, then pick it up again and continue several times before I finished it. It is beautiful now that it is finally done so I guess it was worth it!

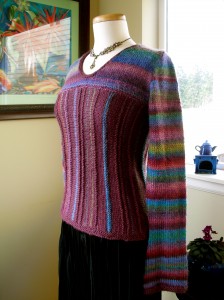
Fashionably Long Hand Covering Sleeves in Tonalita Knit In the Round on Five Douple Pointed Needles

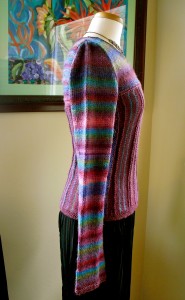
The sleeves may appear long in the pictures. That is because they are designed to be the trendy long type of sleeve that goes over the palm of the hand. They are also taken up when worn so they really do fit perfectly. The bottom edges of the sleeves cover my hands and reach the bases of my fingers exactly. This is very pretty and very cozy ~ but definitely makes for a dressy sweater rather than one you would wear for cooking or doing the dishes! ( A great excuse for avoiding those activities!)

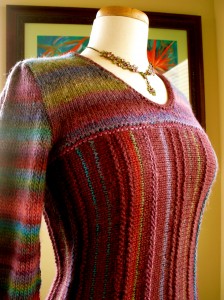
The bottom part of the sweater is knit in a strip from side to side in stockinette stitch with occasional stripes in garter stitch and stockinette stitch. The knitter adds these whenever and wherever she likes, so each rendition of this pattern is unique. I put in a lot more stripes than the original designer did ~ originally to be sure I would have enough of the solid purple color to finish the body ~ ultimately because I really liked the design better that way!

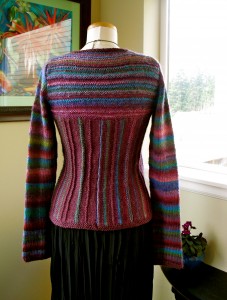
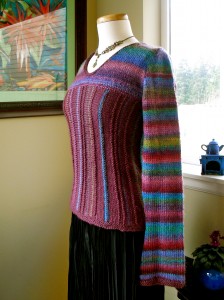
I knit the sleeves in the round on double pointed needles in order to avoid seams. I made the stripes on both sides match each other as well ~ on the yoke and both sleeves. This required cutting the yarn and reattaching it and carefully keeping track of the rows worked in each color. I did the back yoke on mine with a lot more texture and garter stitch worked into it than the designer used in hers as well. I tried to do the same method in the front but it didn’t work out as well there! So my yoke ended up being highly textured in the back and smooth stockinette stripes on the front. this was risky, but it worked.

The Back of the Iris Sweater Featuring Garter Stitch Stripes in Two Directions


All in all this sweater was a huge experiment. I added a double row of garter stitch around  the bottom to tie it in better with the edging around the neck. The designer originally finished off her edges with a line of single chain crochet! Because I used different yarns and am a different knitter, my Iris sweater almost looks like a different sweater than the original Poppy design. This often happens when you knit something in very different yarns and make fitting and design adjustments along the way.

My Iris Sweater is an interesting project that evolved using bits and pieces of leftovers from two other projects. And using a lot of determination! It is sometimes fun to see what you can do working with limitations. In this case only having small amounts of two types of yarn that weren’t even the ones called for in the pattern. If I had gotten stuck without enough to finish I would probably have added yet another yarn or changed the design to accommodate my limitations.

I was anxious to photograph it and post it. After the agony of finishing it I am anxious to get some feedback from other knitters and designers! Of course I am interested in the opinions of non knitters as well. I photographed it with a black pleated skirt, but, for a more casual look I plan to wear it with dark green or dark blue vintage jeans and dark green boots or a dark purple skirt and purple tights that I have.

Corset~Like Figure Forming Fit

I knit my Iris sweater to be very fitted with a slight negative ease. To me the body of the sweater has a corset~like effect with the shape of the body and the slimming vertical stripes simulating the stays of a corset. This is form fitting and figure flattering. The yarn is fairly fine in quality and certainly in feel, so I wanted a refined looking fitted  sweater rather than a loose fitting one. It is possible to make fitted knits when you make them custom to fit yourself or another person for whom you are knitting. The trick to achieving that is negative ease. I made the sweater tighter than the designer did hers. I achieved a dressier more formal look. Her looser fitting one is more casual.

Knitting is an art form, and in making art, each artist’s interpretation is individual and unique, even when using a pattern. In knitting I find a pattern is really just a guide to get me started. I rarely make any pattern the exact way it is written with the same materials the writer used. In fact I do not know if I ever have.


Side View of beautifully Shaped Iris Sweater

I always wonder if people who do not knit have any idea how complicated making something like this sweater is. Think about it! Every single stitch is made by hand and has to be counted and kept track of while you go! It requires a tremendous amount of concentration and time and self discipline. Hand knitting takes a lot more time than sewing.


It breaks my heart when I see a beautiful hand knit sweater that someone lovingly made somebody given to a thrift store. I have found them and It is my personal mission to rescue them whenever I do. It is on the same level as rescuing an abandoned animal for me! Knitting is an art form and to do it well is an amazing accomplishment. It takes hundreds of hours to make a hand knitted garment. I will be pleased if people who didn’t understand anything about what was involved in knitting before reading my blog develop an interest in it from reading what I write and looking at the pictures I post. Not only does the knitting take a lot of time and expertise, but the yarns and fibers themselves are amazing, fascinating and very valuable. I will write more about that in the future.

Fitted Knit ~ Like a Corset Through the Torso

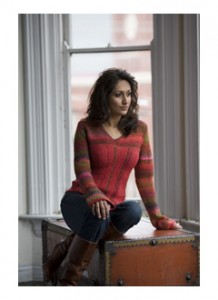
The Original Poppy Pattern, in red yarns is pictured below. More photos in red can be seen on the blog of Lisa Shobhana Mason and can be found in her book Yarnplay, available from Amazon. This sweater is photographed on the cover of her book and directions begin on page 98. It is rated  advanced level for experienced knitters. I would definitely agree with that rating! You can find photos of other knitters completed versions of this pattern on Ravelry if you would like to see how their interpretations of the same original pattern turned out. I always enjoy seeing them!  You can see them on Ravelry (requires free account). I just looked at these other knitters works – and what fun it was to see how they differed from mine! This is always the case with the feminine arts like quilting, knitting, sewing, crocheting, embroidery, etc. – each woman’s personality comes out in her needlework. Check it out, you will see what I mean! The sweater has been made up in many different yarns, colors and sizes.

Incidentally Ravelry is a great place to get ideas and find patterns for knitting and see other peoples work.


Original Poppy Sweater in Red by Lisa Shobhana Mason

If you want to make a fitted garment with negative ease experiment with the following suggestions. Knit a size smaller than you normally would. Be sure to make the pattern pieces long enough though! You will want them to end up tighter around but not a lot shorter! Try knitting on a size smaller needles than the pattern calls for. This will create a tighter knit, thus smaller, piece of knitting. Be sure, again, that the length is adequate. In this case I experimented and ended up using one size smaller needles than originally called for in the pattern and adding length by knitting a few extra rows to get the length I needed through the torso. I knit sections, take them off the needles and try them out by holding them up to my body or that of the person I am knitting for. I put them back on the needles and make any necessary adjustments, then continue. I sometimes have to take out fairly large sections and redo them, but I do it because I want perfect results. The trick to avoiding having to redo large sections is to try things on to test the size and figure out the measurements fairly often. theoretically you should be able to do this by calculating it out on paper, but that is not the same thing as a try on! The only true test is actual fitting on the body of the person for whom you are making the garment. It is always worth the extra time it takes.
 

Share

Four Ways to Tie and Wear a Fabulous Designer Silk 36 Inch Square Scarf

Friday, April 1st, 2011

Step #1 ~ A Square Leonard de Paris Designer Vintage Silk Scarf

I have asked Tricia James, International Scarf Stylist, to show me some ways to wear my designer silk 36″ square scarves. Here is a lovely and unusual vintage Leonard de Paris silk scarf from Lady Violette’s private collection. This scarf is unique because the designer’s name and signature are in the center of the scarf. They are usually placed in  one corner so that it is easier to drape and tie them while showing the designer’s name.

I love this scarf because it features many beautiful flowers in the design and they are positioned inside a central heart. The violet has cordate heart shaped leaves. As my name, Violette de Courcy literally means violet of the heart and I am a lover of flowers this design really appeals to me! It is very personal!

Tricia told me she could show me how to easily make one fold into four wearable styles!

Step #1) Begin by opening the scarf out in a big square.

Step #2 ~ Fold Scarf in Half


Step #2) Fold the scarf in Half as shown, In this case we decided to fold this scarf down through the vertical center of the big heart making a rectangular shape.


Step #3 ~ The Proper Way to Hold the Scarf to Make the W Fold.


Step #3) Next, in order to make a W fold, hold the Left Upper corner of the scarf up in your Left hand, while taking the Right lower corner in your Right hand. Next, hold the scarf away from your body so that the Right upper side of the scarf falls behind thus creating the  W fold…


Step #4 ~ Voila! You Have Now Created The W Fold


Step #4) Thus folding the rectangular shape half folded scarf into a W shaped fold as Tricia shows.


Step #5 ~ Position W Scarf Around Your Neck.


Step #5) Place the W folded scarf around your neck as shown on the mannequin bringing the two corner ends to  the center front.


Step #6 ~ Tie a Simple Double Knot


Step #6) Tie the two pointed ends by tying them once, then again, thus forming a simple secure double knot.

Tricia says, “No fancy hard to tie knots here!”


Step #7 ~ Style 1 of 4: The Sailor Collar ~ C'est Fini!


Step # 7) You have created a lovely Sailor Collar out of the scarf, like the collars on midi blouses. This is a classic French looking style!

This is Style # 1 of the four styles from one fold ~ the W fold.

Step #8 ~ What the Sailor Collar Looks Like From the Back


Step #8) Just so you’ll know, this is what the Sailor Collar scarf tie looks like from the back.


Step #9 ~ Style 2 of 4: The French Bandana


Step #9) Simply rotate your already tied scarf around on your neck so that the knot is resting stylishly on one shoulder and the point is hanging down the front. This is another stylish and classic look I call the French Bandana.

This is beauty is Style #2 of the four from one fold ~ the W fold.


Step #10 ~ Style 3 of 4: The Draped Cowl


Step # 10) To create a flattering draped cowl rotate the already tied scarf so that the knot is in the center back and adjust the scarf so that a point is spreading out over each shoulder and a pretty cowl effect is formed in the front.  This is called The Draped Cowl. It looks lovely over a dress or blouse as shown and is a fabulous neck filler for a jacket or coat.

The Draped  Cowl is Style #3 of the four from one fold ~ the W fold.


Step #11 ~ Style 4 of 4: The Scarf Necklace


Step # 11)  To create what we call The Scarf Necklace which is really like a jeweled necklace but made of beautiful colorful silk , simply roll the cloth sections from each shoulder toward the center by turning them under and smoothing them with your hands until you have achieved an attractive draped ring of soft fabric around your neck.

The Scarf Necklace is Style #4 of the four from one fold ~ the W fold


I am delighted to have learned how to use my favorite scarf now! Perhaps you have a huge square designer silk scarf languishing in a drawer that you would like to use too! I know many people receive them as special gifts and are often at a loss as to how to wear them. Hopefully this will give you some ideas to try on.

Visit Ticia James at Scarfgenie .com

Share

I’m Having fun sewing 50’s skirts! I can’t stop! Here’s another, hot off the press!

Monday, March 28th, 2011

Sewing 50's Styles on My 1952 Singer Featherweight Sewing Machine

Sewing these colorful little cotton skirts is so fast and so rewarding! I’m suddenly caught up in it! So I have just finished another one! Again, size 3T, for the three year old princess Mademoiselle Coco who loves pink and loves twirly skirts! I am loving them so much that I am going to make myself one as soon as I finish the Princess Wow concert dresses!

I’m whipping these up out of leftover fabric from other bigger projects.

Hot Off the Press Today ~ Three Different Cotton Prints & and Five Yards of Rick~Rack! Size 3T

Here is today’s creation! Amazingly, it required two full packages of Rick~ Rack! For a child’s skirt ~ size 3T. That impresses me as a lot of Rick~Rack. I don’t know what to expect when I make an adult’s dress! But I can tell you that I intend to use a lot of the stuff as I love the effect! It is crisp, fresh and decorative! But it is not cheap! The wide stuff ~ called Jumbo, is $4.99 for a package of 2.5 yds. and the Medium is $2.99 ~ so this small skirt contains $8 worth of Rick ~ Rack, $1.50 of elastic, two spools of thread, and the fabric which I cannot really cost out as I used left overs. When I make it again I will calculate the yardage and price it out. It is important to know how much a project is going to cost to make.

People used to sew to save money, but nowadays it is actually quite expensive. You just get to make exactly what you want and get a perfect fit. Those are the advantages. Fabrics and trimmings have gone way up in prices. Of course fuel prices effect these costs as well. Sometimes I take apart old clothes and reuse the fabric and buttons, and other parts in new creations. I actually really enjoy doing that at times.

Two Twirly Skirts

Here are the two little pink twirly skirts I have made for Coco over the weekend. Both pink, of course! And super cute.

What’s in that pink heart box? A little bumble bee tea set! A tiny teapot, 4 little cups and saucers. and a  sugar and creamer. Yes, I will probably photograph it and post it soon.

These would be the perfect skirts to wear for an Easter tea party! I will have to get cooking.

Pink and Green the Ultimate Preppy Combo!

Here’s a close up of the other skirt. It’s a full circle. The bows are removable for washing and ironing or can be taken off and untied and worn to tie the hair back in a pony tail.

Yesterday I read that in the 1950’s ~ 52 million sewing patterns were sold! And that 50 million women and girls in the US were sewing on a regular basis! They  were making clothing for themselves, their children and their families. And making curtains, slipcovers and pillows and so on for decorating their homes. That sounds like domestic bliss to me!

The majority of patterns sold were for women’s dresses. And were they ever pretty! Super full skirts, based on Dior’s New Look, nipped in waists. Bright beautiful prints  and  solid  colors, crinolines, hats, and high heels! I would have been in heaven! So lovely and so inspiring!

What would happen now if 50 million American women suddenly started making the majority of their own clothes again? Would everyone look pretty? I think so! Would shopping malls with store upon store of ready made go out of business? Or collapse? Hopefully!

Personally, I love the old styles and I love the old patterns. I look at Vogue Patterns Catalogue for the Vintage Vogue  Pattern reissues every time I am in a sewing store. And I have bought some on eBay as well. But now that I know the statistics I wonder where all the original 1950’s patterns are?

I want to discover a warehouse full and make them all! Tell me if you know of one! Seriously!

Share

A Fun Day of Sewing Charming 1950’s Styles in Crispy Printed Cotton

Sunday, March 27th, 2011

Butterfly Apron ~ Original 1952 Design

The Feminine Arts in Action


Today I made a couple of fun and easy ultra feminine vintage goodies out of flower and butterfly and polka dot printed cotton. It is so fun and relaxing to work with compared to slinky slithery silks! And it goes so much faster. Very rewarding!

I made a 1952 Vintage Vogue Apron from currently available Vogue pattern number 8643 ~ view A. I love the giant super functional pockets, the practical length and the fact that it required 3 packages of bright pink rick~rack! That is 7 and 1/2 yards! Wow!

Great Big Piockets with Great Big Rick~Rack!

It is so springy and cheerful! I am currently in love with colorful aprons and pinafores and printed cotton dresses! The fabrics are so cute and the styles are so girly. I want to start wearing them as accessories all the time while I am working at home. They make me feel good, like wearing perfume does, or having a bouquet of fresh tulips on the kitchen table. They are so colorful and so uplifting! Easy to make too. It is no wonder they were so popular in the 50’s! They make you feel good. Psychologically!

Little Girl's Twirly Skirt


I also made an adorable size 3T full circle skirt in bright pink polka dotted cotton, with green butterfly pockets, waistband and bow from leftover apron material. I made miles of handmade bias tape for the hemline of this little skirt out of a third pink and green printed fabric.

Pleated Butterfly Pocket Trimmed with Custom Made Bias Tape and Button


It runs along the top of the pockets and around the bottom of the hem of the skirt. It shows up better in person than in this little photo. And it is a really nice touch in person. The pockets  also have pleats and are trimmed with little pink buttons. This little girl’s skirt is made from currently available Simplicity pattern 2356.

I had a special request for a butterfly skirt! And just enough fabric left over from the apron to make two pockets with the butterflies strategically positioned with one on each side and tilted a bit so they look like they are in flight. I think it is a hit! It is going to be a surprise and I am quite sure the little three year old fashion plate I made it for will absolutely love it! I have enough leftover fabrics to make her some matching doll clothes too!  I intend to do a doll skirt just like the little girl’s skirt!

Interesting Front T~Panel Construction

This kind of sewing is so much fun. I love mixing the fabrics, and adding as many girly details as I possibly can. That would be multiple pink and green printed cottons, pockets, bias binding, decorative buttons, top stitching, inventive pockets, and, of course bows!

The apron features a front T~panel construction which eliminates gathers across the stomach and creates a very slimming look while allowing the side gathers to give the impression of a lushly gathered full skirt.

Women were so conscious of their prettiness in the 1950’s. I say we should look this good around the house! I’m sure it will make us look better and I think it will make us feel better!

Little girls naturally want to wear flowered skirts and butterfly prints and bows and pink ~ grown up women should get back into it as much as possible again! All these vintage touches bring back femininity. They are artistic and they make us feel good. It’s those feminine arts doing their positive work! Bringing sensual pleasure and beauty to life!

A Lovely Twosome!

Nice Crisp Bow in the Back

Share

How to Tie & Style the Basic Beautiful White Silk Shawl Demonstrated by International Scarf & Accessories Stylist Tricia James

Thursday, March 24th, 2011

One Version of the Exquisite Finished Shawl Style Garnished With a White Silk Flower

One Version of the Finished Shawl Style Decorated With a White Silk Flower Corsage

Here is one of several of the beautiful decorated versions of this finished shawl style that I showed over the last two weeks. This one is decorated with a white silk flower corsage.

To create this basic tie and style Tricia used a white raw silk oblong scarf/shawl measuring 72″ long by 20″ wide ~ not counting the fringe on each end which is a nice extra touch and measures about two extra inches long on each end.

We have experimented and discovered that a pashima or a silk scarf of this approximate size will also work for this shawl tying/styling technique. You can use a solid color as we have done here, or an all over small print.

The longer the shawl is the more you will have to work with as you create your drape. We recommend the longer versus the shorter versions of these shawls for ease and success in creating this style.


Step #1

To Begin:

1) Drape the shawl over shoulders with Right side of scarf longer than the Left side ~ as in picture 1


Step #2


2) Bring the shorter Left side of shawl across your body ~ as in picture  #2


Step # 3


3) Drape it over allowing it to rest on your Right shoulder  ~ as in picture #3


Step #4


4) Pick up lower Right longer end of shawl in your Right hand and bring it up across the center front of your body to the center of your neckline ~ as in picture #4


Step #5


5) Then tuck it under your neckline and ~ placing your Right hand up under the shawl from below, take hold of the tail and pull it down and through the center front with your Right hand, ~ while taking the upper Left shorter end of shawl (that was resting on your Right shoulder) in your Left hand and pulling it upward ~ thus making a large soft center front knot ~ as in picture #5

Begin to pull on the two ends of the shawl simultaneously, creating a custom fitted shawl around your shoulders, thus preventing the shawl from slipping throughout the day.

As Tricia says, “A custom fit is a marvelous thing, Darling!”

We all agree with that, don’t we?


Step #6


6) Tuck Left upper end end behind your Right shoulder and spread the shawl out styling it attractively at both top and bottom. This is very elegant and attractive just like this! You can wear it plain and simply like this, unadorned ~ as in picture #6.


or,

For added interest you can decorate this beautiful basic shawl shawl tie with a silk flower corsage, a brooch, a shawl clip, a hair accessory used as a scarf clip or anything else you can think of as Tricia demonstrated in several earlier blog posts. The styling possibilities are almost endless once your imagination sets in! I really encourage you to experiment!

Be sure to visit international scarf and accessories stylist Tricia James at her website scarfgenie.com to see other interesting scarves, scarf styling options and products she has to offer.

And come back to this blog, Ladyviolette,com often because I will be posting many more shawls and scarves and ideas on how to wear them on a regular basis.

I am a great admirer of shawls and scarves and feel they add amazing elegance and options to women’s wardrobes. A scarf can be a beautiful and unique personal statement and the way one wears it is certainly one of the loveliest of feminine art forms.  I am personally committed to demonstrating this and to finding out more about how to style and wear them successfully again. I say again because I think they were worn much more in elegant previous eras and I feel it is time to bring them back, research how they were worn in the past and learn how to tie and style them once again for our enjoyment in the present ~ here and now!

Additionally there are so many new contemporary ways to wear them.  And, luckily, I have my friend,  the modern current day scarf specialist, Tricia James to collaborate with me on this project!

Tricia brings her own artistic ability to styling and tying scarves and shawls along with 20 years past experience traveling around the world while training and working with her mentor Isabella Gardener. I will interview Tricia soon and post her incredibly interesting and exotic back ground story on this blog…

I also plan and look forward to sharing some amazing examples of vintage scarves and shawls I have collected with you here in the near future. Watch for this!

And, if you have historical information to add please share it with us as well. We would love to hear from you! After all, isn’t that is what the web is for?


Share