Image 01

Lady Violette

The Romantic Lifestyle

Posts Tagged ‘Feminine Arts’

Learning to Knit Gloves ~ Living Up to My 2012 New Year’s Resolution ~ Getting Started ~ Part #1

Thursday, January 26th, 2012

Knitting Gloves? Well Yes, that is one of the things I resolved to do in 2012. I love gloves. I have small hands with long fingers and new gloves never fit me as they usually come in one size fits all or med. & large only. And vintage gloves are hard to find. I figure if I learn to knit my own I can make the hands and wrists small enough, the fingers long enough, and choose the styles and colors I really want.

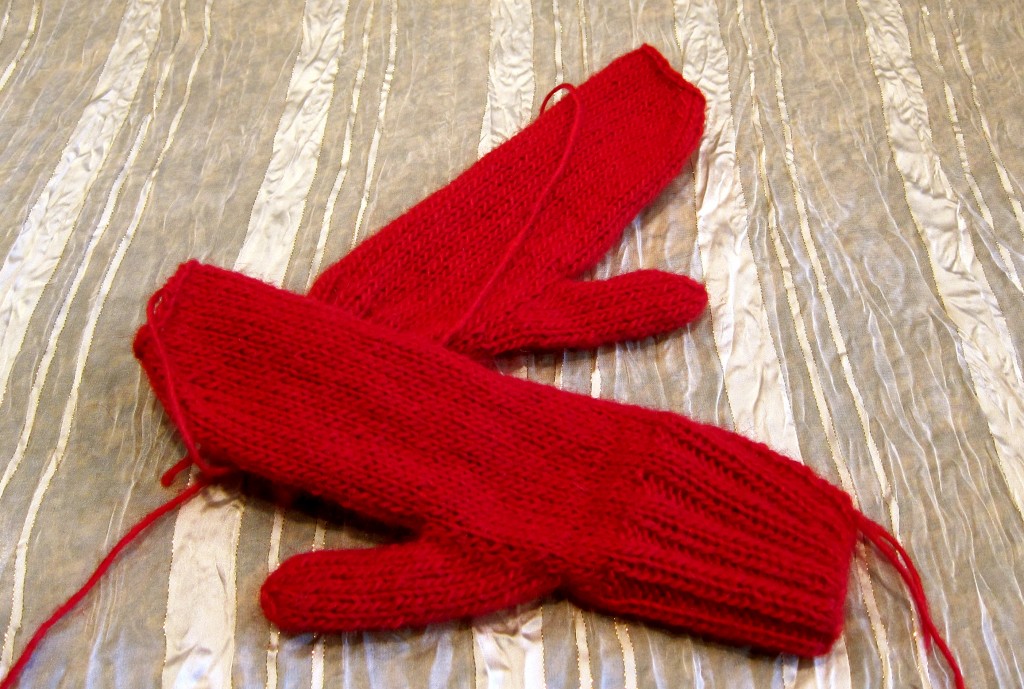
Red Fuzzy Mittens All Knit Up on Two Needles - Flat Technique - Ready to be Sewn Up & Finished

I really am learning to d it. It is a challenge! Fortunately I already know the basics of knitting. I began with a pair of red mittens – so I could learn to understand the basic structure and how to shape thumb gussets before attempting to do 5 fingers. I knit a pair of two needle mittens, on size 6 needles, in the red yarn, now all knit up and ready to be sewn together using mattress stitch so that they can be worn. Hopefully I get that done within the next couple of days. Blocking them and sewing them up all around is all that is left to do. I may also add a decoration of some sort to make them not so basic.

Next, I am knitting a pair of basic 5 finger gloves in violet Shetland wool. My purpose being to learn how to do the thumb and fingers perfectly on a plain pair of basic gloves before I take on making lace or decorative stitch fancy gloves.

Violet Shetland Wool Hank Knitted Gloves In Progress

Here they are, so far! I have done the ribbing for the cuffs, making them four inches long on size #4US needles, then transferred to size #6US needles for the section of the glove up to where the thumb gusset will begin. Next comes the thumb gusset, then the thumb, after that, the little finger, then a bit more knitting around on the hand to bring it up to the base of the other fingers, then each individual finger – each one has to be knitted using four double pointed needles in the round in a tiny circle to form a cylinder. The silver needles are my working set, the red needles are just being used as holders for the live stitches on the other resting glove. I am doing each section on one glove, trying it on to be sure of the fit, then moving over to the second glove so I do the same thing on it, then switching back to the first glove again to continue with the next step. It is very fiddly! Especially since it is being done on a set of 5 double pointed needles in the round instead of two needles, flat, as I did the red mittens above.

Gloves are definitely harder to make than two needle mittens. I highly recommend learning on a mitten first, then graduating to a harder glove with double pointed needles and five individually knitted fingers. I am using Jamieson Shetland DK weight wool here at a gauge of 6 sts per inch. This is a rather large gauge for gloves, but I wanted to be able to make them relatively quickly as my practice set, before moving into a more challenging tiny gauge fine yarn – which is my ultimate intention. I want to “graduate” to knitting fine gloves in refined styles in beautiful colors ~ using many of the interesting fingering weight sock yarns which are very well suited to gloves as well!

I love the yarns! I can hardly wait! Discipline, discipline! I have 2 skeins of lovely yarn picked out, on hold, for my next 2 pairs of gloves, but I won’t buy them until I get these finished. They will be my reward for getting through these first two projects!

I am off to do more work on these today, so will keep you posted with my progress. I am determined to finish them this week! I have to stay on schedule here to accomplish my goals! My first goal is to finish knitting the red mittens and the purple gloves shown above during this January. Then to move forward throughout the remainder of the year by knitting a pair of gloves every month. Each pair must be increasingly more difficult to knit so that I make technical progress. I feel that I will be quite a good glove knitter by next New Years 2013 if I manage to accomplish this. Plus, I will have a good collection of hand made gloves made up from practicing!

After I finish these two pairs I will be looking for glove patterns or a book of gloves to make! I want to make authentic vintage styles, of course! This is only the beginning!

Share

Lady Violette ~ Erte Inspired 1920’s Style Hand Knitted Cloche With Pearly Vintage Accent

Friday, January 20th, 2012

Lady Violette's Rambler Spiral 1920's Cloche Hand Knitted in Cashmere and Silk

Another of My Recent Creations in the 1920’s Mode is a Hand Knitted Rambler Spiral Patterned Forget~Me~Not Luxury Fiber Flapper Style Cloche Hat With Pearly Vintage Accent. I am currently exploring making and wearing elegant knitted hats as feminine fashion pieces as they did in the 1920’s ~ 40’s. Versus the knitted granola hat destined for the ski slope, skate board park or shapeless grunge fashion accent  There are so many beautiful yarns out now that I cannot resist making something gorgeous out of them to put on my head!

I had to attend a 1920’s themed party so I made this little Erte inspired hat to wear with my blue 1920’s vintage dress of the same color rayon brocade combined with a darker blue velvet. I also wore many pearls so I trimmed the hat with a vintage pearly and blue trim piece that I had. I love the way this turned out! And I am already in process making it in two more colors – a dusky berry and a woodsy brown. I have two other stitch variation in mind to try out as well.This is such a cute shape I want to make several of them in many colors ~ perhaps a full bouquet! I am fantasizing about opening a drawer full of them overlapping each other in a rainbow of pretty yarns in many colors!

I used Sublime Cashmerino Silk Aran 10 ply yarn from England and found the basic cloche pattern in  Sublime’s Aran Hand Knits Books. You can use the basic hat pattern with any stitch variation you like. Like all vintage British patterns this one is written to be knitted flat on straight needles and seamed together down the back in finishing. It fits perfectly and looks adorable on. It required 2~50 gram balls of Aran weight yarn but I’m sure I have enough left over to make a knitted flower corsage to pin on one side of the hat. I think that will make a nice accent ~ instead of the pearl piece – when I want a different look. This is definitely a pretty hat design one can wear in the summer!

It’s still snowing here! And very dark outside! When I have the corsage finished and the snow has melted I will get a friend to photograph me wearing the hat and post pictures of it again. I wore it to the 1920’s themed party and it was a hit.

The pearl accent piece is not a vintage brooch. It is 3 vintage buttons wired together in the back and meant to be sewn onto something as an accent. It is a great idea to wire any number of buttons together to make such a “garnish” which is what I have decided to all it. You could also do the same thing with clip earrings. You can untwist the wires anytime to use the buttons as originally intended too! Such a garnish could be used on a coat, jacket, hat, dress, stole, even in your hair! The idea is probably something women came up with during the mend and make do era when they needed to whip up an embellishment in lieu of a jewel to trim an outfit before going out. It is very clever and a great use for pretty vintage buttons.

You can visit my site on Ravelry to find out more about my knitting and see more of my projects. I am ladyviolette on Ravelry. I post photos of the item, yarn and pattern information there so that you can find it if you want to create the same or similar article. If you are a knitter or interested in knitting I urge you to visit Raverly. It is a terrific resource for people with interests in knitting and crochet.

Share

Lady Violette Design ~ Portrait Cloche in Honor of Edward Hopper

Thursday, January 19th, 2012

I know, you have been wondering where I am and what I have been up to. I haven’t been idle! Here is some of the stuff I have been doing!

I have been working really hard on knitting and designing hats, mittens and gloves over the last three weeks. This is a new discipline for me. I have never made gloves or hats before January 1, 2012! And I made a New Year’s Resolution to do so this year! As I mentioned yesterday I am taking classes in these subjects. And, as it is my best personal mode of learning, I am just jumping in and doing some designs of my own at the same time. I feel ready to share a few of them now. So, starting tonight, I’ll unveil one to show you!
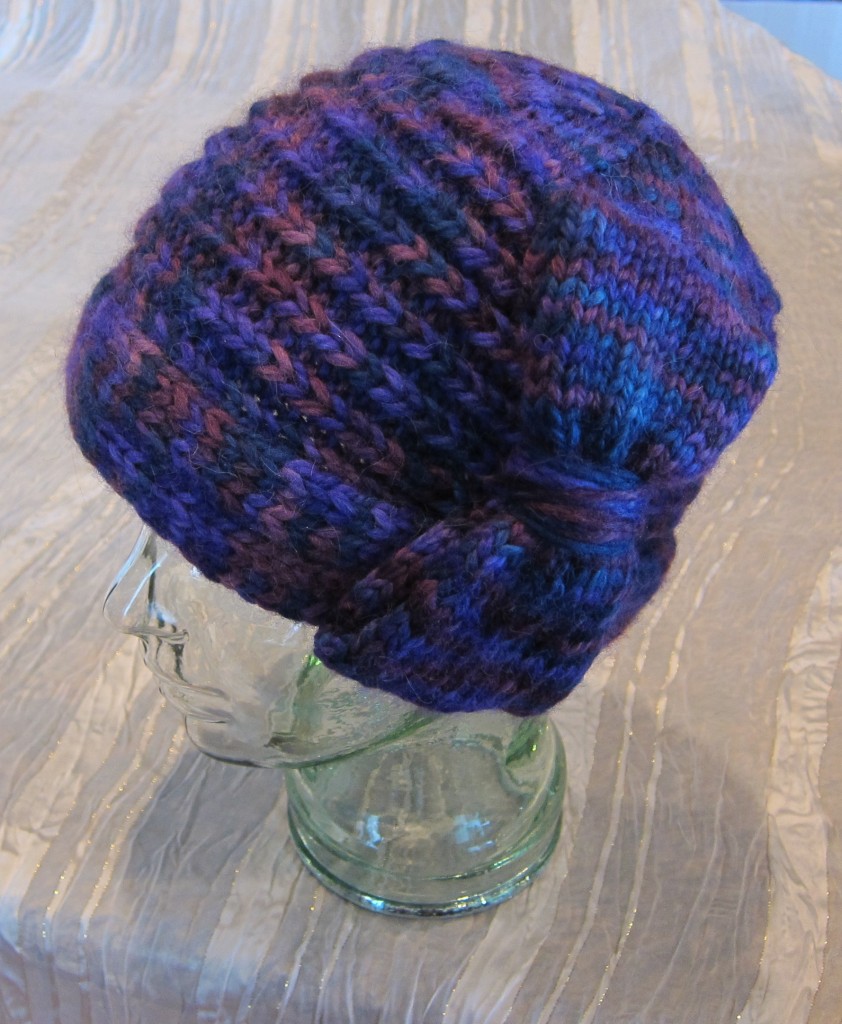
Lady Violette's Design ~ A Portrait Cloche in Honor of Edward Hopper

Voila! I created this hat which I am calling my ” Portrait Cloche in Honor of Edward Hopper.” It is hand knitted of hand dyed 100% alpaca which is incredibly soft and warm. Pure Luxury!

I designed and made it to attend an art museum opening of Edward Hopper’s paintings. I wanted to make a hat in the style of the ones the women in his paintings wore. I also wanted it to look like a proper 1920’s ~ 30’s formed felt hat, rather than a knitted hat so I made it very thick and sculptural with a turned back rim and graduated shaping. I made a very thick sculptural bow to cover the left side of the hat. It comes down over the left ear and has the added benefit of being like a very warm ear muff! You could place the bow over the right ear instead if you preferred to do so.

The Overhead View of the Crown of Lady Violette's Portrait Cloche In Honor of Edward Hopper

This hat is very thick and warm, but I may have to try making one with my trademark earmuff bow on both sides now! I’m thinking of ways to keep even warmer on my 4th day of being completely snowed in! And it is still snowing out! We are in the middle of a huge snowstorm in Seattle and I am taking advantage of using this time to post my designs and knitting projects and related stuff on the knitting website Ravelry! (Honestly, I would rather be knitting!)

I’m really happy with the way this hat turned out. I wasn’t exactly sure of what I was doing as I made it but it is perfect and exactly what I had in mind. I am considering writing the pattern so I can offer it to other knitters who would like to make one, but, to do that, I must make another one and carefully write down the steps as I go. I think I should do it in a lighter color so the details really show up. As usual I kept copious design and construction notes on this one, but nobody but me can understand them! I always work the initial design out that way, then redo it for a final run through and perfection test to be sure somebody else can understand and follow them. I probably should point out that this hat requires good technical sewing skills as well as knitting skills.

I wear this one with a vintage navy blue 1930’s coat in wool gaberdine and a purple wool dress. The outfit is totally inspired by the women in Hopper’s paintings who are always dressed in strong clear distinctive colors. I get a lot of inspiration for my clothing from painters. I like to recreate the moods, styles, and colors of the paintings in the way I dress.
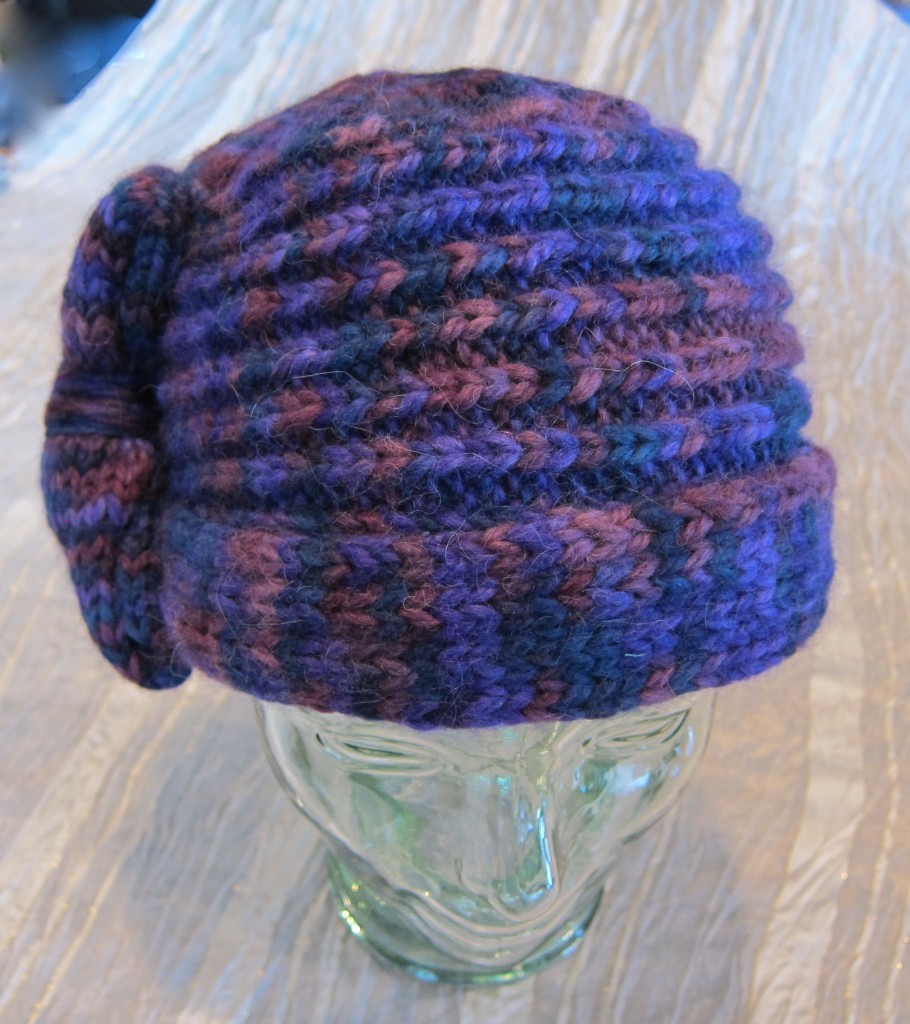
Lady Violette's Portrait Cloche In Honor of Edward Hopper ~ Viewed From the Front ~ Features Deep Sculptural Horizontal Ribbing, a Turned Back Brim for Double Thick Forehead Warmth, & Her Trademark Thick Earmuff Bow

My “Portrait Cloche in Honor of Edward Hopper” also reminds me of Dorothy Parker, the brilliant writer, who also dressed really well. She was known for her feminine suits and adorable accent hats like this one. I just know she would have wanted to wear one of these! Do you English majors out there who are interested in fashion agree with me?

I can also wear this hat with a deep purple wool crossover wrap and tie coat with a big ruffled collar. This is more of a 1970’s look, but also very successful. It looks great with this hat. In fact, once I finished the hat I found quite a number of interesting things in my closet that I could use it with. So many I want to go out! I am feeling so horribly house bound! I haven’t been able to get out to go anywhere since last Saturday night. I’d love to get bundled and dressed up in my purple and blue winter ensemble and go to some elegant cafe wearing my “Portrait Cloche.” As soon as I can get out of here I will and I’ll get someone to take a proper photograph of me in the Portrait Cloche In Honor of Edward Hopper in the right atmosphere worn with the right era vintage clothes. This may still be a few days off as it is still snowing like mad! The airports are closed and the streets are blocked off! My classes have all been cancelled.

We only get snow like this in Seattle once every 2 or 3 years. It is inconvenient, but I also love it! I like the opportunity to stay home because I must and get some other things done. And I love the cold and the whiteness and the excitement in the air that the snow brings with it. A lot of people get very upset about their busy schedules getting interrupted, but I don’t. I see it as an opportunity to slow down and get a few things done that I normally do not have time for. Like making a couple of new hats! And setting up my Ravelry knitting site – which is a hugely time consuming project.

And, of course, get back to posting on my blog. So, back to the blog, as I promised and back to the “Portrait Cloche” : Let’s look at some pictures of it from all angles so you can really see what it looks like.

A Profile Shot From the Right Side of Lady Violette's Portrait Cloche In Honor of Edward Hopper. Here I have turned the hat and placed the bow on the right side and toward the back to show a different way to wear it!

I used Baby Alpaca Grande Hand Dye from Plymoith Yarn to make this hat because I happened to already have two balls of it in the perfect colorway of Blue/ Purple. I had hoped to get the hat and big bow out of one skein, but no such luck! It took about 1 and 3/4 altogether. Thus the yarn for this hat cost $40 plus sales tax! Expensive for a hat! But worth it to me. It is very stylish, warm and soft. Alpaca yarn is very luxurious and not at all scratchy. Even people with wool allergies can often wear it successfully. It is important to select non-scratchy or itchy yarn for a hat. I have made the mistake of using 100% wool that caused my forehead to itch and gave me a rash after a half hour. That quickly ruins the hat I spent hours making for me!

I plan to use the small amounts of left over alpaca yarn to decorate the violet tweed gloves I am currently making with little bows to co-ordinate with this hat. That should be really feminine and appropriate to the era that inspired me. And the gloves will be beautiful with the two ensembles I have described above. Here is a picture of them now as works in progress. I am finding it really interesting to construct them on the tiny tiny needles
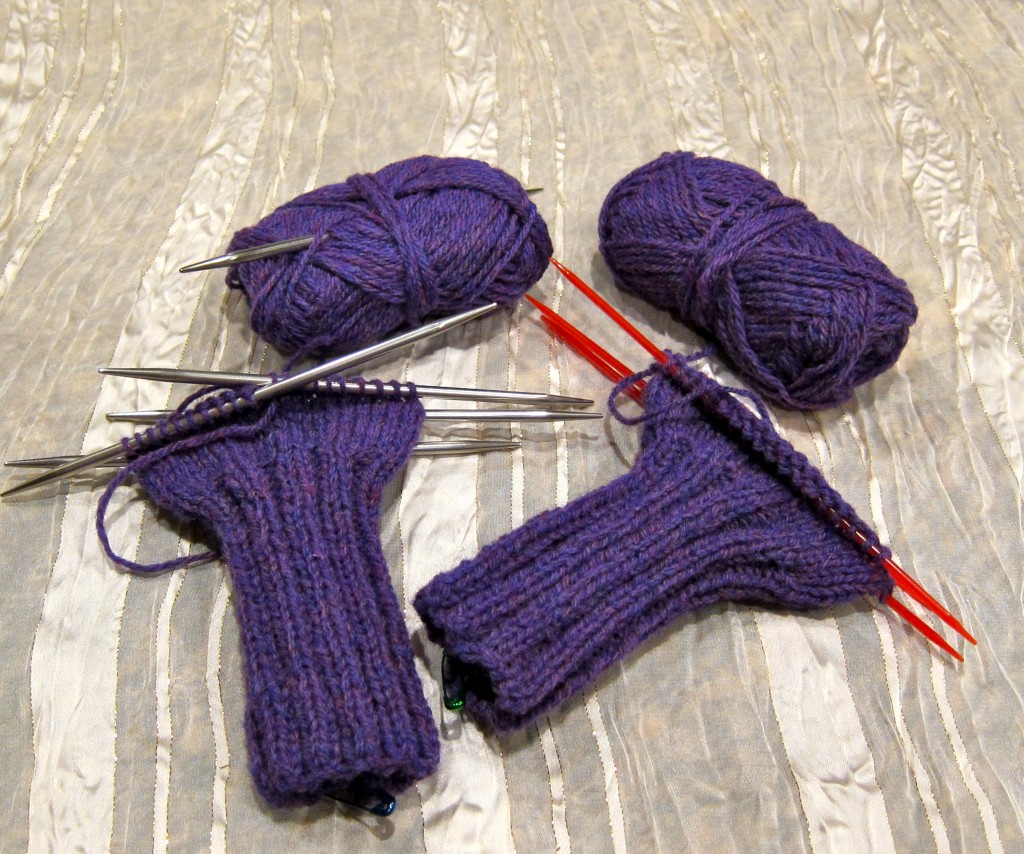
Violet Tweed Five Finger Gloves With Bracelet Length Cuffs. This is the first pair of Five Finger Gloves I have ever made!

I am going to try to find another suitable yarn to make a spring/summer version of this hat – hopefully using one ball of a nice looking yarn and costing under $25 to make. I want to offer beautiful patterns that can be made up in affordable yarn. Anybody have any good suggestions? This one needs to be really bulky!

I keep trying to make hats out of one ball of yarn but I keep running out and needing to get a second one. This has happened on the Noro Spiral Beanie hat I am currently making as well. (See my work in progress in Noro Silk Garden in pastel colors and gray. I’ll post a picture of that here tomorrow.)

I am about to begin writing up several of my personal knitting pattern designs so other knitters can make them. I know cost of yarn and supplies is an issue for many people so I am planning to suggest several types of yarns in different price ranges so people have a choice. I am always making new things out of old ones and creating new things out of found fabrics and supplies – so this issue is always on my mind. I’d love to hear suggestions from readers of alternate materials you think would work as well. I’ll seriously consider them.

Lady Violette's Portrait Cloche In Honor of Edward Hopper Folds Flat For Convenient Packing

I will be writing out the design and instructions for making Lady Violette’s Portrait Cloche In Honor of Edward Hopper Soon. When it is done & available I will post it here and on Ravelry. Check back if you want the pattern. We could even do a supervised knit along to make it here on my blog if a few people are interested.

If you are  interested in making this hat let me know.  It is not hard to make. In addition to the ability to read a knitting pattern, you only need  these basic knitting skills:

1) Cast On

2) Knitting,

3) Purling

4) Decreasing

5) Binding Off

6} Sewing a straight knitted seam together in mattress stitch

7) Picking up & Knitting stitches

8) Steam Blocking

About Ravelry. It is a knitting and crocheting social networking website, like Facebook for knitters and crocheters. In order to access it it is necessary to join it, even if you are not a knitter or crocheter or other needle worker. However, it doesn’t cost you anything to join. It is am amazing resource and I feel it is well worth joining even if you  currently simply enjoy looking at what other crafters and fiber artists are doing.

It is also the last word on finding information and sharing your work.  I am ladyviolette on Ravelry.

If you visit me on Ravelry you can view all my current projects in these areas and see pictures and read about my past work in those disciplines.

I’d love it if you come by and see me sometime. So will you, I guarantee it!
 

Share

Classic Museum Quality Child’s Vintage Scandinavian Sweater ~ A Successful Restoration Story

Saturday, December 10th, 2011

Classic Vintage Child's Norwegian Sweater~ Successfully Rescued & Restored From a Rag Pile

I am an avid knitter and am always on the lookout for amazing hand knit vintage sweaters that I can rescue from oblivion. I love hand knits and cannot bear to see them abandoned and unappreciated! I especially cherish children’s sweaters which were made with love by a grandmother, auntie or mother long ago. I know what is involved in making them since I knit myself and finding one and returning it to it’s original splendor is very exciting! Seeing it worn by children in my family and appreciated again is the icing on the cake!

The Inside of This Sweater is as Beautifully Done, Technically, as the Outside ~ a Really Good Example for Modern Knitters of the Stranding on the Backside of Two Color Fairisle Knitting

I recently found this little boy’s Norwegian sweater in a filthy thrift shop. It was dirty, and terribly damaged. And only $2. But it was a total disaster. I should have taken before pictures, but I was in a hurry to clean and repair it to send to a little boy as a present!I needed to get it to him quickly so he could use it before he outgrew it. As we know little children grow like weeds so no time was to be wasted!

First off, I gathered up the live unraveling stitches on safety pins, then I washed it very carefully in cold water by hand, as I was afraid of moth or other infestation. I washed it over and over to get the disgusting amount of dirt out of the wool. It is made of beautiful quality old style yarn – of the nice stiff type that is now very hard to find. It still contains its natural oils.

The Intricate Snowflake and Geometric Pattern Covers the Entire Sweater ~ Back and Front ~ Beautifully

The navy is a very dark inky shade, almost black, also impossible to find! I know as I searched every local yarn shop with the tattered, but now clean, little sweater looking for matching yarn to use for the extensive repairs needed. I could not find a match. I also want to find this type of yarn for my own knitting. Thus, if anyone reading this has a source I would be grateful if you would inform me of it.

The Sleeves Were Full of Holes When I Acquired the Sweater, But Now They Look as Good as New!

The ribbing on the wrists was unraveling and torn, the ribbing at the neckline was coming out and the sweater had holes in the elbows, the button placket and the back. It looked like it had been worn as the main winter coat by some child and his three older brothers before him as a hand-me-down and never mended or washed! But old wool wears like iron, fortunately!

Unable to match the yarn in it I finally had to unknit sections of the sweater in order to get enough of the navy main color yarn to make the necessary repairs. I undid all the ribbing at the bottom and both cuffs and then picked up the live stitches and reknit them using the resulting salvaged yarn and making the new ribbing sections shorter than the originals had been. The ribbing at the bottom of the sweater and the cuffs of both sleeves is now about an  inch shorter than originally. And it looks as good as new!You cannot tell that I have reworked it. I know this was often done during the mend and make do era. People also used to save a bit of the yarn and extend the ribbing to make the sweater larger as the child grew bigger.

Interestingly the B.K.S. Handmade in Norway label was still hanging by one thread so I resewed it on to retain the authenticity of the sweater.I think B.K. S. must be the initials of the woman or man who knitted this sweater. This nice touch makes me think I should get such a label made to sew inside the items I knit myself. I try to do as good a job as this and I want them to become heirlooms for my own family in the future.

Label of Knitter and Pewter Reindeer Button

The vintage pewter reindeer buttons are real beauties. And I was charmed by the fact that an extra was attached to the chest of the sweater with a red and navy striped grosgrain ribbon like a little military medal. The maker provided this extra button in case the child who got the sweater lost one! Fortunately none of the buttons were lost.

This Amazingly Detailed Sweater is Made to Fit a Boy of About 4-5 Years Old. Note the extra Button Sewn Onto a Striped Ribbon Like a Military Medal in Case the Child Lost a Button!

I took pictures of the sweater from all angles and both inside and outside to keep a nice record of how the fairisle work was done. It was both beautifully and expertly done. This is a textbook example of Norwegian knitting. It is worthy of a place in the Scandinavian Heritage Museum. I think it was made in the late 1940s or early 1950’s. It is a real treasure! Now restored to it’s rightful original splendor! I only wish the original knitter were able to know how much I appreciate her (or his) work! I would love to be able to tell her (or him) that myself! She (or he) so deserves it! I hope posting it on my blog garners the admiration and attention it deserves.

Expert Color Work! It Looks as Pretty on the Inside as it Does on the Outside ~ At least to an Avid Knitter!

I will include photographs of the stranding closeup so you can compare the way it looks on both sides. Here goes!

Fairisle Work ~ Another Detailed Shot of The Stranding

I shipped it off the restored sweater to the lucky little boy I repaired it for just in time for Xmas. He will wear it, his little brother will wear it and it will be a treasured heirloom in our family now for a few more generations! I made them new sweaters too. I love making small ones because they work up so fast! It is good practice in these difficult techniques prior to taking on an adult size sweater. I often tackle a little one for a family member before taking on the challenge of doing an adult one. After this repair job I feel quite ready to undertake a full size Norwegian sweater. I just have to find the perfect pattern. I want to do an adult one for myself and a man’s size with reindeer and snowflakes on it.

The Finished Restoration of This Museum Quality Child's Size 5 Year Old Sweater

I think this pattern is perfect for a child’s sweater. Does anybody out there have great classic vintage Norwegian sweater patterns for adults? Or know of a good source? I am looking now. Any suggestions will be most appreciated. I would like to find hat and mitten and glove patterns as well. And yes, I really will make them!

The red and white baby blanket under the Norwegian sweater in the photographs is my present for a new baby who is coming into the world in February! It is never too soon to start making hand knits and crochet heirlooms for the next generation! I am determined that they grow up with handmade knits so they enjoy them and learn to appreciate them! I did and that is what got me started as a knitter.

I was taught to knit by my grandma when I was only 4 years old. I was fascinated by it and couldn’t put the needles down! She later told me that she taught us to knit so she could busy us  and get her own work done! She said it kept us occupied for hours enabling her to work on her own sewing and knitting! Brilliant!

Under her supervision I very proudly made my very first scarf for my grandpa for Christmas when I was five! It was copen blue wool and consisted of knit and purl stitches only. She made me rip it out and reknit it until it was absolutely perfect! He wore it for years and told everyone that I made it! He even wore reading in  bed on cold nights and tied it around his bedpost so he could have it ready if a chill came on! They were very encouraging and supportive of the craft of knitting. They were sheep ranchers so their interest ran deep! They raised their own wool on their ranch in Southern Idaho. They sent it to the Pendelton Woolen Mills to be processed.

When I was a little older I went to the Pendelton Mill myself on Saturdays where they had knitting classes for children and teenagers. We were allowed to choose yarn for our projects from the overruns of the mil. It was a goldmine of fine wool in beautiful colors. I remember making my first sweater out of a beautiful emerald green merino held double with green mohair all the way from Italy. The yarn was free if you were a student there so cost was no object. The mill was interested in developing future knitters and demand for their products. I know of no such program these days! I attended those classes when I was in the 1st, 2nd, 3rd and 4th grades. Then we moved away from the area. The teachers were excellent and I still remember what I learned there! It was an excellent  basic foundation. Amazingly I was only 6 to 10 years old when I took those classes. My mother went to the advanced adult knitting groups and they created amazing items some of which I still have and will photograph and post on my blog in the near future.

I decided yesterday that I should photograph these beautiful vintage sweaters and share them with others. Once again, the exquisite vintage needlework produced by these women deserves to be seen!

And One More Fairwell Picture of the Norwegian Sweater Because I Cannot Resist!

Share

Violet Evening Gowns in Various Versions of Violet for Lady Violette

Wednesday, November 16th, 2011

I am always hunting for gowns and dresses in my signature color which is violet of course! It seems that Marcia Cross and her stylist Jessica Paster are too! Here is Marcia Cross in yet another gorgeous violet evening gown selected by Jessica for a walk down the red carpet. What a wow color! I love it with her bright auburn hair. This gown was designed by Vera Wang and Marcia wore it to the Sag Award Ceremony in 2006. Marcia certainly isn’t afraid of color and it looks great on her! Asked if she selects her own outfits she says “No! I just put on what my stylist Jessica tells me to wear and go out the door!” They make a great team if you ask me because she always looks just wonderfully dressed!

Share